

Johnny Red
-
Content count
5 -
Joined
-
Last visited
-
Days Won
2
1 Follower
-
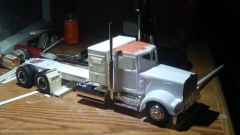
We're going to start off with my fond memories of riding all over the 48 states in a 1974 transtar A with dad when I was a kid. All I have to work with is a cab and a bag of old beat up parts, so, most will be reconditioned, the rest scratch built or kit bashed.
-
I'm going to say it's about 60% done, it should be finished in time for the toledo nnl.
-
Stretched it out and added aluminum wheels with a resin c15 cat. She's been a slow build but it's getting there.
-
Backdating the hood on this kit isn't as tough as one might think. With the proper tools, and a little patience, this conversion is quite simple. First is to prime the hood to see the markings for the cuts, I drilled two holes in the top of the fenders for corner location. The first cut with a razor saw was along the hood upright on an angle to the bottom of the headlight buckets. Second cut came in from the side, at this point you should be meeting with the drilled holes. The first cut with a razor saw was along the hood upright on an angle to the bottom of the headlight buckets. Second cut came in from the side, at this point you should be meeting with the drilled holes. Now that both buckets are gone I lined the inside of the fenders with sheet styrene cut to fit, this creates a foundation for the putty to lay on. Everyone has their favorite brand, mine just seems to be squadron green and white. Starting with the green, put more than enough on and go past the ground zero, this will help in the end results. After the green is sanded off, you should have noticeable low spots. Now comes the white, I'm using two colors as a guide to see how deep I'm going into the fender Once this is sanded off, do a quick mock up to check your work. At this point more primer will be applied and small defects will be cared for prior to paint.
-
Backdate the 1/24 Italleri Freightliner FLC
Johnny Red posted a topic in Model Truck Building Tips & Tricks
, Backdating the hood on this kit isn't as tough as one might think. With the proper tools, and a little patience, this conversion is quite simple. First is to prime the hood to see the markings for the cuts, I drilled two holes in the top of the fenders for corner location. The first cut with a razor saw was along the hood upright on an angle to the bottom of the headlight buckets. Second cut came in from the side, at this point you should be meeting with the drilled holes. Now that both buckets are gone I lined the inside of the fenders with sheet styrene cut to fit, this creates a foundation for the putty to lay on. Everyone has their favorite brand, mine just seems to be squadron green and white. Starting with the green, put more than enough on and go past the ground zero, this will help in the end results. After the green is sanded off, you should have noticeable low spots. Now comes the white, I'm using two colors as a guide to see how deep I'm going into the fender. Once this is sanded off, do a quick mock up to check your work. At this point more primer will be applied and small defects will be cared for prior to paint.
