

Cornbinder
-
Content count
409 -
Joined
-
Last visited
-
Days Won
67
Posts posted by Cornbinder
-
-
And now...

I had a built Italeri Cummins, so I used that. Since the hood barely opens (despite opening far enough during test fits... there won't be any full underhood detail on this. Probably for the best anyway. The wheels have also been settled upon- AMT LaFrance five-hole steel discs, I kept the Moebius tires, which fit the AMT wheels pretty well. The exhaust is also finished, but it's a single-outlet weedburner with the modified T600 muffler, so no need to eat up bandwidth with that!
-
Seat was robbed from a '57 Chevy... cobblestone upholstery pattern and all. The kit steering wheel was used. Though it's too old-style for a T600, for this Retro-Riffic Edition, it's just the ticket.

-
Welp, cab, hood, and chassis are cleared. The cab has also sprouted a visor- the kit piece done in BMF. The interior is most of the way finished, I just need to find an appropriate seat. I'd like to run an old-school type bench seat, I'm just poking around in the spares pile to see if I have something that "works".

-
I just bought a new camera in January and I still haven't figured out it's sweet spot yet. I had my old Canon Powershot for almost seven years, so I'm pretty much in a position where I need to relearn everything. The Kodak is about ten times the camera the Canon was, and I've maybe used 5% of it's capability.
-
Looks WAY better in person, though- in these pics it shows up way too light or way too dark. Once it's done I'll have to take the pics on a bright but slightly overcast day.
-
Holy momentum, Batman! I've made more progress on this thing in the last two days than in the last two years!
The front end design is locked in.
Two small bumperettes flank the fog lamps- they add a little flair and cover up a blemish on the driver's side of the bumper. A little BMF and a black wash to the grille and I think it looks presentable enough.

Just had to see how she'd look mocked up. It's a good feeling to have the KW at this point after nearly a half decade of rattling around in the box!
-
Clipping right along now!
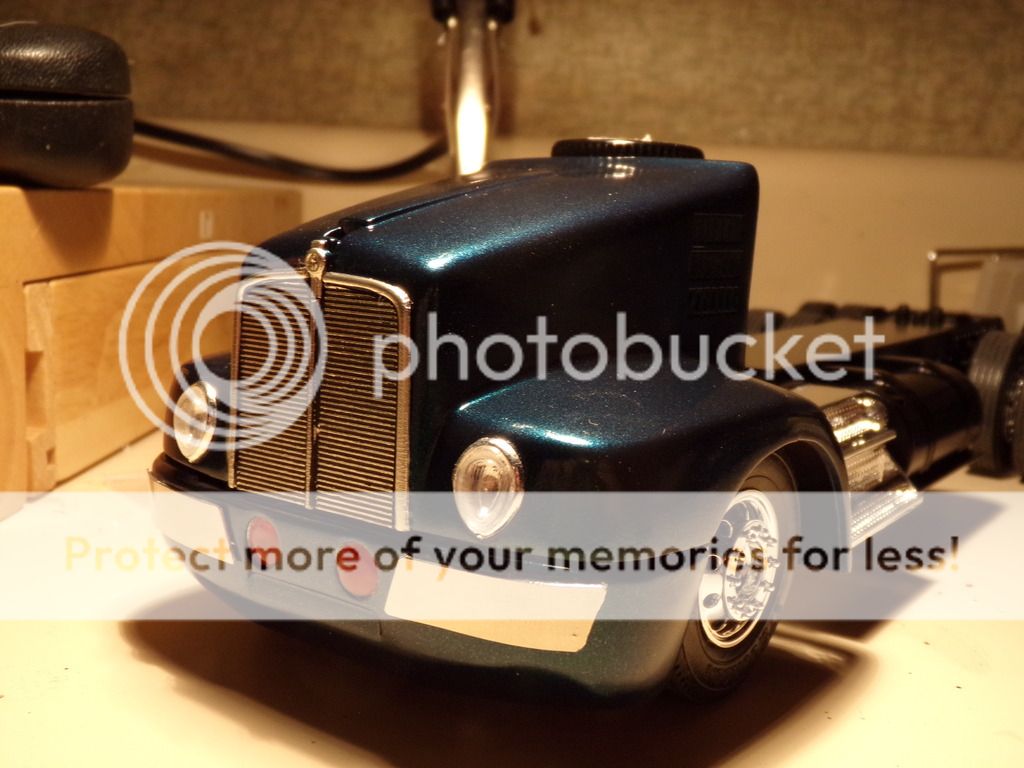
Last night, I finally came up with a plan for the front bumper. Many '30's and '40's Kenworths seemed to have two round orange fog lamps on the front bumper. Borrowing from that, I cut two holes in the bumper to make way for such an arrangement just beneath the grille. Speaking of the grille, I cut a piece from the same sheet of grooved styrene I used to make the grille in my 359, and I also added a small trim strip around the opening.

The chassis, in basic gloss black, is pretty much dialed in.

I also threw some paint at it... Ford Cayman Green Pearl, by way of Plastikote. It's a shade or two darker in person than it shows up in the pic.

-
I'll keep attempting to kick out the jams.
-
Work continues!
The fenders were modified to give them an "old-school" kind of look, and to eliminate the huge gap between the fender lip and the tops of the tires.

I also built up the kit bumper to a deep-draw bumper. I see 1:1 Pete's with fenders like these, but the bumper just has straight edges, and I just think it looks weird. I prefer the bumpers which continue the arc of the wheel opening, so that's what I did with mine.

And now a quick mockup of the modified (but still unfinished) fenders and bumper with the grille in place, just to see where I stand.

-
 3
3
-
-
A little work done tonight.

A rear plate was made for the frame and blended in. This will eventually play host to the taillights, plate, and trailer lines. I also lowered the rear to match the front by removing about 1/3 off the top of each air spring. The center supports have since been installed.

Not wanting to go with the stock intake scoop on the passenger's side only, not liking the look of external air cleaners on a T600, and considering the fact that none of the '30s-era KWs I'm using for inspiration used external air cleaners, I decided to keep an underhood setup, but add some louvres to each side of the hood. These were made from Plastruct N Gauge stairs, cut into short sections and stacked three deep. some trim may be used here- as always, we'll see where the project takes me.
-
Yeah, that Frame-Stretcher Apparatus ™ can wreak some serious havoc on molded details.
 I think I'll eventually end up with all of Gary's stuff at some point, so at the very least I can chronicle all of it online.
Not really much progress, other than robbing a vestigial 359 cab mount included in the 352 Pacemaker kit for use in this 359. It may be hidden under a deck plate by the time it's all said and one, but oh well, at least I'll know it's there.


-
Welcome aboard!
I'm American, but I work for a French company that makes parts for US built trucks.
-
Going for a kind of "retro" look, for want of a better word.
-
1
-
-
4 hours ago, Casey said:Looking good CB. Will that hood fit other ROG 359s?
No idea there. Being that it is 1:25 you could probably make it work on one.
-
1
-
-
Really impressed with how the Detroit fit together.

-
1
-
-
I've been working on this for a while, but I've been making some progress on it lately again, so here it is.

So far, it has consumed parts from an AMT White Road Boss (cab/interior, suspension), AMT Autocar A64B (rear frame rails and taillights and more parts to be used later), a set of TL Model Trucks frame rails, and a conversion hood set from AITM. Here is an early mockup- I later removed the lettering from the hood sides.

Here I have added the A64B battery boxes, along with that kit's five-hole front wheels. I later removed the lift axle- it may or may not return in more detailed form. You can also see that I have removed the Autocar hood scripts- the areas have since been puttied. The project pretty much stalled right here until a few days ago, when the Detroit V12 I wanted to put in in showed up. That's not the fault of the caster- it's all my fault because I kept holding off on ordering!
The GW Trucks engine assembles easily and looks great. I used Polly Scale Vermont Green- it is a decent match for Detroit Alpine Green. I will need to rethink the location of the alternator, but with the addition of some locator blocks for the bellhousing and a front engine mount cut from .040" plastic card, I think I'm onto something.
-
Got a little bit more accomplished.

The brackets were modified and relocated to mount the side steps. I'll probably end up making a filler panel to do away with the gaps around it.

I also bobbed the rear of the frame- eventually there will be a flat panel back there for the lights, plate, trailer lines, etc..
-
1
-
-
I started this four, maybe five years ago, with a started kit. The condition of some of the already assembled parts (like the frame) and the high number of incorrect parts (like the frame), combined with the fact that a T600 doesn't exactly set my heart aflutter in the first place led me to build it as a custom. The fact that you don't seem to see too many custom T600s, compared to more traditional-looking rigs like W900s, probably also nudged me in that direction. Aero tractors do tend to be overlooked as custom projects, by and large.
Other than the fender modifications and (possibly temporary) Moebius wheels and tires, this was how the thing looked for four years. Oh, yeah, I did steal a Revell snap W900 kit as a frame donor. It's every bit as inaccurate as the AMT/Ertl frame (which was also a W-series frame recycled from the '70's), but since this is a custom and much of the telltale parts of the frame will be hidden anyway, I wasn't too worried.
Last night I dug it out and got this far....

I did a little bodywork and filled in the door handle openings. I was torn on what to do with the sides. I did cut down the stock aero skirts but the more I looked at that the less I liked it. I decided to try the W900's side steps. With that in mind, I modified the Anteater fenders by cutting them at the front tire center line, and splicing in sections cut from the W900 hood, using the patented Fender-Blender™ technology. I did add the forward stub from the T600 on the W900 chassis as a means to locate the hood hinge and bumper in the proper locations, so I kept the Frame Stretcher Apparatus™ in the toolbox for now.

A few changes were made to the hood up front as well. I did away with the vertical center divider. The KW will use '37 Ford "teardrop" headlights. I added some trim around the grille opening using D-section plastic strip. The grille will be pattered after a '30's/'40's style KW grille. The Bare Metal foil I applied over the KW emblem a half decade ago (to protect it from filling with primer) put up quite a fight coming off, but it came off eventually. A new piece will now protect it until it's ready for the final detailing.

STILL needs some bodywork, not to mention a ton of other doodads, such as a powertrain. I may stick with the Cummins as it comes with quite a few chrome goodies, or not. I also closed off the top of the frame, which not only gives a custom look but also restores quite a bit of the torsional rigidity you lose when you cut the molded floor off the top of one of these Revell snapper frames!
That's it for now... here's hoping it won't take me another five years to wrap it up. I'm hoping to get this thing done by 2020, so...
-
Another order from Gary arrived today. You can see the 127" hood for the Revell snap Peterbilt here-
I also got the Detroit V12. I forgot to put the water crossover pipe in the group when I took the picture, but rest assured it IS included! And your eyes do not deceive you- that's two oil pans and three pairs of different exhaust manifolds provided, so you should have no trouble adapting it to whatever your pet project may be.

I also picked up the Neway Lift Axle.

-
I'm not even in the frame of mind to discuss the state of truck modeling online at this moment.
Might be because my order from GW Trucks showed up today.

After applying the patented frame stretcher apparatus (sadly, damaging the steering box in the process), the hood fit like a glove. Once the fender mounting holes were opened up they, too, snapped into place. I also lowered it a tad- mostly by taking material out of the front leaf spring mounting pads and a little off the tops of each air bag. I'm going with a flat cab wall and I'm leaning toward an oval-shaped rear window.
-
Nice.
")
-
Best part is, they take up very little room. You can fit about 30 of these in the "footprint" cast on the shelf by, say, a stock-wheelbase AMT 352 Pacemaker.
-
-
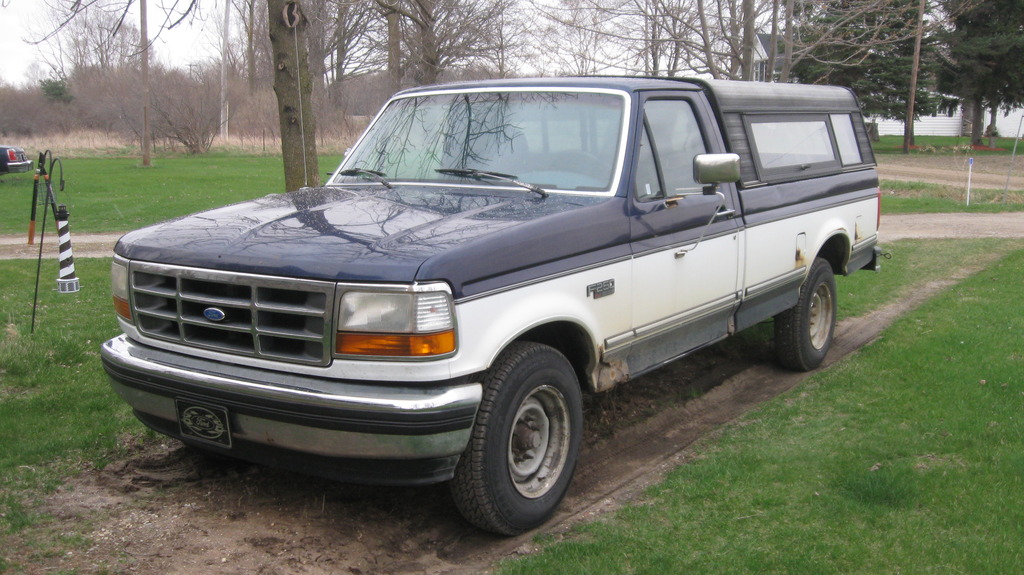
Very nice! Captured the look of a well-used unit that still has some life in it.
Custom Anteater
in Model Truck Workbench
Posted
Couldn't resist an outdoor shot of the KW in "drivable" form. That's how I refer to a model when it has all the major components in place which, if it were a 1:1 vehicle, you'd be able to jump in and go. Still needs a little work.