
Cornbinder
-
Content count
409 -
Joined
-
Last visited
-
Days Won
67
Posts posted by Cornbinder
-
-
I've got a couple I need to get around to building myself.
-
 1
1
-
-
I don't know- I can still see them.
*Edit* I THINK I know what happened, and I think I fixed it.
")
-
A little bit more progress.

The engine is mostly done- it needs a little detailing and paint touch up. I used DupliColor Chrysler Intense Blue for the engine block... in person it's a few shades darker than in the pic, and looks like a decent match for the blue used on Navistar engines.

I cut off the LoneStar's mud flaps and modified the Transtar's to fit to the LoneStar mounts/taillight housings. A "Scout" decal from an AMT/Ertl scout was used. I need to touch up the IH logos and clean off some fingerprints on some of the chrome, but these pieces are pretty much done.
-
1
-
-
First off... sorry for the poor quality of these pics. The overhead light fixture in the hobby room crapped out, so all I have to light the work area is my halogen drafting lamp!
Anyway, this is something I've been messing around with for a couple of months now.

Looks like a basic buildup of the old Ertl kit. Okay, so I added some Moebius wheels and tires. Wait... is that a rear air suspension? That doesn't really look like a Transtar chassis. Well, there's a simple explanation. It isn't. This Transtar will sit on a shortened Moebius LoneStar chassis.
It's kind of a "resto-mod" theme- classic vehicle with modern underpinnings. You can have the look of a cool old Transtar, but you'd be able to use it every day, because you could still get parts and service at any International garage, because all the "dirty bits" are 2011 LoneStar. Which will be a nice thing to have when that Maxforce engine gives you trouble... and it probably will. But hey- at least they'll have stuff for that in stock! I doubt the same would be true for the original V800.
Here's a mockup...

The plan as of now is to go with a plated Mercury sleeper- this non-plated one is just there to see how everything will fit. I don't know if I'll use the LoneStar quarter fenders or go with the ones from the Transtar at this point. The idea is for the tractor to look like a nicely restored and lightly accessorized unit, until you take a closer look or crack open the hood and see the newer drivetrain and chassis components.
-
1
-
-
Darn it, title should read "Peterbilt 352", you know, with a t at the end of Peterbilt...
Fixed it for you.
Cool project, too!
-
1
-
-
I've pondered making a few fenders like that. Did you roll a flat piece of plastic for the top, or use something that was already rounded, like a cut-down pill bottle?
-
It seems like every truck model with a tilt hood has something off about the fit of the hood to the cab. It seems like if you build by the instructions they never line up the way they should.Here's one area where you will want to ignore the instructions. The instruction sheet usually has you install the cab, then the hood. If you do it that way, chances are good you'll never have an even fit between the hood and cab at the cowl. Hood-to-cab fit is always iffy in general when a tilting hood is concerned, and on those old AMT truck tractor kits in particular. That's not to say that other manufacturers kits are any better, but the AMT kits seem particularly iffy. You can fight the hood fit all day and still not get it looking good, but it's easier to install the hood first, and then tailor the position of the cab to suit, rather than vice-versa.The first thing you want to do is to install the hood hinges to the back of the grille- make sure you get them as close to straight, level, and even as you can. On the chassis, the openings for the hinge pins can be opened up slightly. That will give you a bit more "wiggle room" so that you can fine tune the hood position.Tape cab to the hood, making sure the rear of the hood fits tight and flush against the cowl of the cab. On a kit like the White Road Boss, where the hood isn't meant to fit against the cowl, this can be trickier, but still workable. Gently close the temporarily unified hood/cab to get a feel for any modifications you will need to do to the cab's mounting points.Now, onto the cab mounts themselves. You may have to remove material from the top of each of the front cab mounts. You may also want to move the rear cab mount/crossmember a couple millimeters forward of it's intended position. You can install it in the intended location, but know that you may need to bend the mounts forward and/or trim material from the top and possibly rear of them.Here are a few photos explaining the process, on Tim Ahlborn's Fotki page- http://public.fotki.com/mackinac359/how-i-did-it/amt-white-western-s/Tim's tutorial uses an AMT White Western Star, but the same basic techniques can be used on any kit.-
1
-
 1
1
-
-
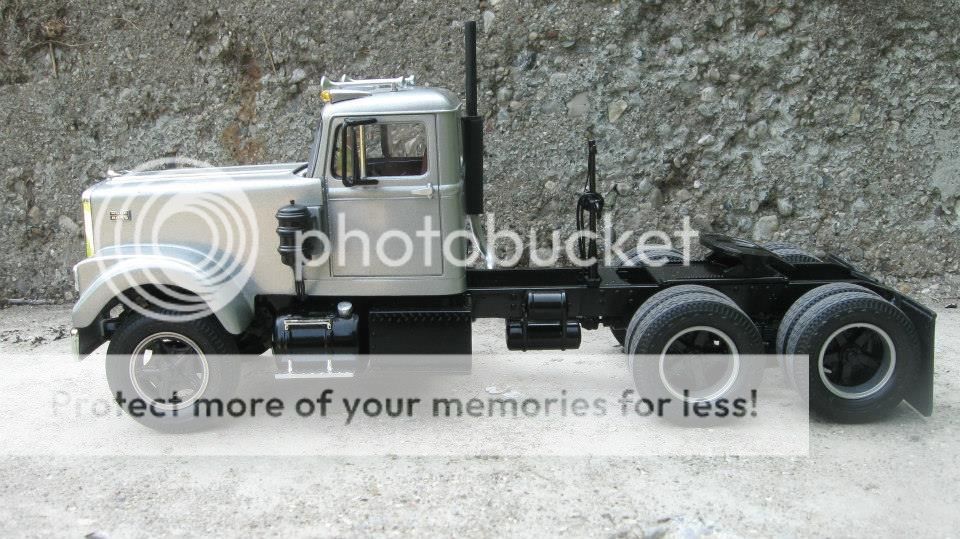
Found some photos of a truck I built about nine years ago. This was built from the Lindberg reissue- the one that came with the flat bed trailer and the '40 Ford Coupe, and the whole mess was molded in this weird, brittle dark grey plastic. I bought a couple of lengths of Plastruct C-Channel strips to make longer frame rails, and used the rear half of the trailer for the flat bed deck. Other than that the kit is box stock. This pic was taken several years after the model was finished. Both the Dodge and Ford were painted with orange from the same no-name-brand rattle can. Yes, the doors on the Dodge open and close, though the gaps aren't terribly consistent!


-
1
-
-
Shaping up to be quite a machine!
-
Filling it with sand is a technique used in the tube bending industry but it can be hard to do on our scale models.
I find a piece of round plastic rod that fits snug inside the tube, it doesn't have to be very tight, but the tighter the better. Let the insert exceed the tubing and you should be able to pull it out after the bend is done. You may need some good pliers to pull the plastic rod out of the aluminium tube, that's why you don't want your insert to be overly tight.
Beerz, Felix
I've done this with plastic rod instead of tubing, what I do is leave the plastic in the tube. I'll leave a little sticking out past the bend so I have a "mounting pin" for the stack- the plastic tube will either slip into a hollow pipe under the cab, or I'll use a short piece of tube to connect it to a solid kit exhaust pipe. I will say I've had mixed results, but I'm totally willing to admit that might be because I'm doing something wrong.
-
1
-
-
Big Al was a little too far ahead of its time- it was making more power and was more fuel efficient than other engines of the era. The trouble was, it was a bit too far ahead of the curve and got kind of a nasty reputation for being a ticking time bomb. One problem was you had to take it in for service and repair at an Allis Chalmers heavy equipment dealer... not as many of those guys around as there were for, say, Cummins. Big Al was based on the earlier Buda 844, AC having bought out Buda Engines in 1953.
-
That's shaping up very nicely!
-
Ah, yes. That looks promising.

-
1
-
-
Yes they are. Everything on the "business end" is from the kit aside from the mud flaps- I made those from some thinner plastic sheet.
-
I started this back in May of 2012... I took a couple of year-long breaks from it during that time. It's going to be weird seeing this finished on the shelf, after seeing it sitting around unfinished on the work bench for so long!
The idea here was a custom tractor, but I didn't want to go with the long frame and polished everything look. Don't get me wrong, I like that look, but everybody's doing it these days. I went with a modest wheelbase, and used as little chrome/polished/stainless "shiny stuff" as I felt I could get away with.
The day cab and Harley grille are from Models By Dave. I had originally planned to add the round Harley headlights, but I liked the look of the fenders without lights of any kinds... so let's just say the headlights are now in the spots where the factory fog lights used to reside. I blacked out the bottom part of the bumper, and went with Duplicolor School Bus Yellow/Tamiya Semi Gloss Black throughout.
The fuel tanks are from a Peterbilt 359, as is the (modified) headache rack. The diamond plate rear fenders are from the Revell Kenworth snap kit. I made new mud flaps from thin plastic sheet. The diamond plate tool boxes came from AITM. The smoke stacks are polished K&S aluminum tubing.
The idea here was a "mild custom" semi tractor, something that could be taken to a show, but could still be used to pull a trailer and earn its keep the rest of the week.


-
Well, this one just got a lot closer to finished...
The toolboxes I ordered from AITM showed up. The more I looked at that dead air under the deck of the headache rack, the less I liked it. I figured the toolboxes would be a good way to fill it in. I went with a 24" box on the driver's side, with the modified factory toolbox just behind it.
For the passenger's side, I went with the 48" box.

A deck plate and a few other doodads and this one will be a done deal. Maybe.
-
Just received my first order from Dave at American Industrial Truck Models (after placing the order via internet Friday night, I might add), and am quite pleased!
First, here are the tool boxes-

Left to right- TB-7 24" Square Tool Box, TB-8 36" Long Tool Box, and TB-9 48" Long Tool box. Each of these particular boxes has a diamond-plate pattern on the door. The 24" boxes are $3.00 each, the 36" is $5.00, and the 48" is $7.00. Each box includes two sticks of styrene plastic strip for making the mounts.
Here is the AS-3 set. It includes a hood, bumper, and tow pin to convert one of the AMT "Big 4" kits to the tilt-nose Autocar A64F. I'd suggest using a White Road Boss or White Western Star, that would give you the right dash. Of course, you could start with an Autocar if you have one handy, too.

This set also includes decals for the grille emblem and optional nameplates for the sides. It's nicely cast and it'll set you back $35.00. If you want to see how this looks installed on a truck, you can check out Larry Spillars' completed Autocars in the gallery...
Dave makes tons of neat stuff, from individual parts to complete kits. I'll be a repeat customer for sure.
-
1
-
-
Lol, all I know about that thing is that it's a hodge podge of several body parts from different Petes, and the guy wanted 28 grand for it...
-
My name's Chuck Most, and I live in Ithaca, Michigan. Many of you probably know me from the Facebook modeling groups and the many scale modeling forums I frequent. I also write for Model Cars Magazine.
I've been building models since 1988, when I was six years old. I have probably built more Hudson Hornets than anyone... 13 and counting. I build a lot of light commercial= pickups, vans, 4x4s, ,as well as light commercial police and emergency vehicles. Hot Rods used to be my main thing, and while I still build them, I mainly go for weathered and distressed subjects nowadays. An old junker has a story and character that a shiny new vehicle just can't match. I built my first semi tractor about six years ago, and have been getting into them more and more over the last three years or so. I've posted pretty much every "big rig" I've ever built here but two or three, I'll have to see if I can find pictures of those somewhere. I also have quite a few more in various stages.
My day job involves making parts for 1:1 semi tractors and trucks- I work for a company called Hutchinson, which makes engine, radiator, and other anti-vibration mounts for companies such as Navistar, Daimler, and Paccar. My particular plant's two biggest customers are Harley-Davidson and John Deere, though oddly, I've never made a Harley or Deere part. I'm usually making engine mounts for Navistar, or bushings for Cummins, though I work pretty much every section in the building except shipping and receiving
As far as my interests go, I'm a big International fan (you probably figured that out right away), but also fond of Fords. REO and Diamond REO are also near and dear to me- I grew up just north of Lansing where they were built for years. But I'll build pretty much anything that strikes my fancy, regardless of manufacturer. I'm even known to build a GM product every now and again. As far as style, I lean toward basic, well-used "workin' trucks", but I'll build a loaded factory fresh owner-operator or a full-blown custom "large car" if that's what I feel like doing. I don't want to burn myself out doing one style or type over and over.
I've got a personal website with quite a few of the models I've built, as well as a few kit reviews- http://chuckmost.wix.com/madhouse-miniatures and it's sister Facebook page https://www.facebook.com/Madhouse-Miniatures-1620083014942424/timeline/
My Photobucket, which barely gets any use these days- http://s980.photobucket.com/user/ChuckMost/library/?sort=3&page=1
And my recently back-from-the dead Flickr page- https://www.flickr.com/photos/36727233@N02/albums
-
1
-
-
Cool!
Being an American, I'm mostly interested in American trucks, but I do like quite a few of the European rigs as well, mostly because I don't see them on the roads over here.
-
1
-
-
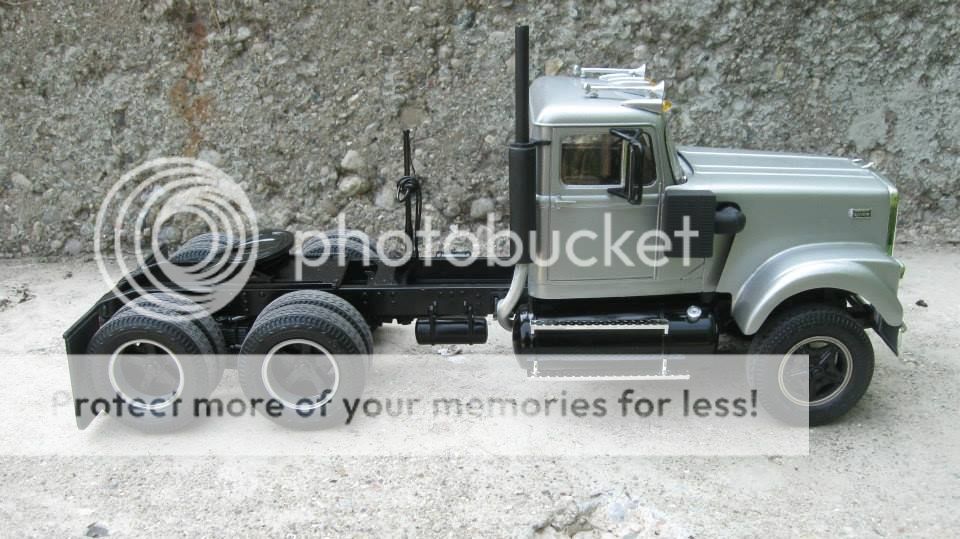
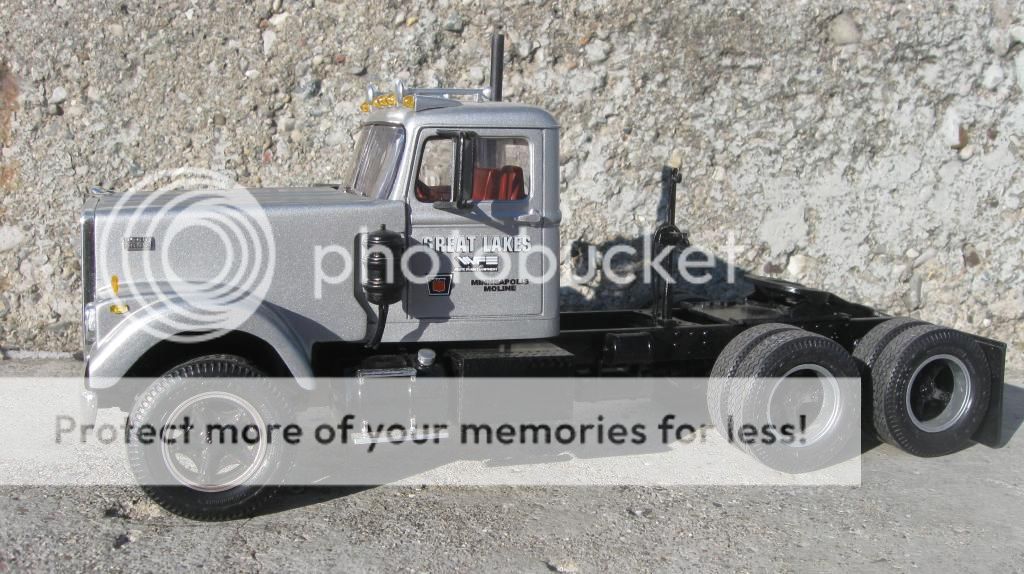
This is just a basic buildup of the reissued AMT kit. I wanted to do this as a White Farm Equipment dealer's rig, so it was painted to resemble a White farm tractor- black undercarriage, with authentic White Argent Silver for the cab and hood. Other than the cast spoke front wheels (from a Diamond REO), it is box stock.
After I finished it, I realized I forgot to put the front turn signals on it. So while I was waiting for the WFE, Oliver, and Minneapolis-Moline decals to arrive from Bossen Implement, I added them. The "Great Lakes" graphics came from an old Monogram Porsche race car kit.
Eventually this will be paried up with a lowboy and loaded down with a tractor or two- there are some pretty nice 1:25 scale diecast tractor replicas out there, including an Oliver 1955.
All in all I'm pretty pleased with how it came out, even though I'm not a fan of how the Road Boss looks with a long hood. I have the 108" BBC hood on order from GW Trucks, so the next one I build will be the medium model.
Here it is before the lights and lettering were added.


And here it is with the lights and door markings in place.
-
1
-
-
This one's basically done- I still need to settle on what to stick on the back, at which time I'll do the sides and any signage. The wheels,tires, crane, and tool boxes are from an Italeri parts pack, and the Todco liftgate is from the base kit- the C600 city delivery. I used that kit because of the longer frame. The flat bed itself is from a C600 stake truck. The Italeri toolbox is a full-width type, I cut it down to make two side-saddle boxes.


-
Cool!
Is that the day cab from the single drive, or the one from the dual drive cut down?
-
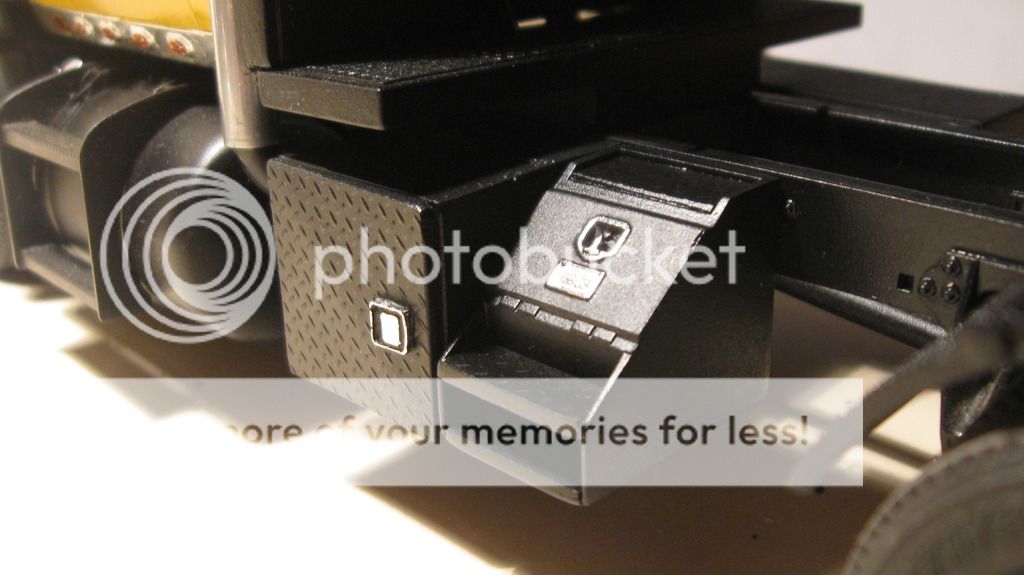
Back end is finished, and I modified the kit-supplied tool box with diamond plate on the steps.


GW Trucks
in Model Truck Kit Discussion
Posted
Gary Wallace has been back for a few years, and has a pretty decent-sized catalog of parts. This is my first purchase from Gary, and I guarantee you I'll be a repeat customer.
First up is the 108" BBC hood for the AMT White Road Boss. I like the look of a long-hood, but I have to be honest, the Road Boss just doesn't look good with the 122" BBC, as depicted in the AMT kit. The 108" should cure that. He also makes the super-short 90" BBC hood, which would be perfect for a "city" tractor. Either way, they cost $15. The fenders will need a bit of filler where the extensions were glued on the master, but other than that, there are no casting blemishes whatsoever. There is a thin film of resin you'll need to remove from the grille opening... no big deal. It's razor thin.
Next up we have the set-back axle hood for the AMT Diamond Reo, which also includes the quarter fenders. Again, the part is perfectly cast, and there are no blemishes of any kind on the parts. This hood also sells for $15.
I have test-fit both hoods to the kit grilles and cabs, and I see no problems with fit. The kit parts fit to Gary's hoods just as if they were the kit-supplied pieces.
Lastly...
Gary can be contacted at gwtrucks@yahoo.com