
Cornbinder
-
Content count
409 -
Joined
-
Last visited
-
Days Won
67
Posts posted by Cornbinder
-
-
Cab is "glassed in" and only needs a few more doodads to complete. The Republic nameplate was taken from an online photo of a vintage Republic dealer sign. I reduced it in size, printed it on photo paper, then cut it out and blackened the edge with a permanent marker.

This prototype was loaned to Outward Bound for research purposes, so that Republic could get "real world" R&D data on the feasibility of offering the Detroit 8v-71 in the CTC-8500 model. It is said that, due to it's low weight and high-powered engine, the Outward Bound drivers quickly nicknamed this tractor the "Hemi Cuda".

-
Along with the Transtar, this one could well be finished this weekend.

The air cleaners are mounted, and made up some intake ducting to connect them to the turbo inlet. I still might rig up some kind of steering box and shaft, or not. We'll see.

The Revell fuel tanks were cut down and painted. I applied foil to the steps, straps, and fuel caps. I also peeled away the lower side door stripes- I wanted it to look like the factory stripes had been peeled away, and an owner had added their logos in their place. The Bloomfield decals came from an AMT Ford C600 stake truck.
-
A few more things to show, weather permitting I should be able to take some pics of the finished product this weekend.

I added some small number boards to go underneath the Mercury sleeper. Some guys would add these to have a place to put their permit stickers and such, and to fill in the open air under the sleeper. The AITM tool box was installed underneath. Again, it's there to fill in the open air on the passenger's side of the Transtar. Also, I think it looks cool.

I used both plate frames at either end of the bumper. I added a shim to push the bumper out forward, and beveled the top edge to clear the grille. These things were done so that the hood could tilt further open without fouling out on the bumper. This looks better to me than the other solution, which would be to mount the bumper a bit lower on the frame horns.
-
Inching closer to the finish line.

The engine bay is pretty well dialed in. I modified the Transtar air cleaner assembly to fit around the engine and radiator. I also used the Transtar kit's oil filter. Both it and the side cover of the air cleaner housing were left chromed.

The grille and hood are installed for keeps- on this kit you cannot install the grille until after the hood is on the chassis. I also cut away the thick molded front mud flaps and replaced them with some new ones cut from .020" styrene sheet. I've since painted the roof light lenses and added the mirrors. I still need to gather up a few doodads here and there, but this one might be finished here pretty shortly.
-
Maybe. Might be a while.
-
No photo, and maybe it's just me, but I've never had good luck with the windshields in these Ertl IH conventional kits. The angle of the "v" in the glass is too shallow to match the inside of the cab. Laid inside the cab, the center of the windshield doesn't even come close to touching the divider. So, I cut the windshield vertically down the center and installed the two sides as separate pieces, just like on the real deal. Fits much better now! I think for the next one I build I'll go with .010" clear styrene instead of the kit "glass".
-
Nicest Astro I've seen in a long time. Any more pics?
-
Threw some paint on it and got it decaled. I also took the liberty of making myself the driver, courtesy of the Chuck decal from the AMT White Road Boss. Still a way to go, but inching ever closer.


-
Did some work on the interior, the cab and hood are now in primer.

And my decals from Modeltruckin.com showed up... this style in red.

-
As a lifelong lover of International trucks, and a model builder, I have to say that among my all-time favorite kits are the '70's-era Ertl International kits. Mostly accurate and crammed with detail, it takes little more than clean and careful building techniques to make a real show piece from one of these kits. While the Paystar kits are relatively easy to find, the others can be a bit more of a challenge.
Case in point, the Transtar II. Though it was reissued in 1996 and run until 1999, it's tough to track down today, which is ironic considering that it was a bit of a flop in the marketplace at that time. This kit started out as a Transtar CO4070A, and Ertl later updated it to the current Transtar II Eagle specs. The original kit had an innovative feature- templates for painting the stripe scheme, a feature picked up later on by many of the Japanese kit manufacturers but pretty much forgotten by everyone else. The 1996 reissue, which is what I'll be showing here, does not include these templates, though their presence is still called out on the box.

Ertl's box art was always striking, and fortunately this kit was not reissued in the unimaginative "standard" AMT-Ertl boxing of the time. The 1996 reissue is pretty much a pure duplicate of the original Transtar II box art.

Here we have the cab, and the piece to the right is the upper interior bucket, which has the inner door and side panels, rear upholstery, and headliner with sun visors. Almost anything that could be done as a separate piece on the cab, WAS done as a separate piece. If you take a close look at the cab, you might be thinking "Hey... it kind of looks like a big Cargostar." That's because, in a way, it is. When IH designed the Transtar cabover, they opted to use as many existing stampings from the Cargostar as possible, in order to cut costs. In fact, I know of a resin caster who is using one of these cabs to master a Cargostar. But that's a story for some other time...

Here we have a sprue full of engine and chassis parts. The Detroit V8 in the kit has very nice surface detail... much more so than AMT kits of the period. I have heard it is a tad underscale, but it is an impressive looking engine when built up and detailed. We also have the battery boxes, dash, cab floor, sleeper partition (complete with a rolled up curtain), visor, and various other doodads.

Here we have the passenger's side frame rail up top, with more chassis parts, mainly wheel parts, front axle, forward drive axle, air brake chambers, and radiator. Again, all parts exhibit very nice surface detail. Keep in mind that this kit dates from the mid 1970's!

Here we have the driver's side frame rail, rear drive axle, the massive walking beams, batteries, inner front spring halves, and the fifth wheel plate. Two high-back buckets, standard on the lux Eagle model, are also included on this sprue. Also note the CB radio... a feature which is strangely lacking in many "big rig" kits.

Unlike AMT, Ertl did not go "primate feces" with the chrome plating, though you will want to strip the fifth wheel. Again, great engraved detail on these parts, and the chrome plating doesn't muck it up too badly at all. The "International" lettering on the grille frame stands out far enough to accept a paint wash quite well.

You'll want to strip the exhaust manifolds and piping, and possibly the air cleaner, but the rest here is good to go. Again, sharp detail and the plating quality is pretty good. Again, the "Transtar" lettering in the side trim stands out proud- note that the side trim pieces also include the door handle and side step. Oddly, Ertl had a love affair with molding the fog lights into the bumper. A little detail painting... or going to the extent of drilling out the molded lenses to replace with clear units, helps quite a bit. Still, that's a very small fly in the ointment, considering how good the rest of the kit is in terms of parts breakdown.

Again typical of an Ertl kit, all the "clear" parts are just that... clear. You'll need your favorite clear red and clear orange for the taillights and turn signals, respectively. The clear parts are relatively thin and don't exhibit much distortion.

Tires are hollow Goodyears by way of MPC. Remember at one time Ertl, AMT, and MPC were all separate companies. Ertl did buy out MPC's "big rig" tooling in the late '70's. A few years later, Ertl took over AMT, and later, MPC. If you've built pretty much any AMT, Ertl, or AMT-Ertl semi reissue from the late '80's onward, you are no doubt familiar with these tires!

The decal sheet includes the Eagle graphics, along with door signage for two fictional hauling firms- Eagle Freight and TSR Freight Lines. Several small permit labels and detailing graphics are also supplied. The names "Linda" and "Elaine" are also on the sheet (hard to see in the pic but visible just to the right of the top "Eagle Freight" decal... so your Transtar can have a name, or so you can put a female driver behind the wheel. Like most '90's Ertl sheets, the carrier is thick and you'll want to trim it as closely to the graphic as possible, but they do tend to lay down well and look good once in place. Barring that, Jerry at modeltruckin.com does a set for this kit, and no doubt there are numerous other choices available through the aftermarket or kitbashing.

Ertl kits don't have instruction sheets. They have full-blown, bona fide, honest-to-Thor instruction booklets, laid out in a checklist format. This booklet also includes a few photos of 1:1 Transtar IIs for reference, thought the photos are black and white and not quite as sharp as you might hope.
As far as building goes, there are really only two things to watch out for. The front track is a bit wide, so you may look into modifying the axle and or front hubs so that the front tires won't stick out past the sides of the cab. You also may want to move the battery box rearward just a tad. Every time I hear someone comment on building this kit, those are the two things always mentioned. Of course, since the kit has posable steering you could always take the lazy way out and just display the model with the wheels turned to hide the track!
I have not yet had the chance to build this kit, but I am very much looking forward to it. The Transtar was once a very common sight on American highways- even 40 years later you'll still see a few out and about from time to time. It's an iconic kit of an iconic semi tractor, an I do hope Round 2 will see fit to bring it back again. Given the superiority of Round 2's decal sheets to the old Ertl sheets, that alone would be an improvement over what is already a great kit.
-
You saw the in-progress here... http://www.modeltruckbuilder.com/index.php?/forums/topic/71-diamond-reo-raider-sbfa-michigan-special/#comment-236
Now here's the end result. I may do a little touchup and add some grease caps to the front wheels, but it still looks pretty good up on the shelf all the same.


-
I might have some completed photos for this up later today. Stay tuned...
-
I think everybody has that one favorite that just sticks out in their mind. For me, when I think of the perfect heavy truck/tractor "look", I usually think of a Diamond REO Raider. Especially in set-back axle form. There's just something about that big bumper and imposing grille that "does it" for me. And when it's set up on spokes with a short wheelbase, that seems to enhance the brute look.
A while ago, I got a very old Frank Gortsema casting of a Raider. This was a slush-cast piece with the hood and cab molded as one piece. It's hard to see in the pic, but there was some severe damage to the roof and the thickness of some of the casting was inconsistent, so I cut away the resin cab and spliced in an AMT cab. I'd like to point out that I'm not trying to "diss" Mr. Gortsema or his talents... just remember that resin casting 30+ years ago wasn't as advanced as it is now.

This is the casting as I received it. As you can see it also includes the interior and an air cleaner box, as well as the bumper and interior tub. The dash is a direct recast of the AMT part, even though the Raider, introduced for 1975, had the newer style "square" gauges. Since the dash is so hard to see in these kits anyway, I'll live with the mismatch.

Here is is mocked up on a modified AMT chassis, with the AMT cab spliced in. I wanted to make the hood functional, but two things stymied that effort... the thickness of the casting, and the fact that the grille insert stays in place- the surround tilts with the hood when opened, but the vertical grille bars are attached to the radiator core support and remain upright. That would have meant cutting through that thick resin. And that also meant I'd likely end up destroying the grille insert in the process, so I'd need to make a new one. All this on top of having to make up some sturdier hinges to 1-support the weight and 2- work with the moving hood/fixed grille insert situation. Yes, you could make it work, but I didn't want to go through all of that. So this will be a curbside, with just enough of an incomplete Detroit 8V-71 to fill in the blanks. I used some Italeri wheels and tires up front... not that it is ever a good idea to mix radials with bias plies. :v

There are three different type of tire on the Raider... the aforementioned Michelins, then a quartet of Goodyears on the forward drive axle, and finally four Uniroyals bringing up the rear. Why not? I mean, I've seen a few old tandems that literally had ten different types of tires on them... if it's only being used for yard duty, no need to buy a full set of new rollers for it, right? You can also see a few rough spots in the hood sides.

Here it is wearing a coat or two of Krylon Hunter Green. The can proclaims "Fast Drying". Ha... as of right now it's been on for 24 hours and it's still tacky in spots. :v I have attached the headlights and front signals- more detail painting, foiling, and some weathering is still to come. The fuel tanks and battery boxes are also in place at this point. Unlike the dash, I will be updating the much-more visible outer door handles- they went from the quarter-turn type included in the AMT kit to a push-button grab-handle type around 1973. I think a set of handles from a Revell '64 or '65 Chevy pickup kit will be just the ticket for that.
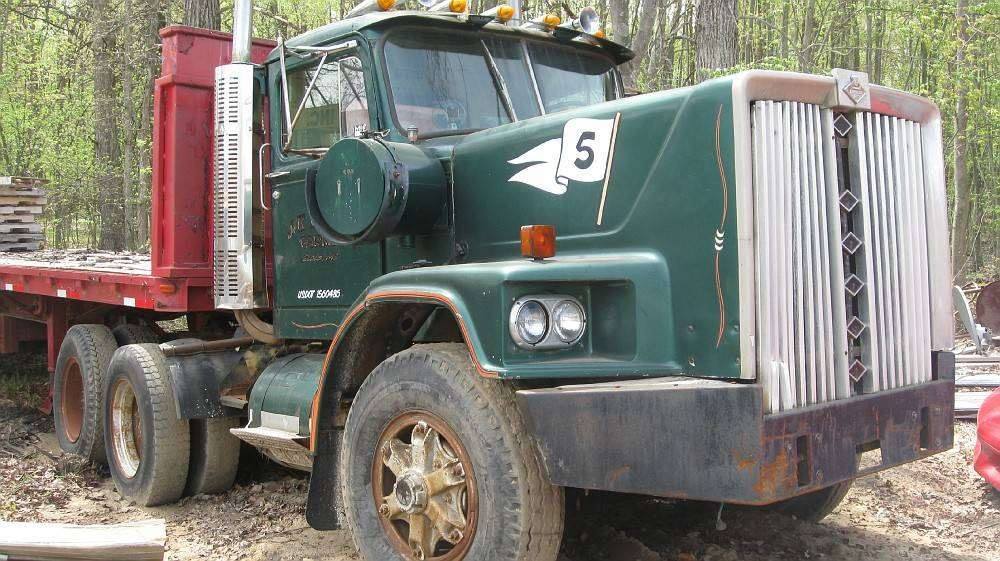
While my model won't be an exact replica, this real Raider has served as my "muse" for this project...

-
Looking tough already.
-
Progress from today...

The intake, exhaust, and related ductwork are in place. The Detroit was also "oiled up" quite a bit.

A hole was cut to fit a cut-down Freightliner grille. The stock ALF headlights were moved down and outward from their intended position. I believe some small side steps will go underneath the doors.
-
Shaping up....

-
Nice!
-
Here's a further-along progress shot I forgot to put up last night...

-
The power went out at work, so I found myself with an extra hour to burn this afternoon. I fiddled around with the Transtar a bit. Chassis and engine still need some detail work, but the basic paint work and assembly are done. Chassis is Harvester Red, of course.
")

-
 1
1
-
-
First off, a little history.
Republic was founded in Alma, Michigan in 1913. They quickly became the world’s largest truck manufacturer- second only to Ford in output. At one point they owned the Torbinson Axle Company, which still exists today as Eaton Corporation. But a series of bad decisions and other factors led to the company merging with American LaFrance to form LaFrance-Republic in 1929. Two years later this company was bought by Sterling, and the Republic nameplate ceased to exist. A parts warehouse existed in town until 1957, and the factory they put up to build Liberty trucks during World War I still stands. While American LaFrance faded away (struck down by Daimler just a few years ago), Republic just burned out. Today, few people in Alma even realize that the city once played host to a legendary pioneer in the trucking industry.
But I wondered what a more “modern” Republic might have been. Suppose that merger with ALF still happened, and the “game plan” adopted was that the LaFrance side would continue specializing in the building of fire and emergency vehicles, while the Republic side would focus on the commercial side. Or, perhaps LaFrance decided to revive the Republic name later on for a line of commercial trucks. Working off that LaFrance connection, and having an incomplete AMT kit at my disposal. I figured that Republic would share quite a few parts with LaFrance to cut costs, so the main cab parts and chassis from the ALF pumper would work just fine with a few tweaks. Or more than a few.
So… call it a “might-have-been” ’73 model. Call it a prototype. Call it a flight of fancy from a guy with a little spare time and a lot of spare parts. I call it a CTC-8500… compact tilt cab, 8500 series. This would be something that would be comparable to a Ford C800 of the same period.
The color scheme will be the “traditional” Republic scheme- yellow chassis and wheels, and a black body, with green pinstriping on both. The interior will be done in green, just because I feel like it. It is going to be weathered- it could be a factory prototype pressed into testing and evaluation duties, or maybe it’s a privately-owned unit that gets a lot of use. It won’t be in shiny, clean, as-new condition.
I managed to scare up just enough of a Detroit 8v-71 to fill out the doghouse. The cab won’t tilt on the model, so only I (and anyone reading this) needs to know the parts-box-special Detroit is missing a ton of parts.

As of now, the cab sits on the shortened ALF chassis. This pic shows Ford C600 wheels and tires- I'll be using the wheels and tires from a Diamond REO reissue on the final product. I also cut the cab down quite a bit, and removed the canopy to make way for a new rear wall. The fenders were moved forward, and parts of the doors were cut away for new wheel arches.
I will probably do a minor "facelift"- perhaps Republic's management would not have wanted their product to be such a dead-ringer for the famous fire truck. I might even add a grille. Quite a bit is still up in the air, but I already have more than a few ideas I'd like to try on this one.
-
A little while back, I built my first Peterbilt. I figured I’d need to build a Paccar companion for it at some point. So... here goes.
The model is a hodge-podge of several kit manufacturers parts- the chassis is the Revell snap kit, the cab and interior are AMT. The Cummins NTC-475 came from an old Revell Pete, and an AMT Diamond Reo donated the Gunnite rear wheels. The Ertl Transtar coughed up the front wheels and all 10 tires. Better wheels and tires improve these snap kits pretty greatly. The wet tank came from the MPC Gravel Trailer. Might be an Italeri part or two on there by the time it’s all said and done.
I cut out the part of the frame with the sleeper floor molded to it, and added some length back with plastic strip and a couple of spare frame rail sections from the parts box. Paint will be Chrysler Intense Blue Pearl, and I may use the snap kit's factory white stripe pattern.

Here's a mockup of the tractor, with the AMT cab in place. I did have to trim the molded cab floor on the Revell kit to fit the cab, but it will sit on there. The Revell hood lines up fairly well with the AMT cowl. I'm also planning to use the straight bumper from the AMT kit.

This is the painted chassis- eventually the entire mess will get some weathering here and there. Note that the cab is not level in this pic- I may add some shims because there's just enough room for "up and down" movement of the cab that it might cause problems later. I'm still not sure if I'll use the snap kit's side steps or go with the AMT step/battery box on the driver's side and a single fuel tank on the passenger's side.

The Cummins fit into the KW chassis like a glove- I did need to glue an L-shaped strip of plastic to the existing front crossmember so the front of the engine would have something to sit on, but it fit great. I didn't even need to mess with the kit exhaust piping too much to get it to line up.
-
1
-
-
I did. Like I said, he's not tech savvy, but he's getting the hang of the online thing and he does want to contribute.
-
He doesn't. But he can send you his product listing via e-mail. Lots of pictures of his stuff online too.
-
Just met up today with Tim Gibson of Saginaw, MI. He's a lifelong truck enthusiast, retired truck driver, and as I found out today, an all-around nice guy. Some time ago he sent me some photos of a few of the models he's built.
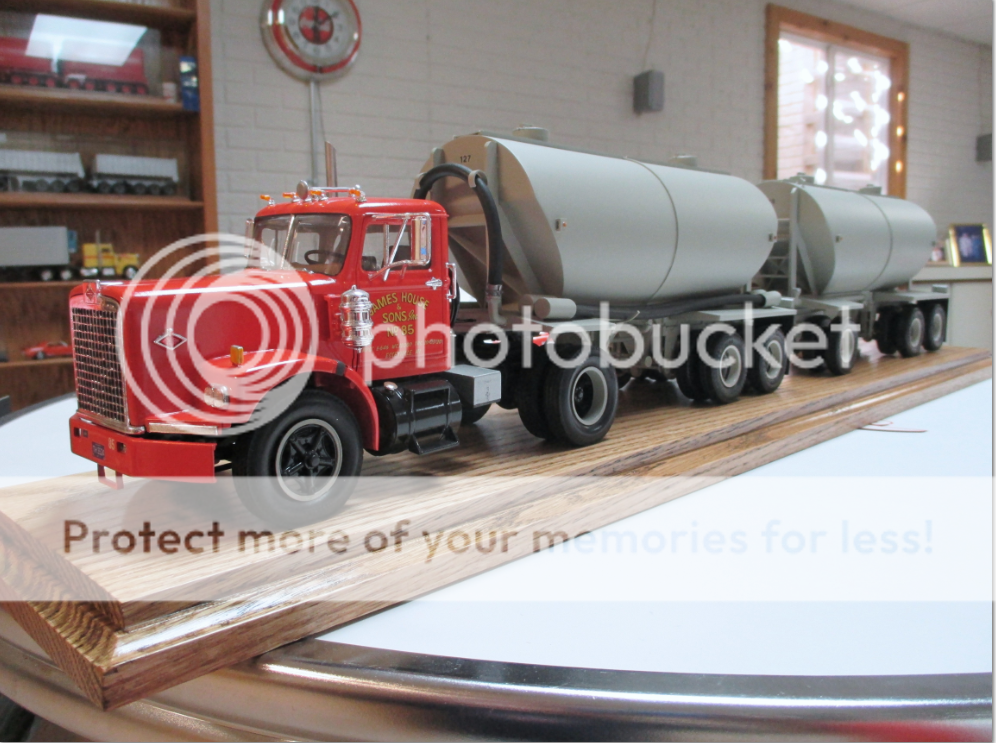
This is the James House and Sons Number 85 Diamond Reo, pulling two powdered cement trailers which were built by James House at their own shop.
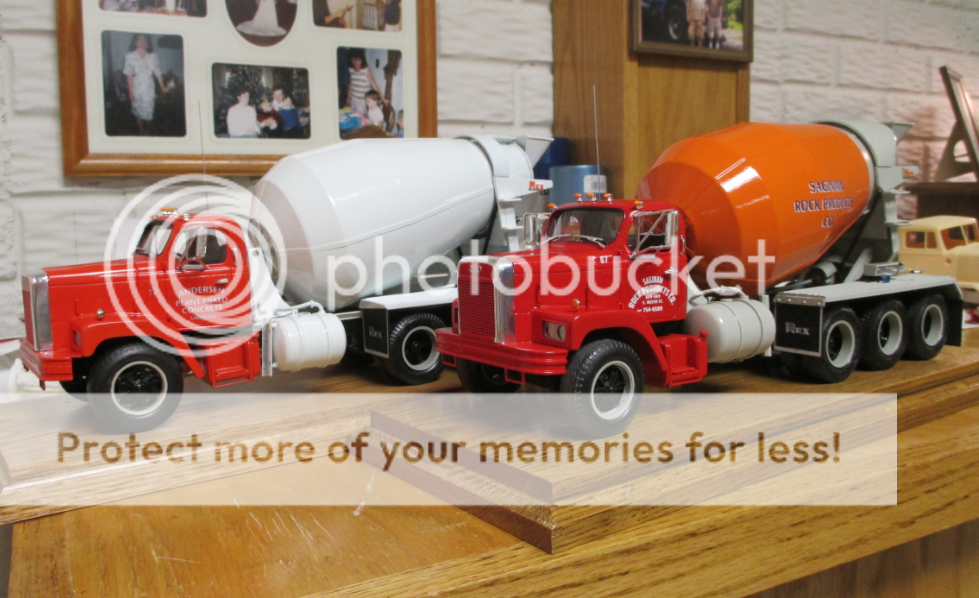
These two REO mixers represent real mixers owned by Anderson Sand and Gravel and Saginaw Rock Products, respectively.

The Ford stake bed is box stock other than the Quality Door & Lumber markings.
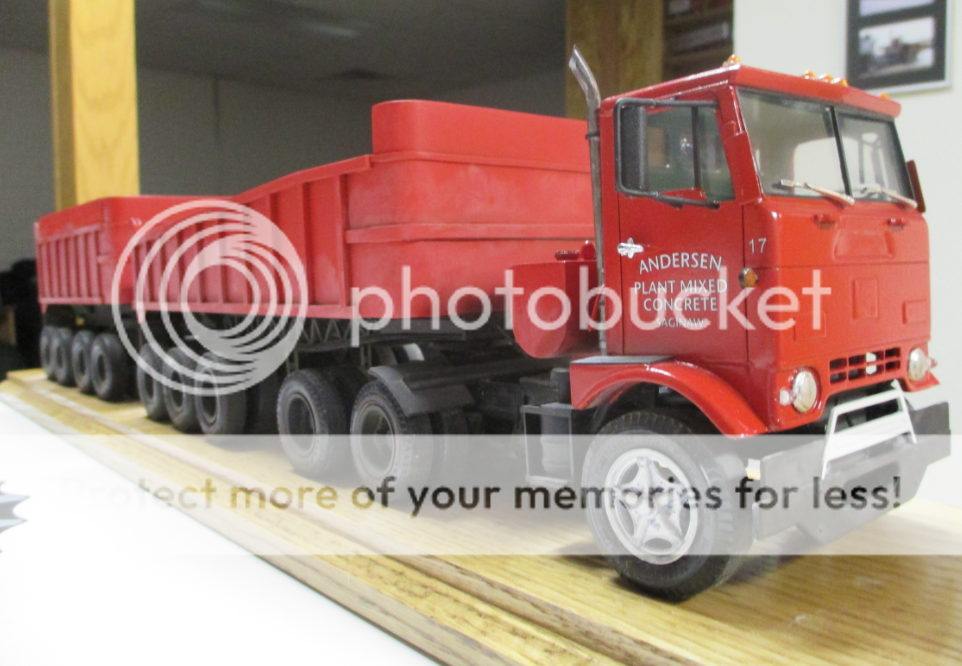
The Anderson GMC Crackerbox represents a tractor driven by Tim's father. It is Spaulding cab cut down to a day cab, and the entire model is lightly weathered. Both trailers were scratchbuilt.
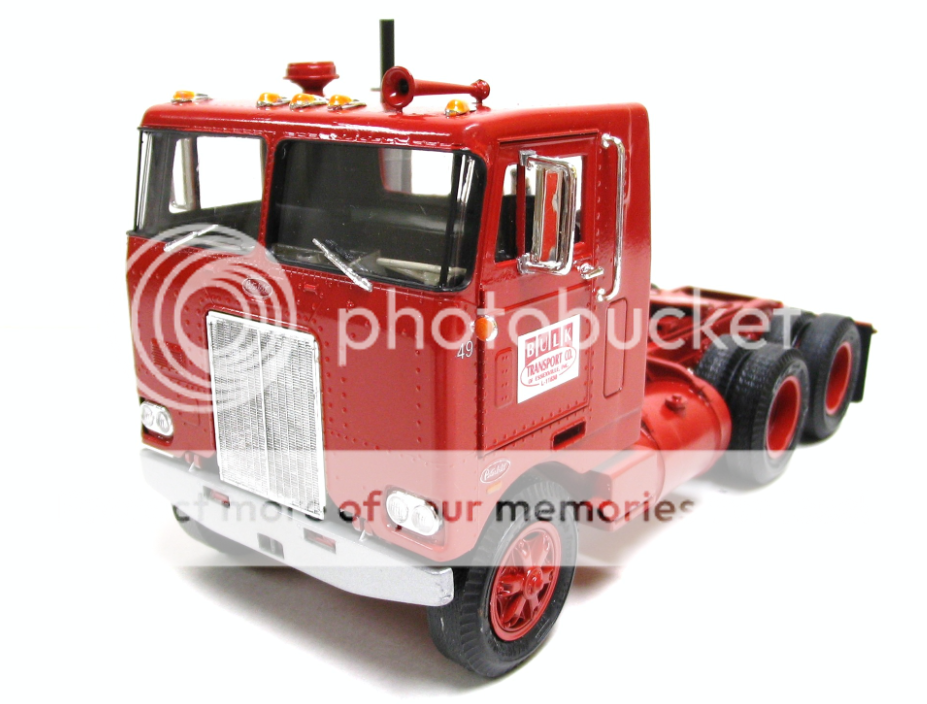
The Pete is a model of a tractor owned by a friend and leased to Bulk Transport. Tim also did a pair of scratchbuilt gravel trailers for this one. The kit cab was cut down to 73 inches. The real tractor has very little brightwork and lots of red paint, so the model follows suit.
He does have quite a few more, but these are the ones I have pics of. Let me tell you- they look pretty good on a screen but they look even better in person!
White Road Boss Dump Truck
in Model Truck Workbench
Posted · Edited by Cornbinder
This is something I've been horsing around with for a few months now. I started with an original 1974 kit, and a 108" BBC Hood from GW Trucks. I messed up on the frame, and ended up buying a fresh reissue to use for parts. For a while, I was undecided on what to do with the thing. Build it as a tractor? Or a flat bed? Or put a dump body on it. The old county road commission "theme" I had with the hood and cab even had me thinking of picking up an AMT Ford plow truck and just sticking the plow and dump body onto this. I ultimately chose to go with a dump body, and a knuckle boom crane.
I had a little fun junking out the interior in this one. Here you can see the dashboard fan (with some Macho Man Randy Savage style sunglasses draped over it), an adjustable wrench, and a pack of Marlboros. There's plenty more to see in there- a CB radio, a first aid kit, and some other little details to add interest.
Here's where it sits as of now. After it sat around in "glider" form propped up on a stack of tires for about a month, I finally went ahead and added the rear suspension. I was torn between single or tandem, I finally just decided to stick with the kit-supplied Hendrickson tandem setup. The kit wheelbase is 194" (oddly listed for straight trucks but not for tractors), I shortened it to 182". The Effer crane is from an Italeri accessories pack, and the dump bed is made from Plastruct flat and strip stock.
The front wheels and battery boxes are from a Diamond Reo, and I used a Detroit 8v71 from a Peterbilt 352 Pacemaker. I cut down the bumper to a "lightweight" narrow type. The caution stripe pattern is a decal from the AMT Ohio George '60 Ford Ranchero. The County Road Commission decals came from the recent MPC Gravel Trailer reissue. I used only the lenses for the cab lights- White offered a "pop off" style clearance light for fleet and budget-minded buyers, so called because the lens just popped off for bulb changing. The kit lenses bear a pretty close resemblance to these units. The horn came from a Revell snapper- don't recall if it was the KW or Pete, though. The mufflers and mounts are from two Diamond Reo kits, with K&S aluminum tubing for the standpipes.
The driver's side fuel tank is from the kit, there is no passenger's side tank. Rather, there is a tool box made from a modified White Freightliner battery box. I lowered the truck a bit- these old AMT kits tend to sit a bit high- probably okay for an unladen truck, but a bit nosebleed-inducing otherwise.
Still plenty to do here... finish the dump body and crane, get the hydro tank for the dump cylinder dialed in, and make up a few more orange barrels (and other junk) to kick around in the back.