

Cornbinder
-
Content count
399 -
Joined
-
Last visited
-
Days Won
59
Posts posted by Cornbinder
-
-
Love it! I've always liked the "late model" Paystar hood design.
-
Just a box stock rendition of the Atlantis reissue, finished with Tamiya paints and Monroe weathering powder. This is the first one I've built out of the box, and now I've started a second. 🤣 Now I need to go through my back issues of Model Cars Magazine and find the series from the 2007 NNL.


-
 2
2
-
-
1 hour ago, DRIPTROIT 71 said:Very cool Chuck!! Did you use the engine from the C cab?
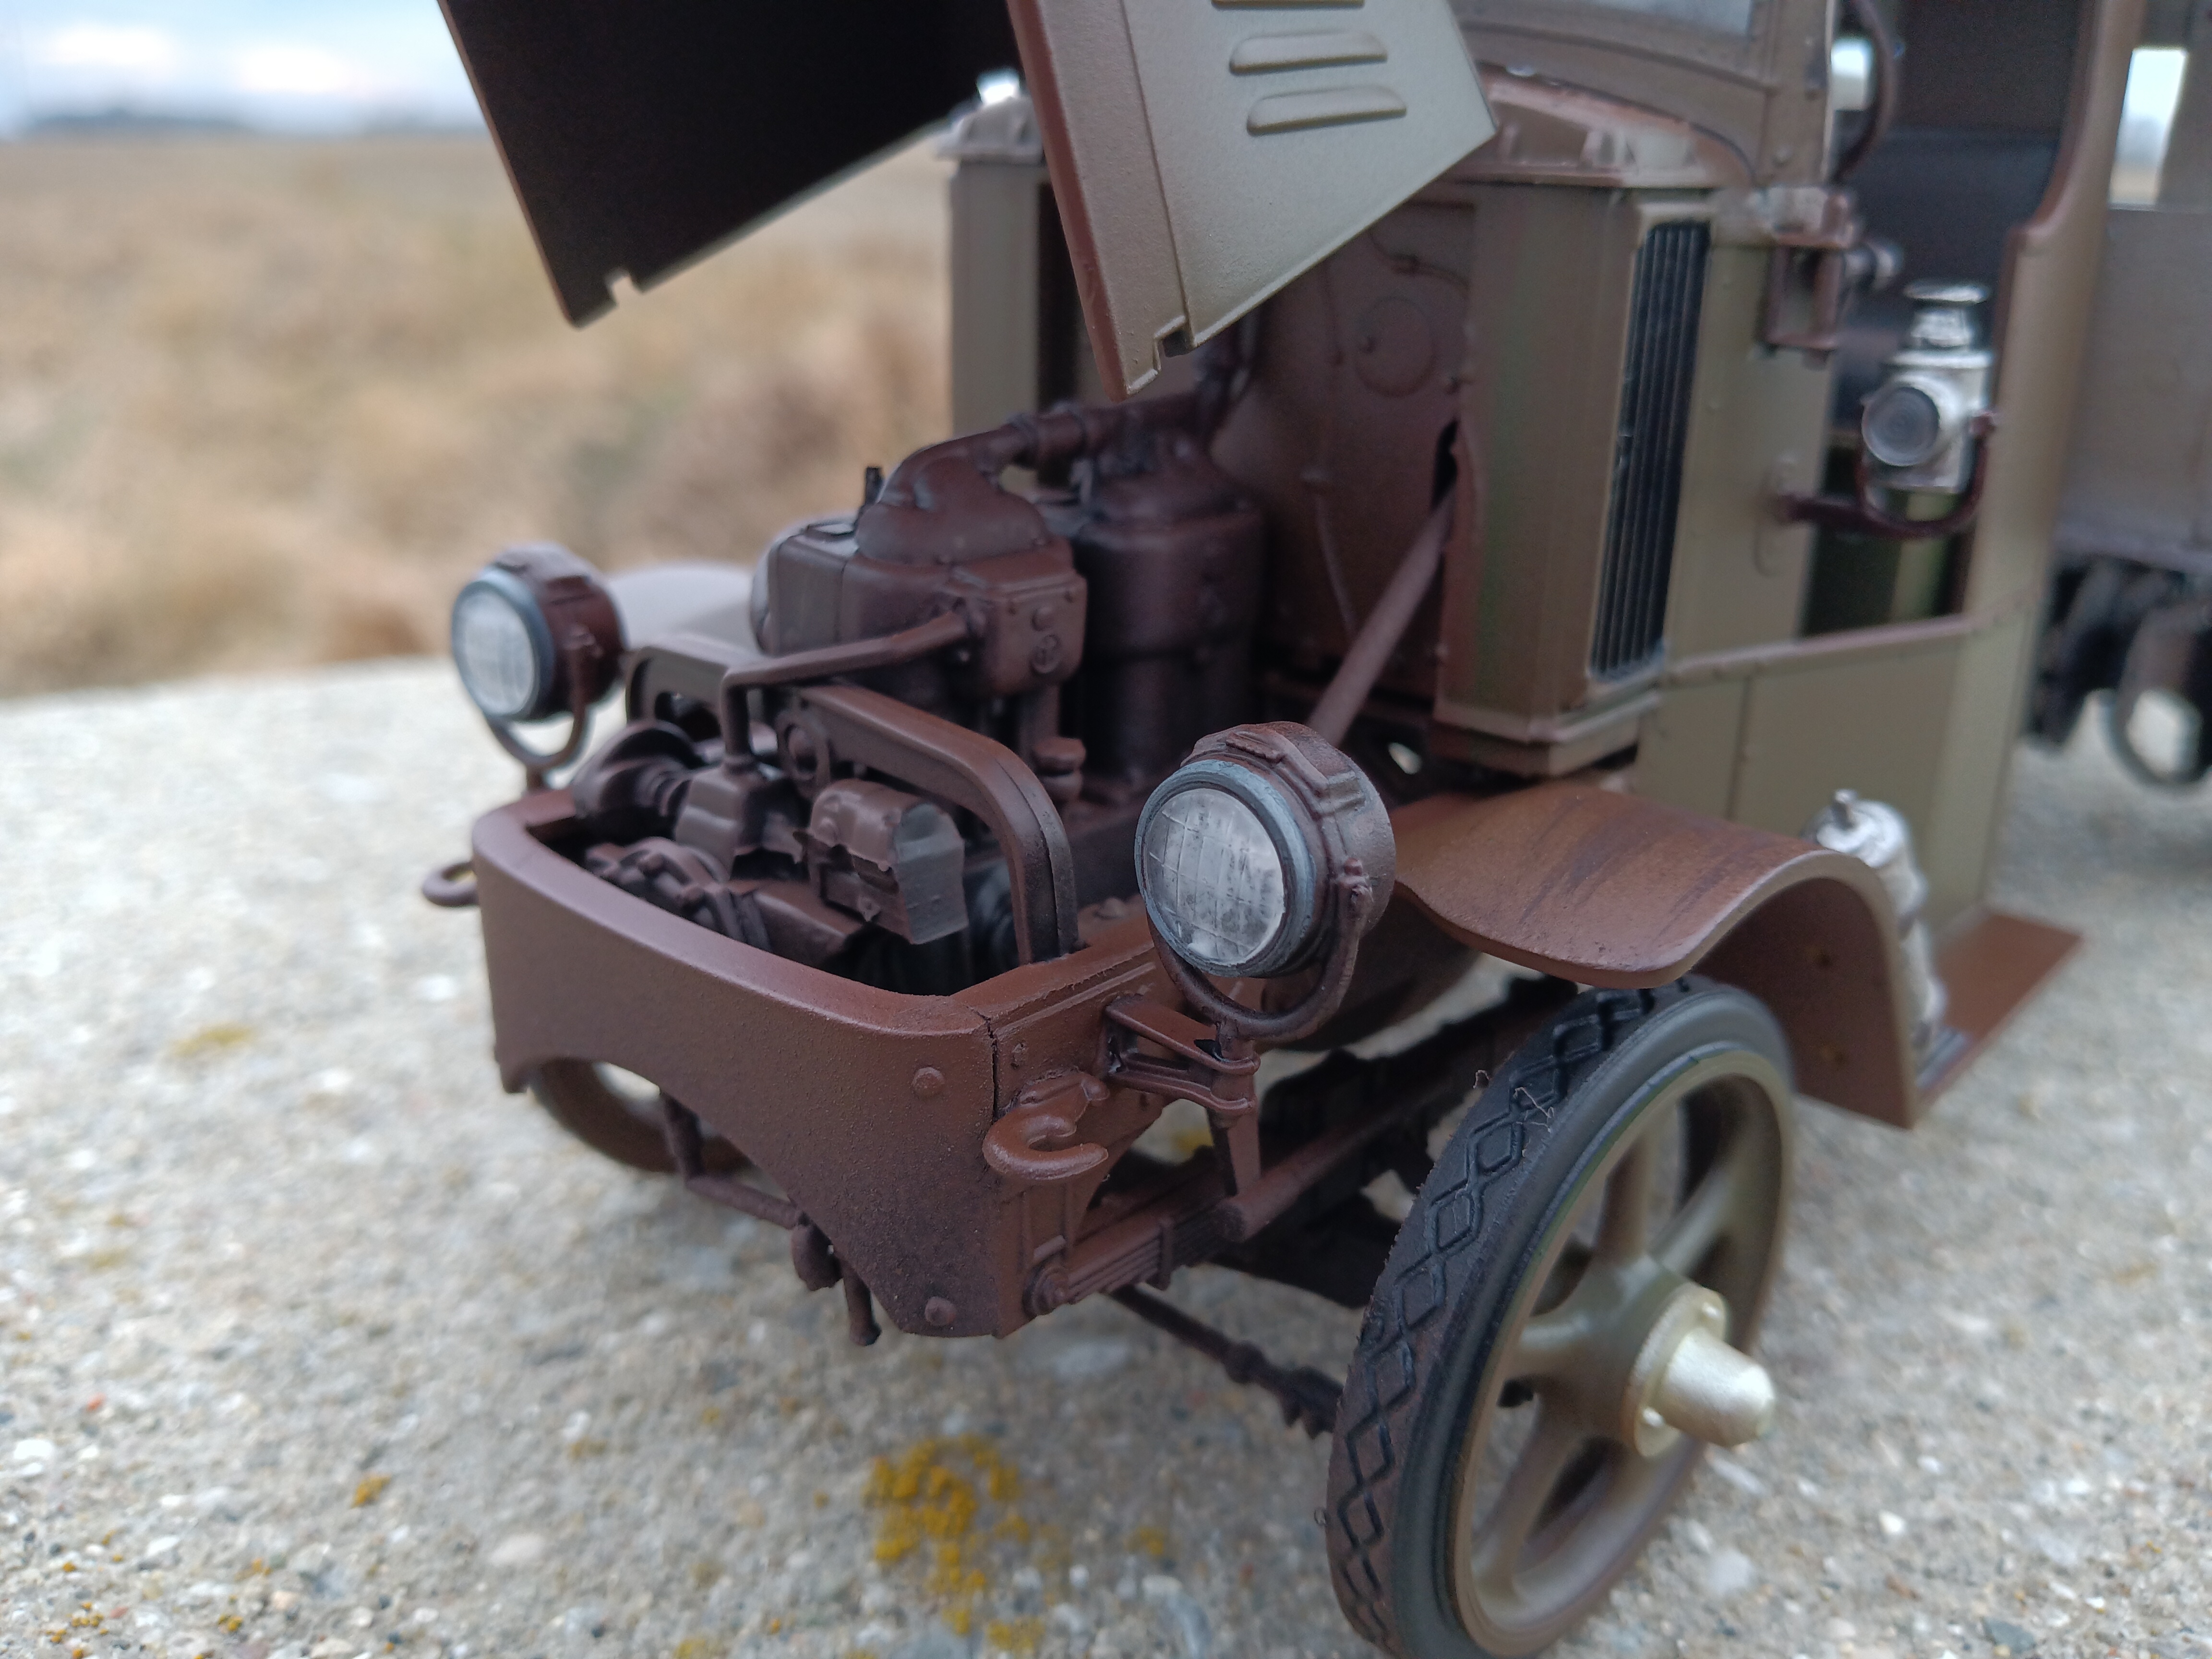
It has the block and heads (and not much else) cobbled from a couple different LNT 800 kits.
-
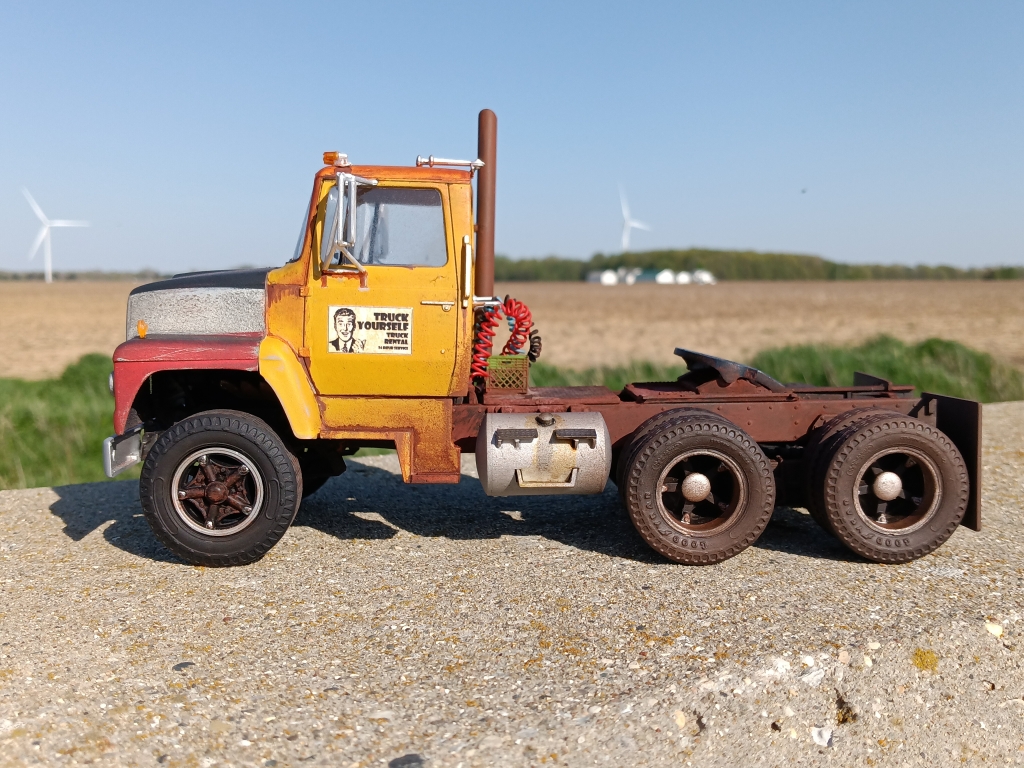
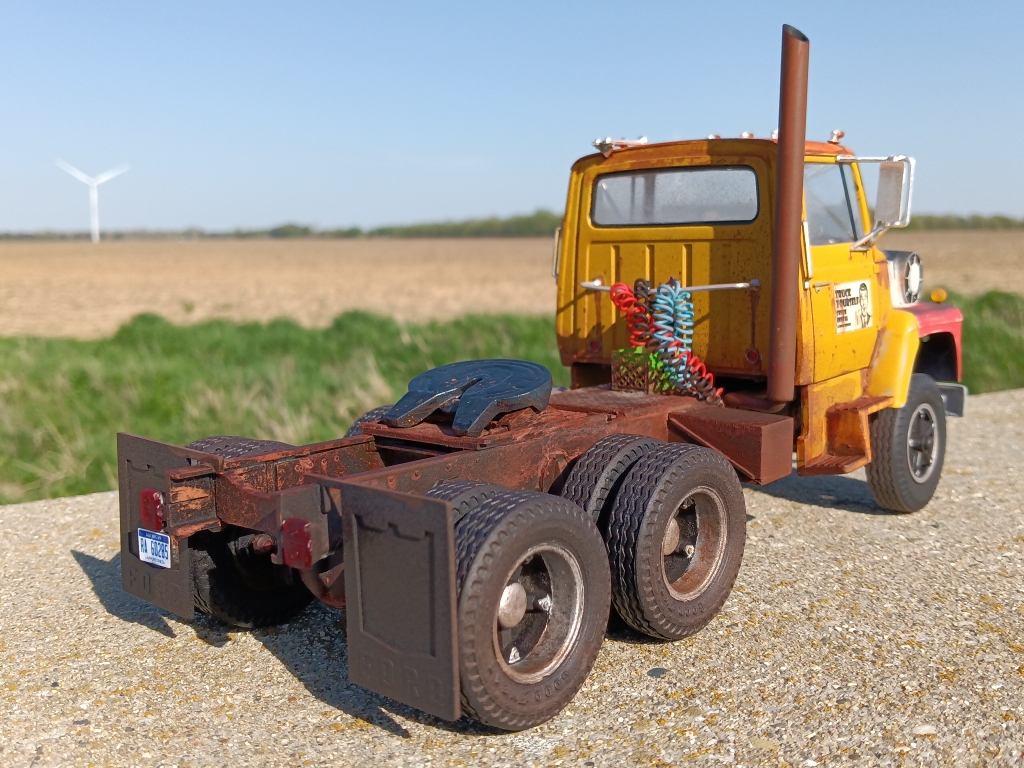
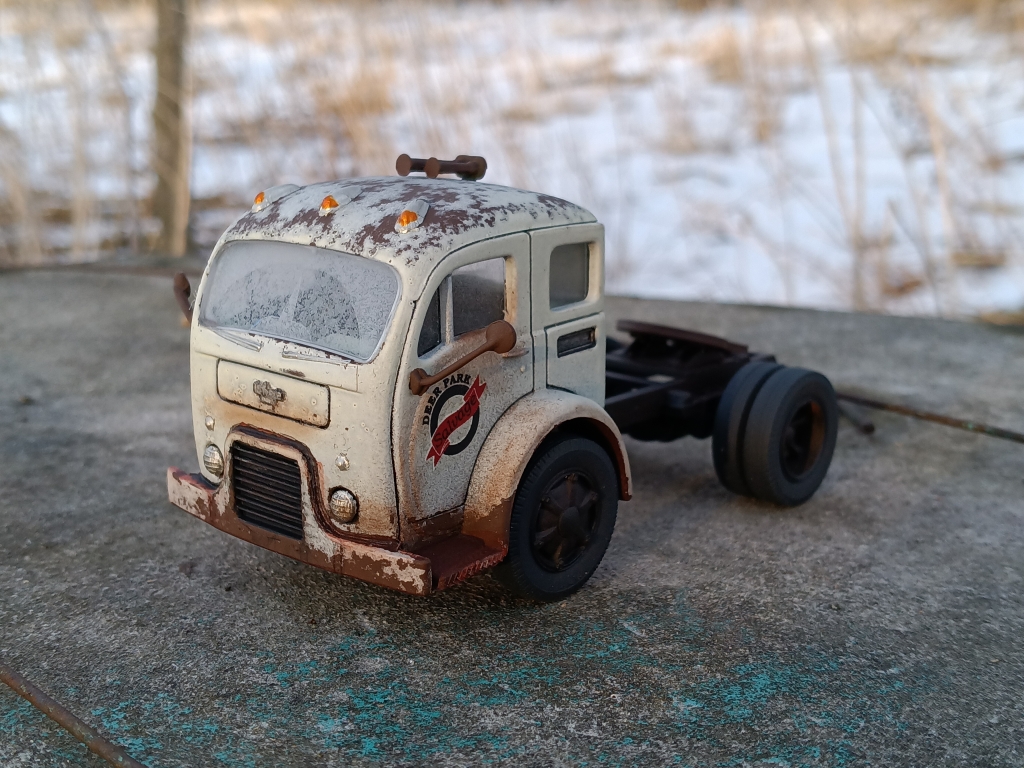
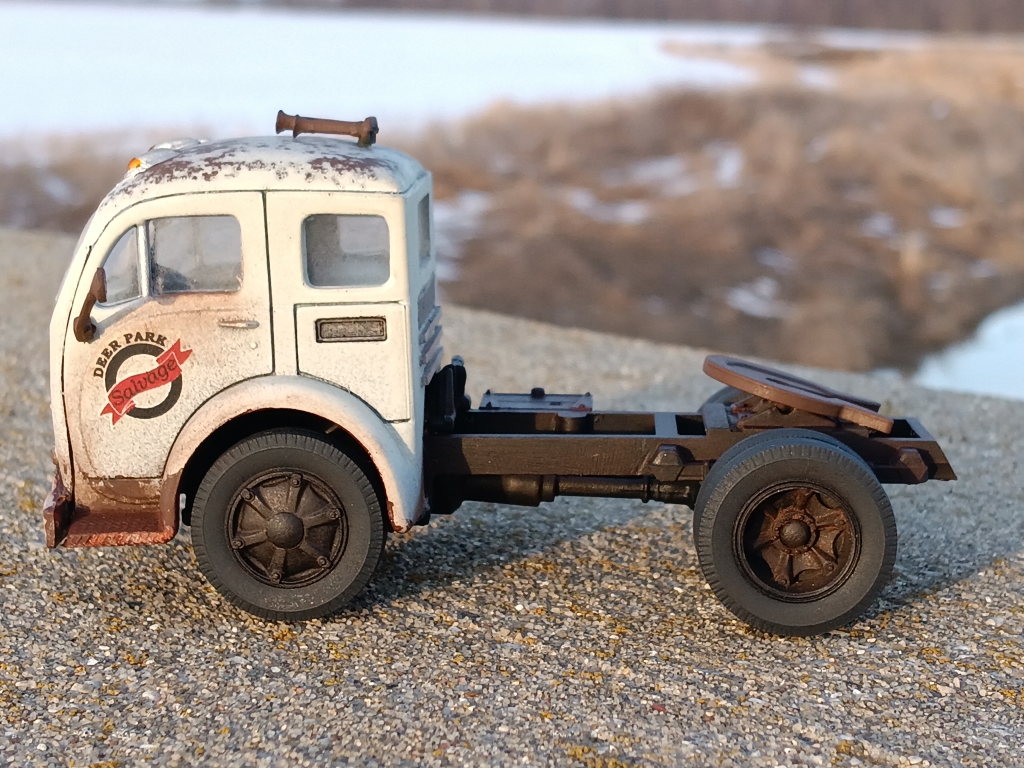
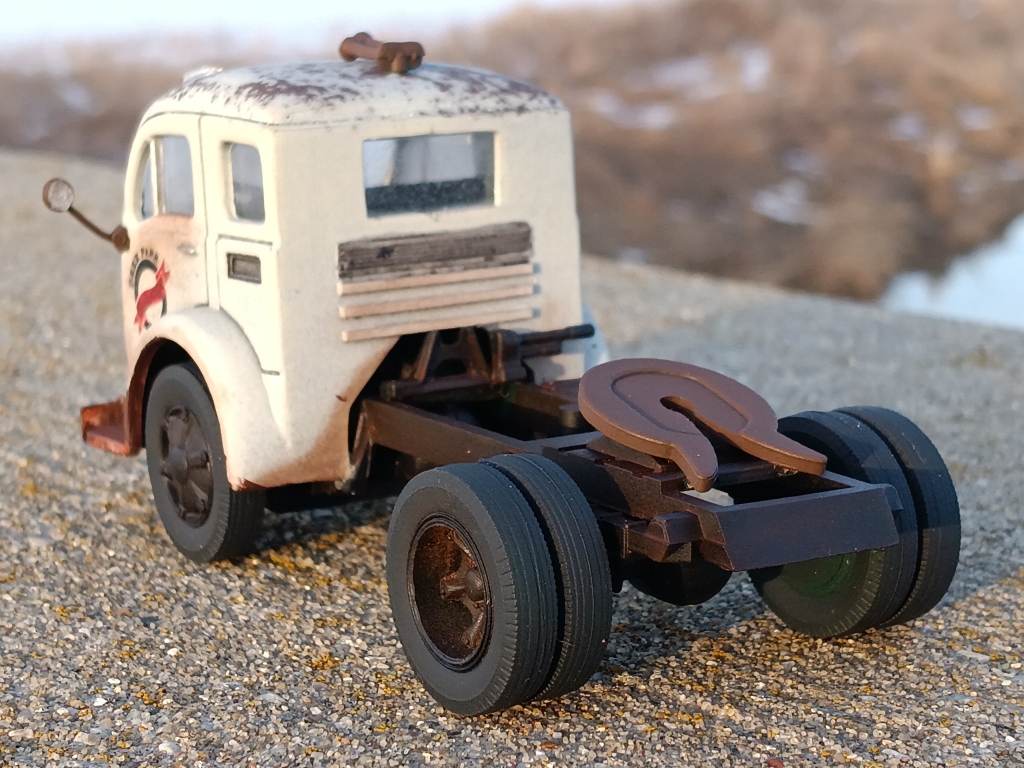
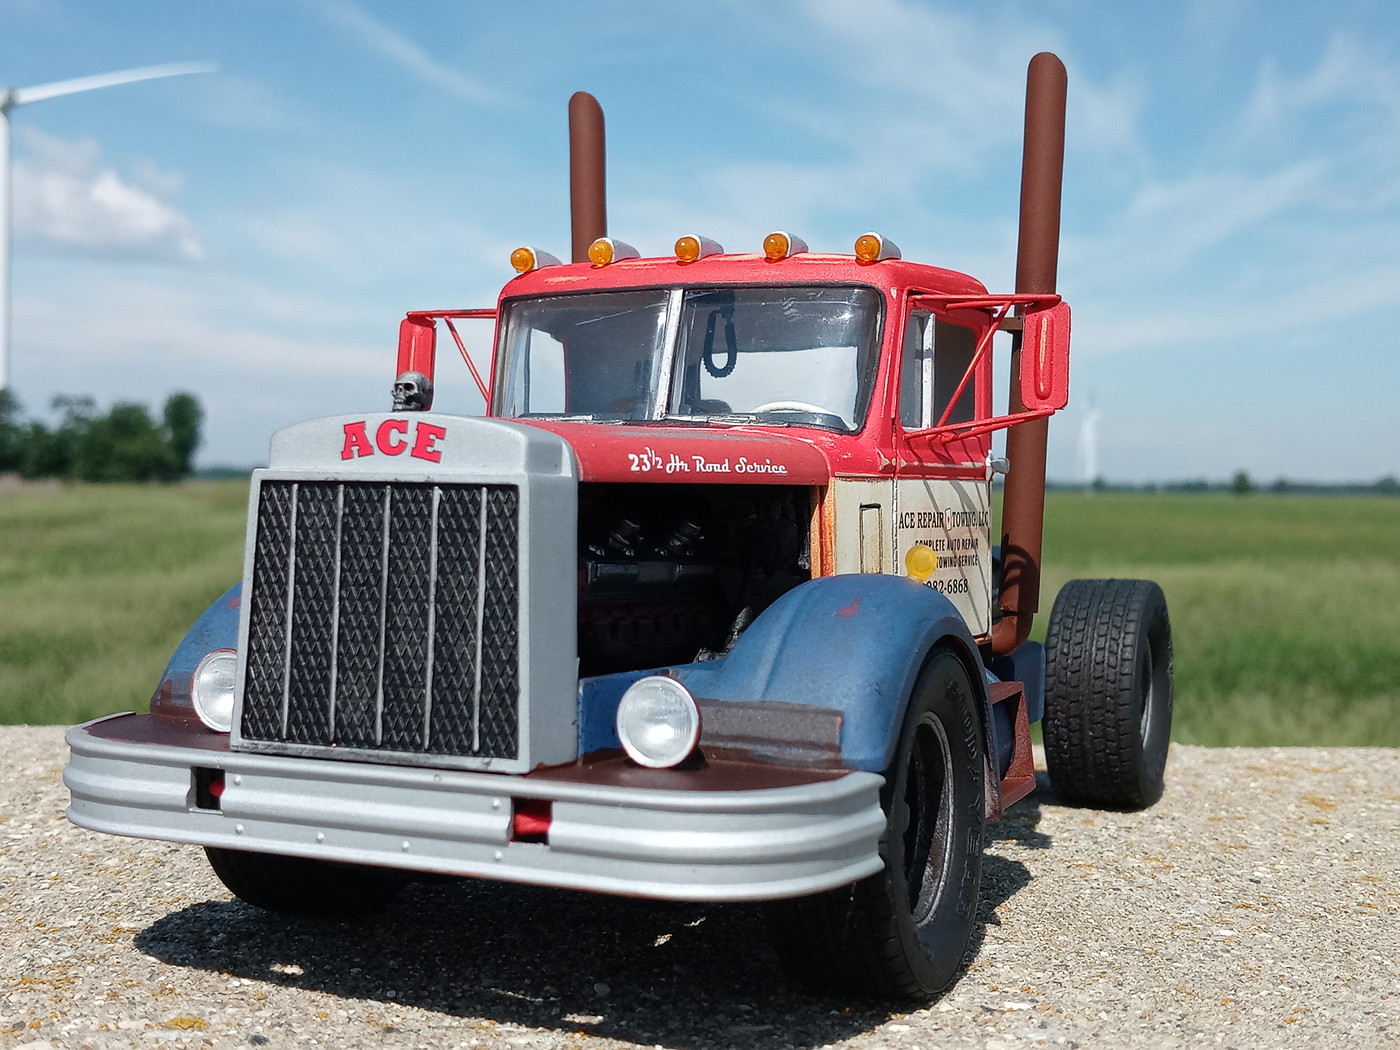
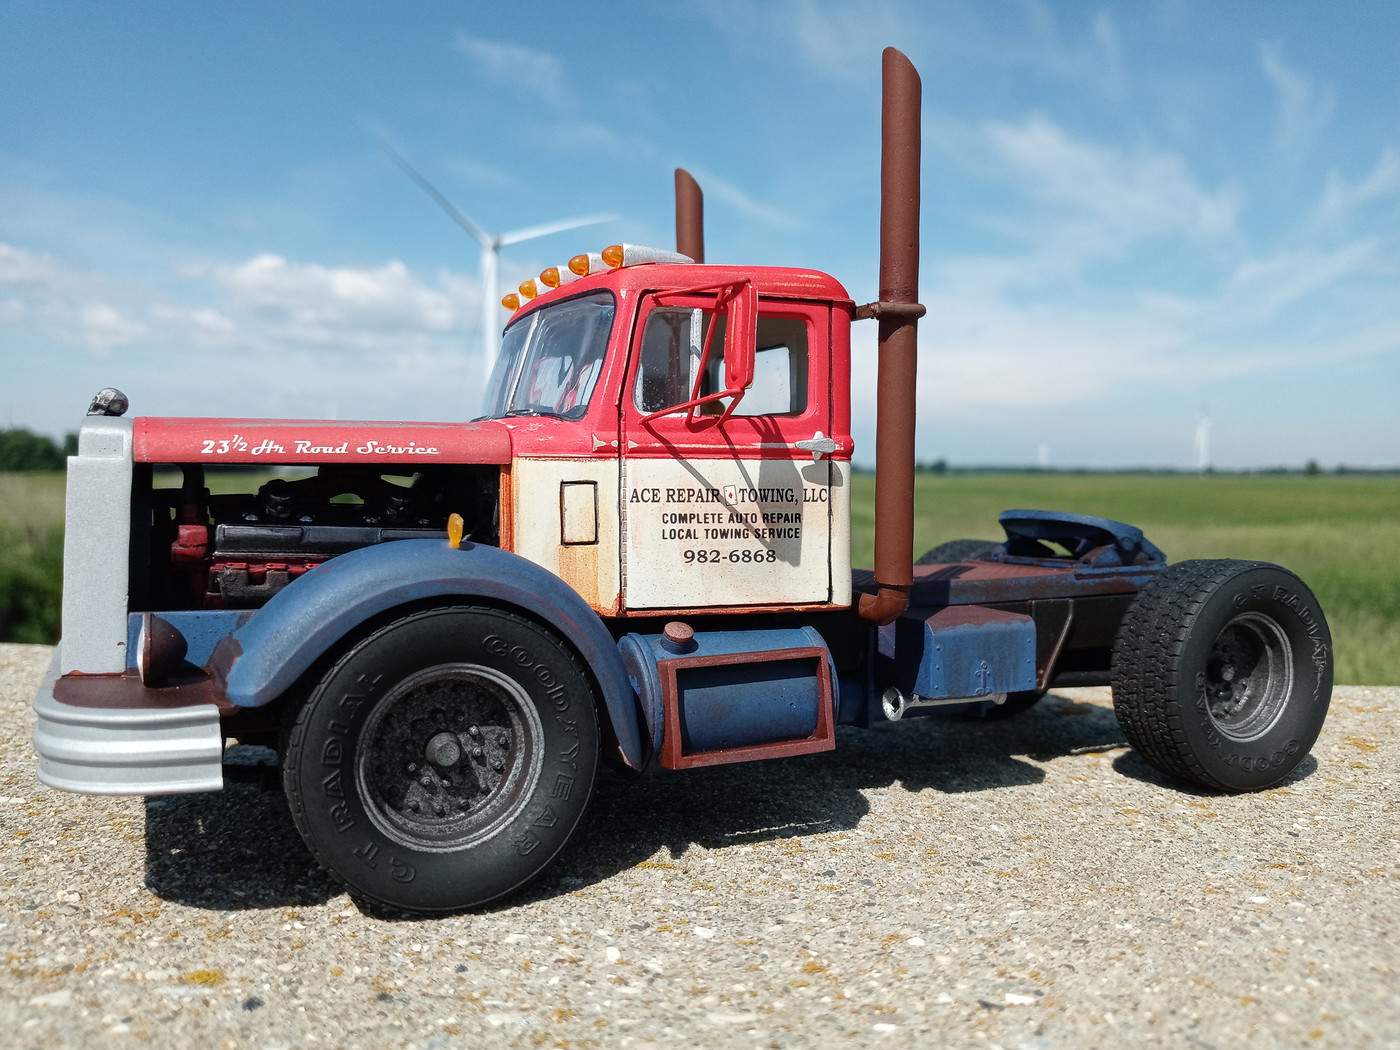
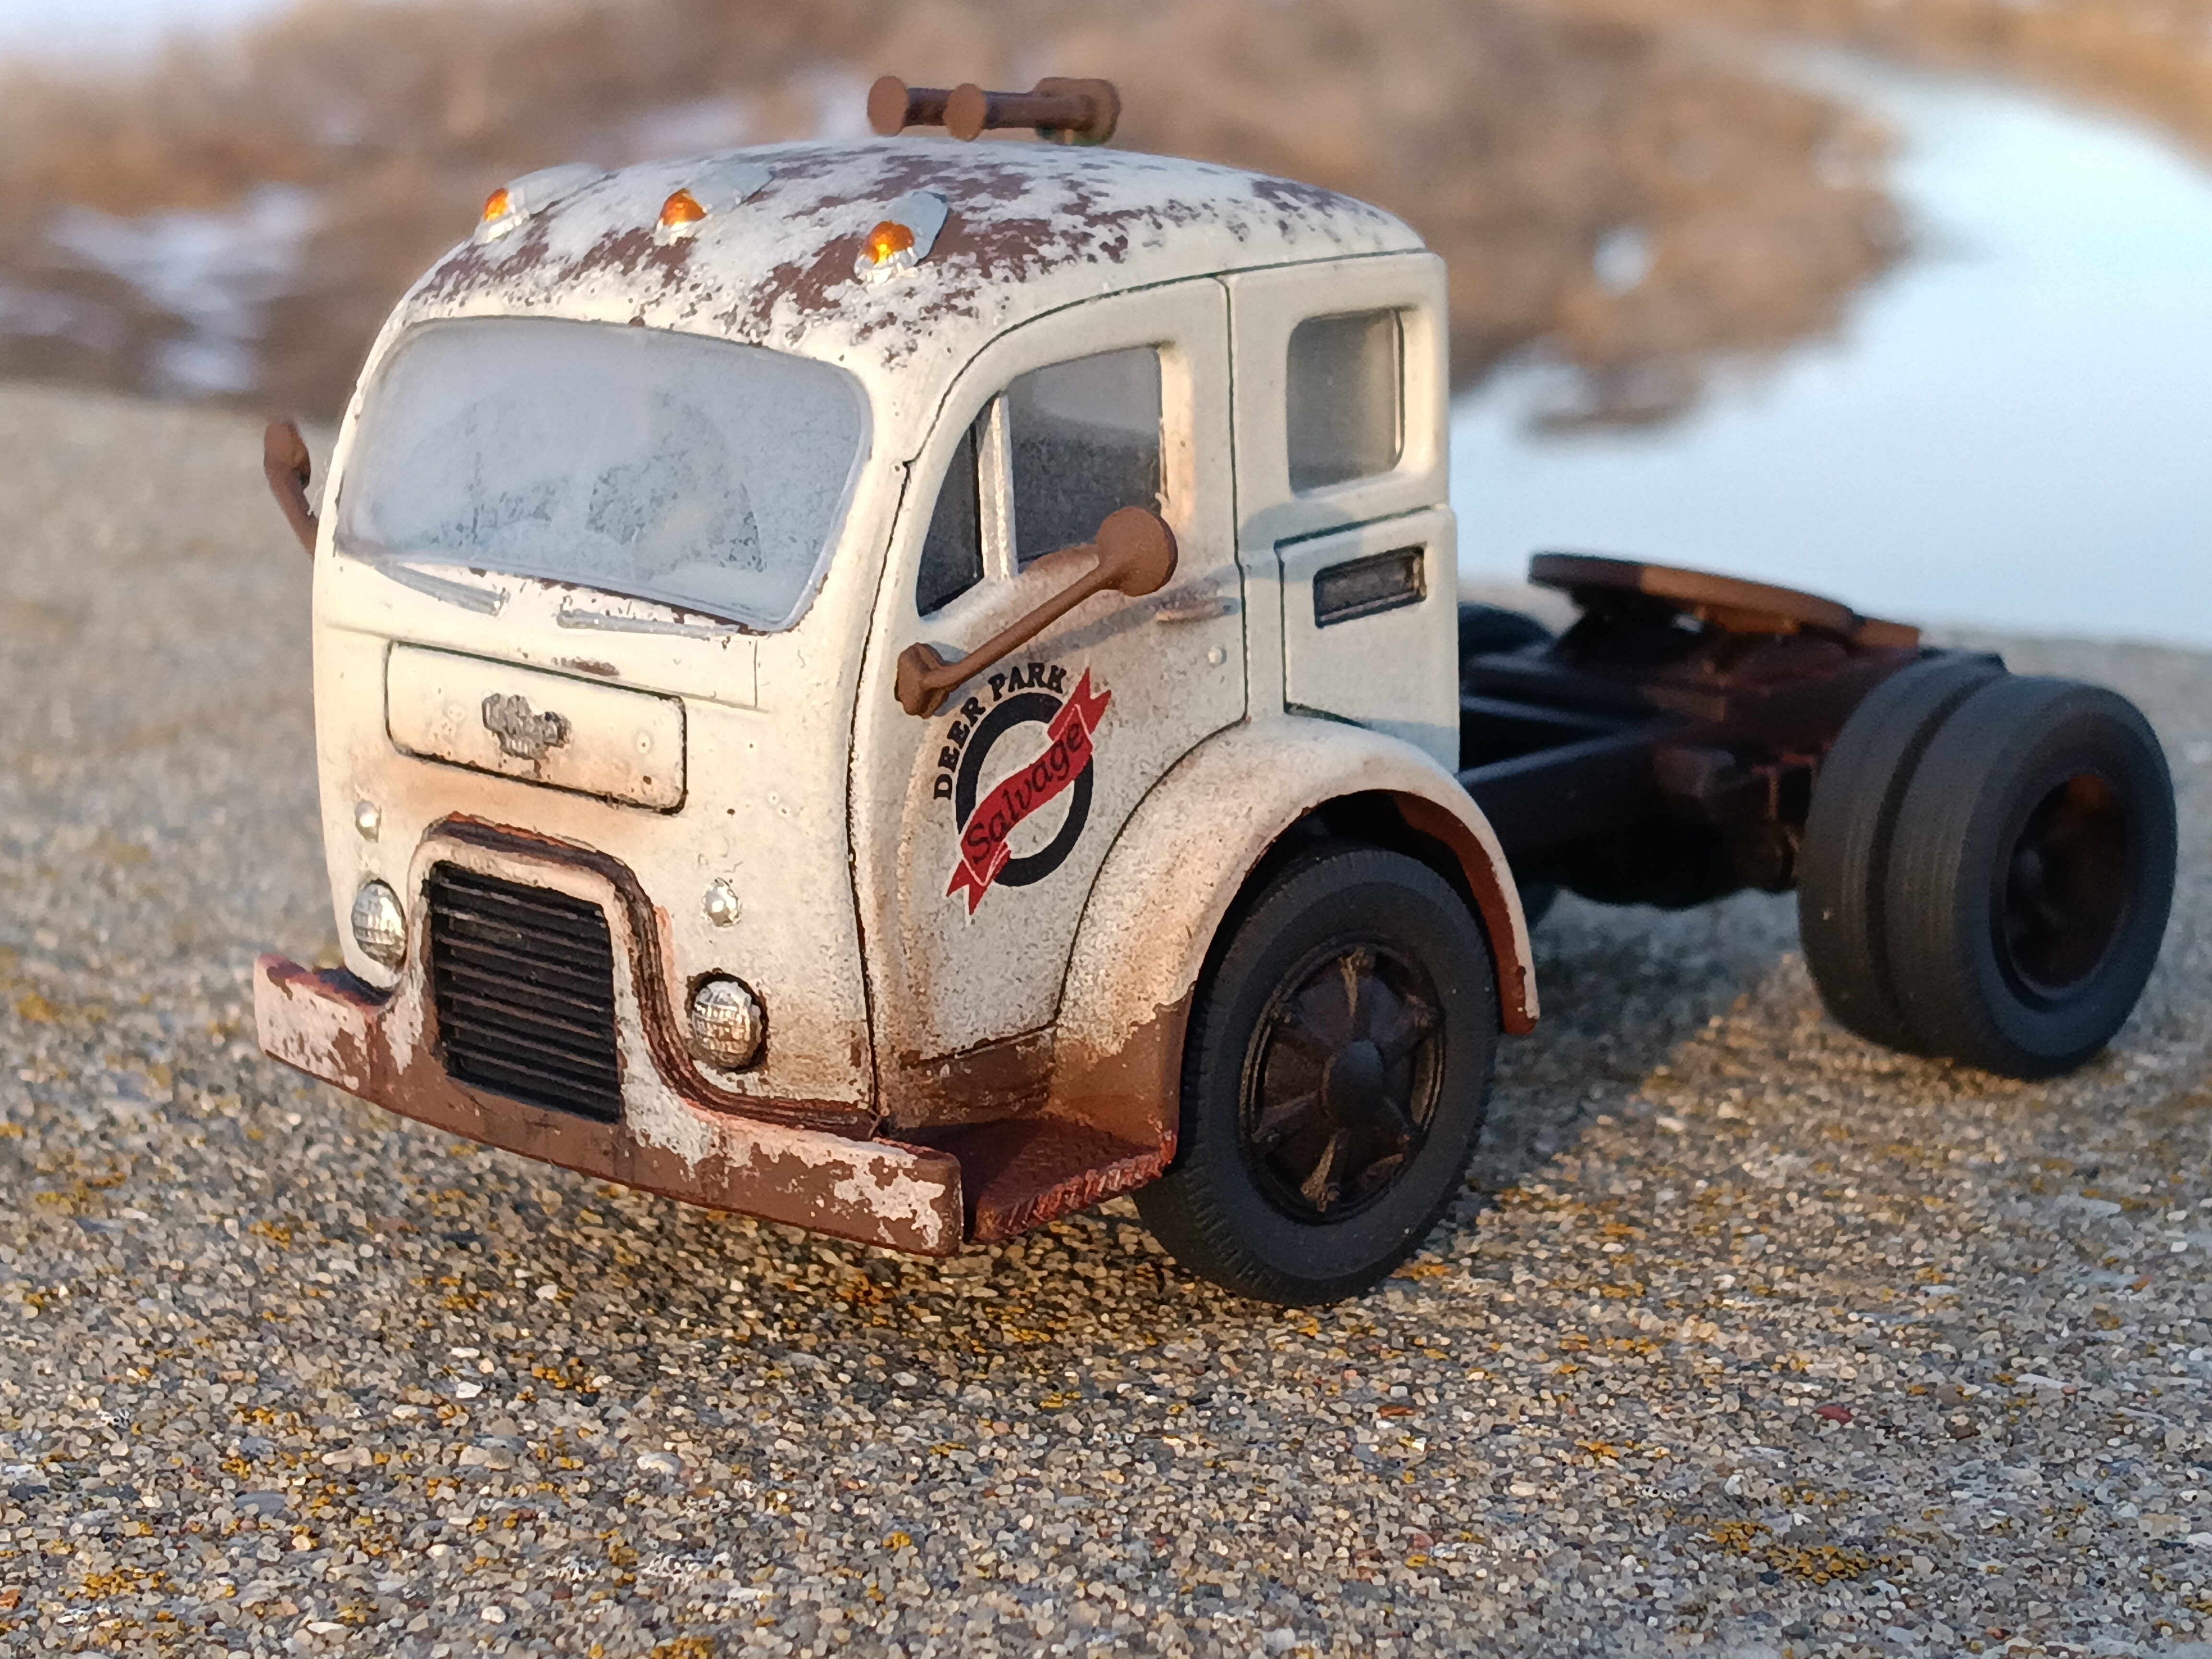
So I had an incomplete AMT plow truck, a box or two of spare Louisville parts, some AITM rear wheels and tires, and some Models by Dave cab steps. I decided to combine the whole mess into one tattered tractor. The quad headlights came from a White Road Boss, I added them after seeing a junkyard Louisville that had been fitted with a similar setup.


-
1
-
-
Lovely Autocar!
The Autocar Driver Cab (style we're all familiar with in the AMT kits) first came out in 1950. There are some design differences but that's the newer style cab with the curved glass.
-
1
-
-
Went with the entire Moebius front floats/super singles set. The battery boxes are in place and I went with the optional roo-bar front bumper.

-
2
-
-
Well... After the hood hinge snapped off (again), and the die cast chassis more or less exploded after being elbowed off the workbench, a slight change of course. It'll be curbside and set up on a spare White Western Star chassis.
The kit battery boxes were glued together side by side and fitted with step plates from a GMC General.
Still trying out ideas for the tank. Not sure what wheels and tires I will use in the end, but the Moebius front floats are likely to stay. May go with the matching super singles in back. We'll see.
Just a quick mockup shot.

-
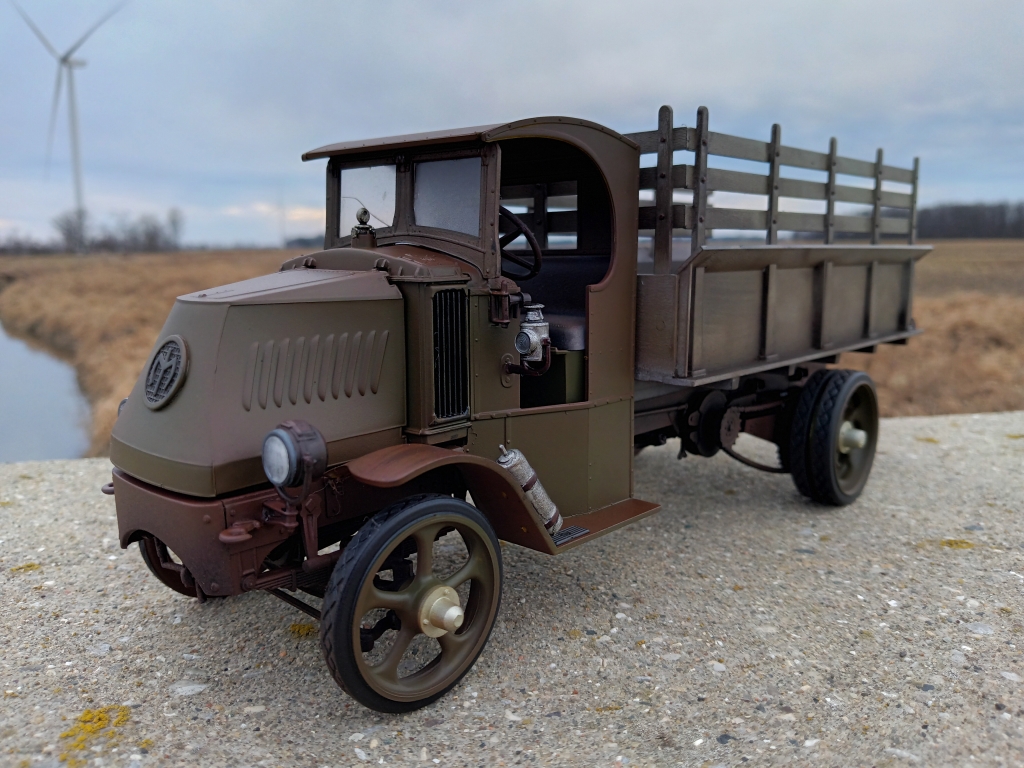
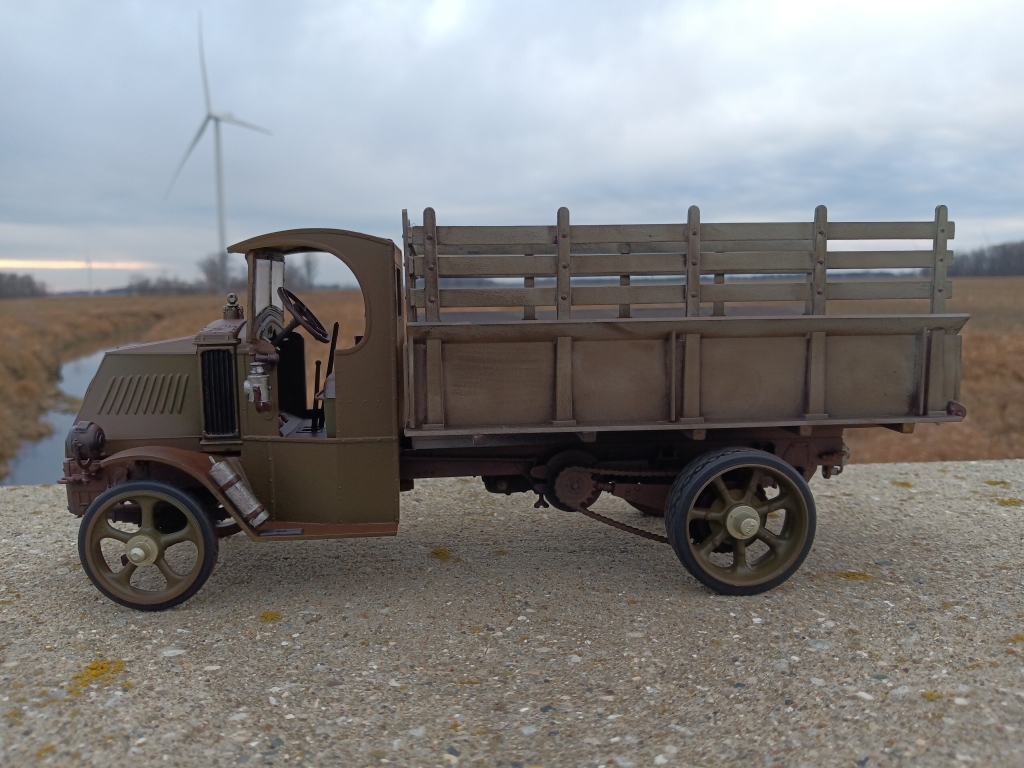
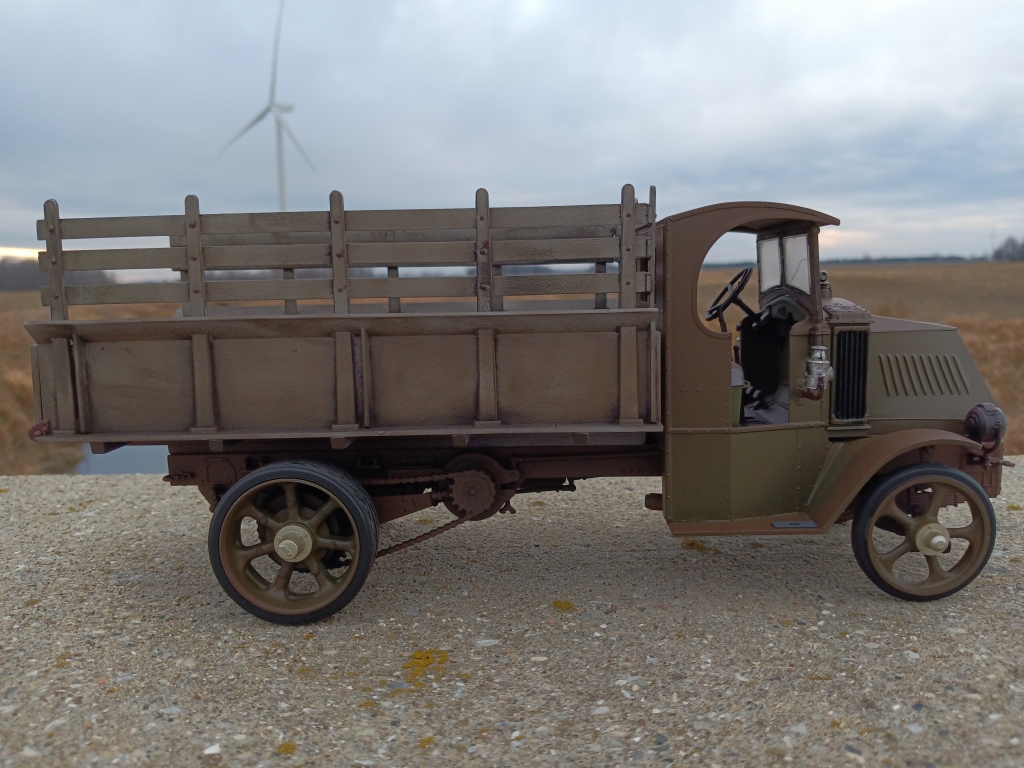
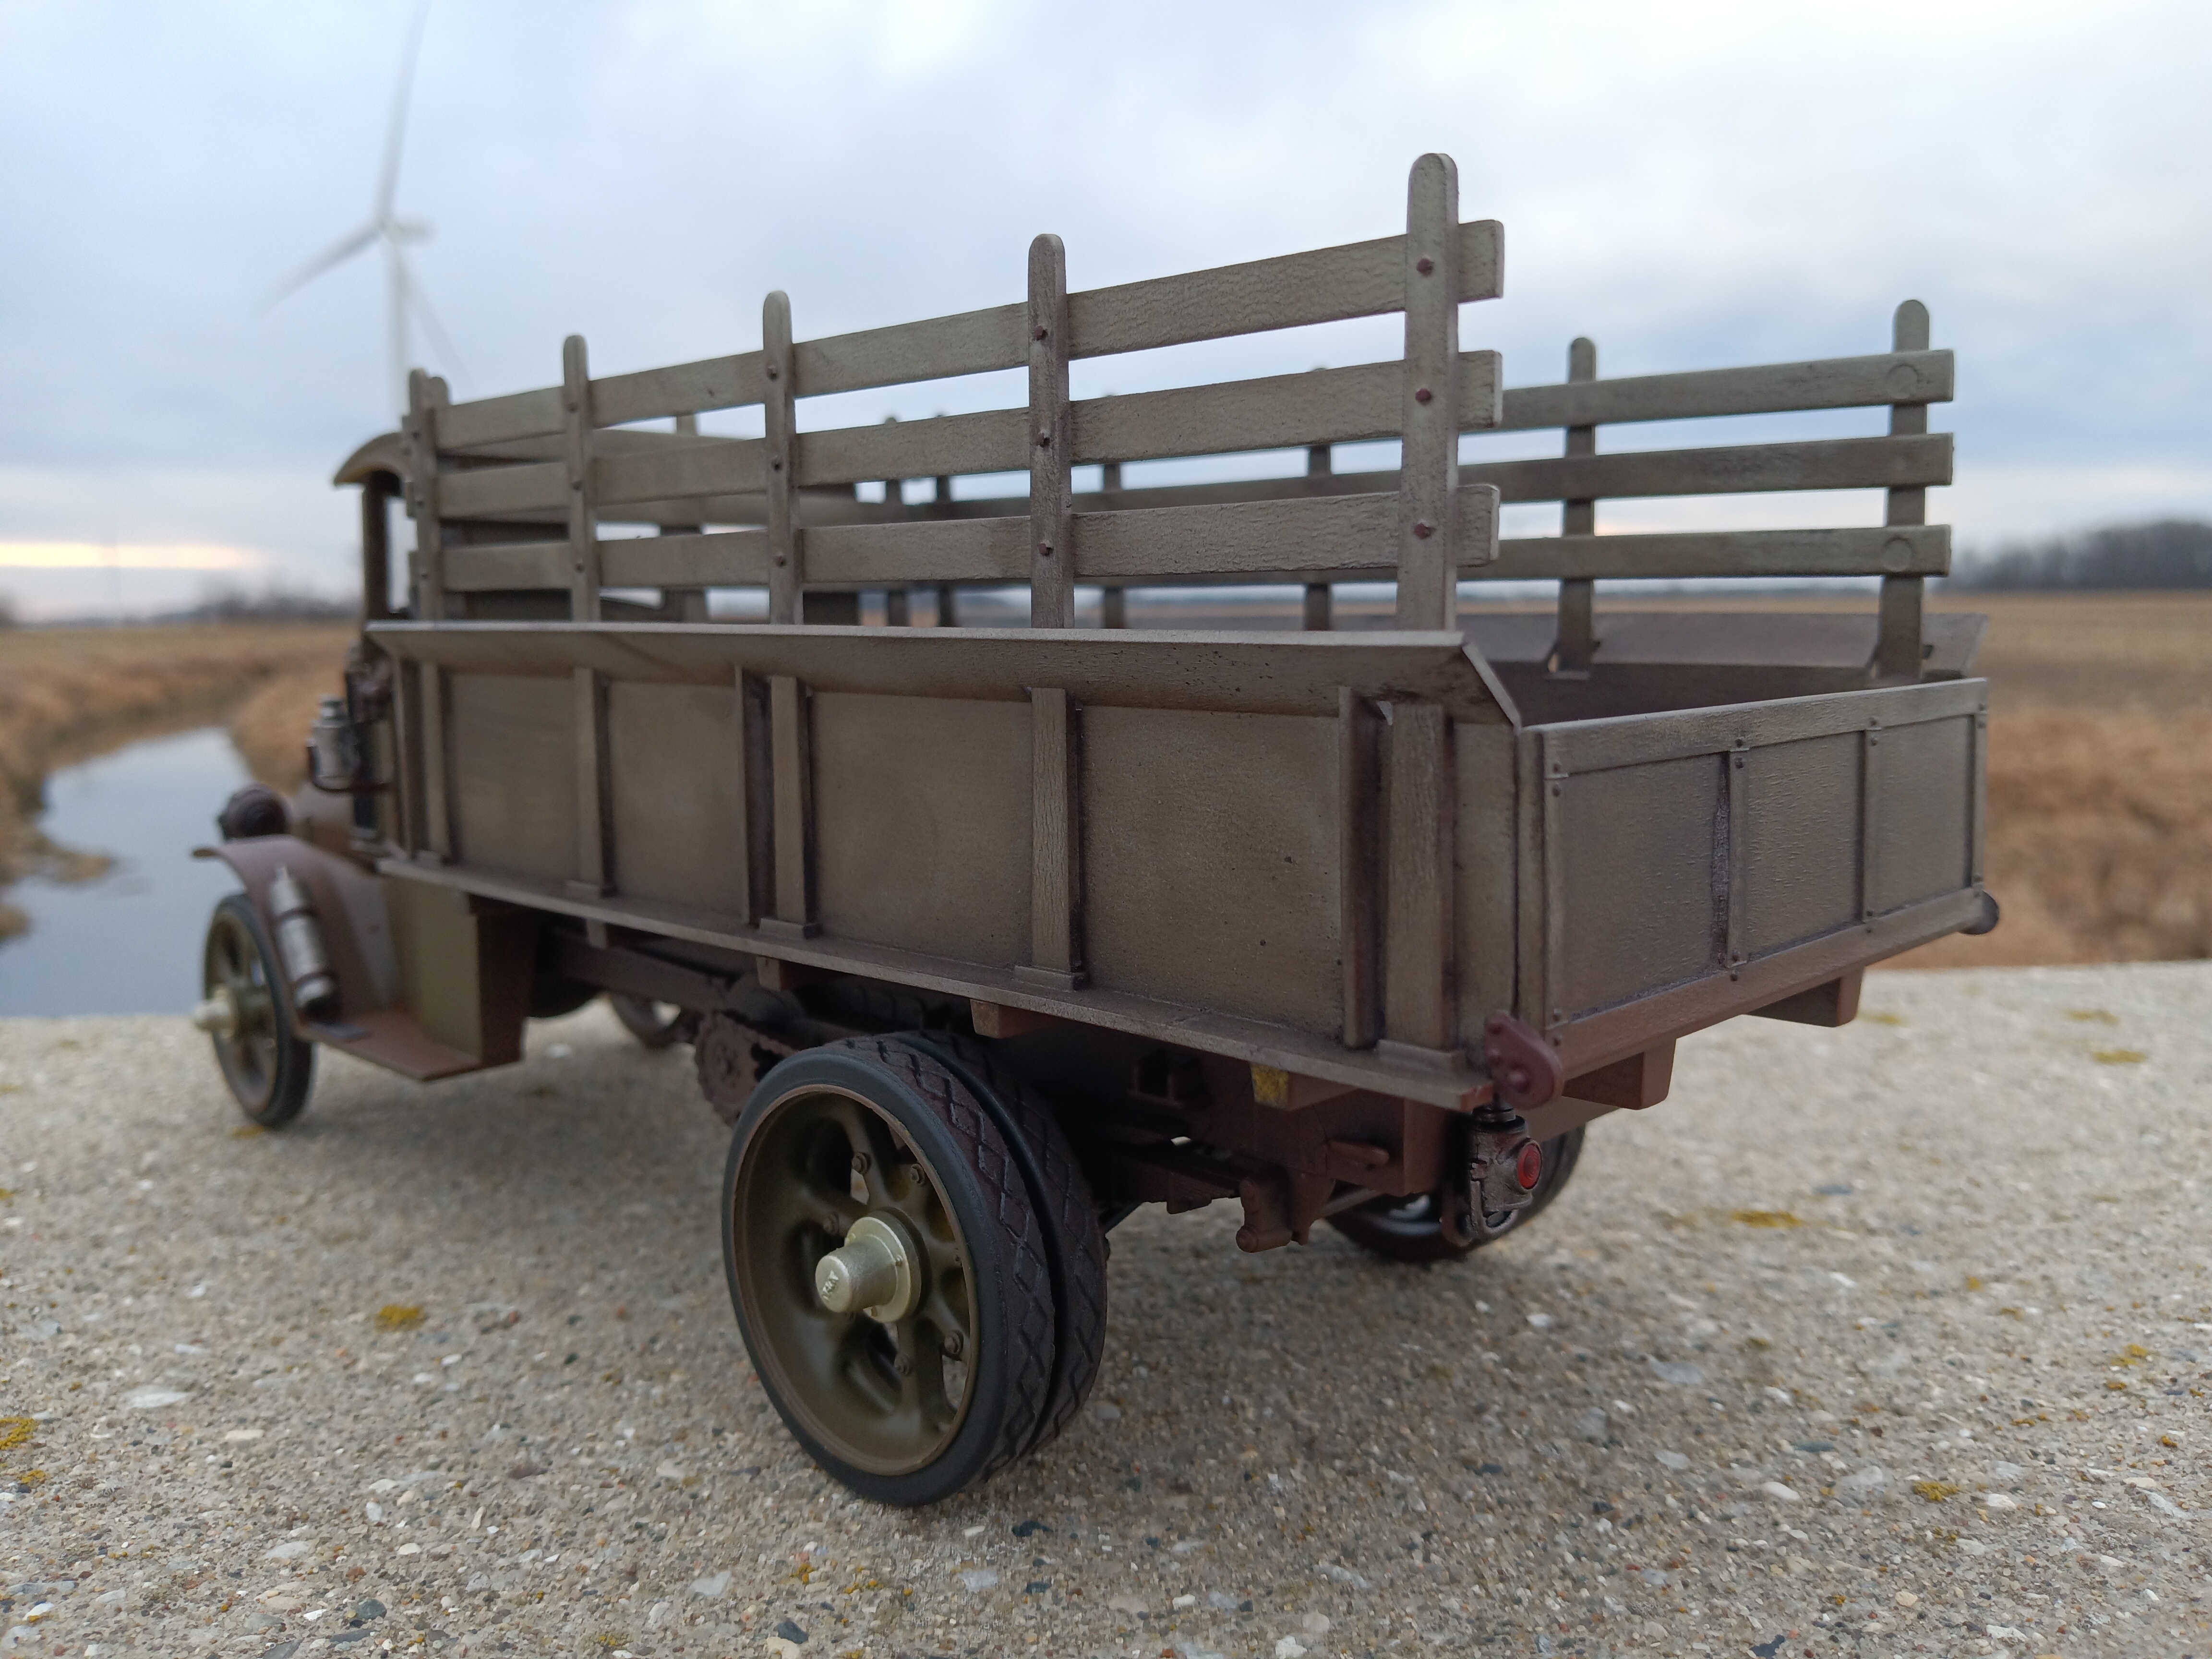
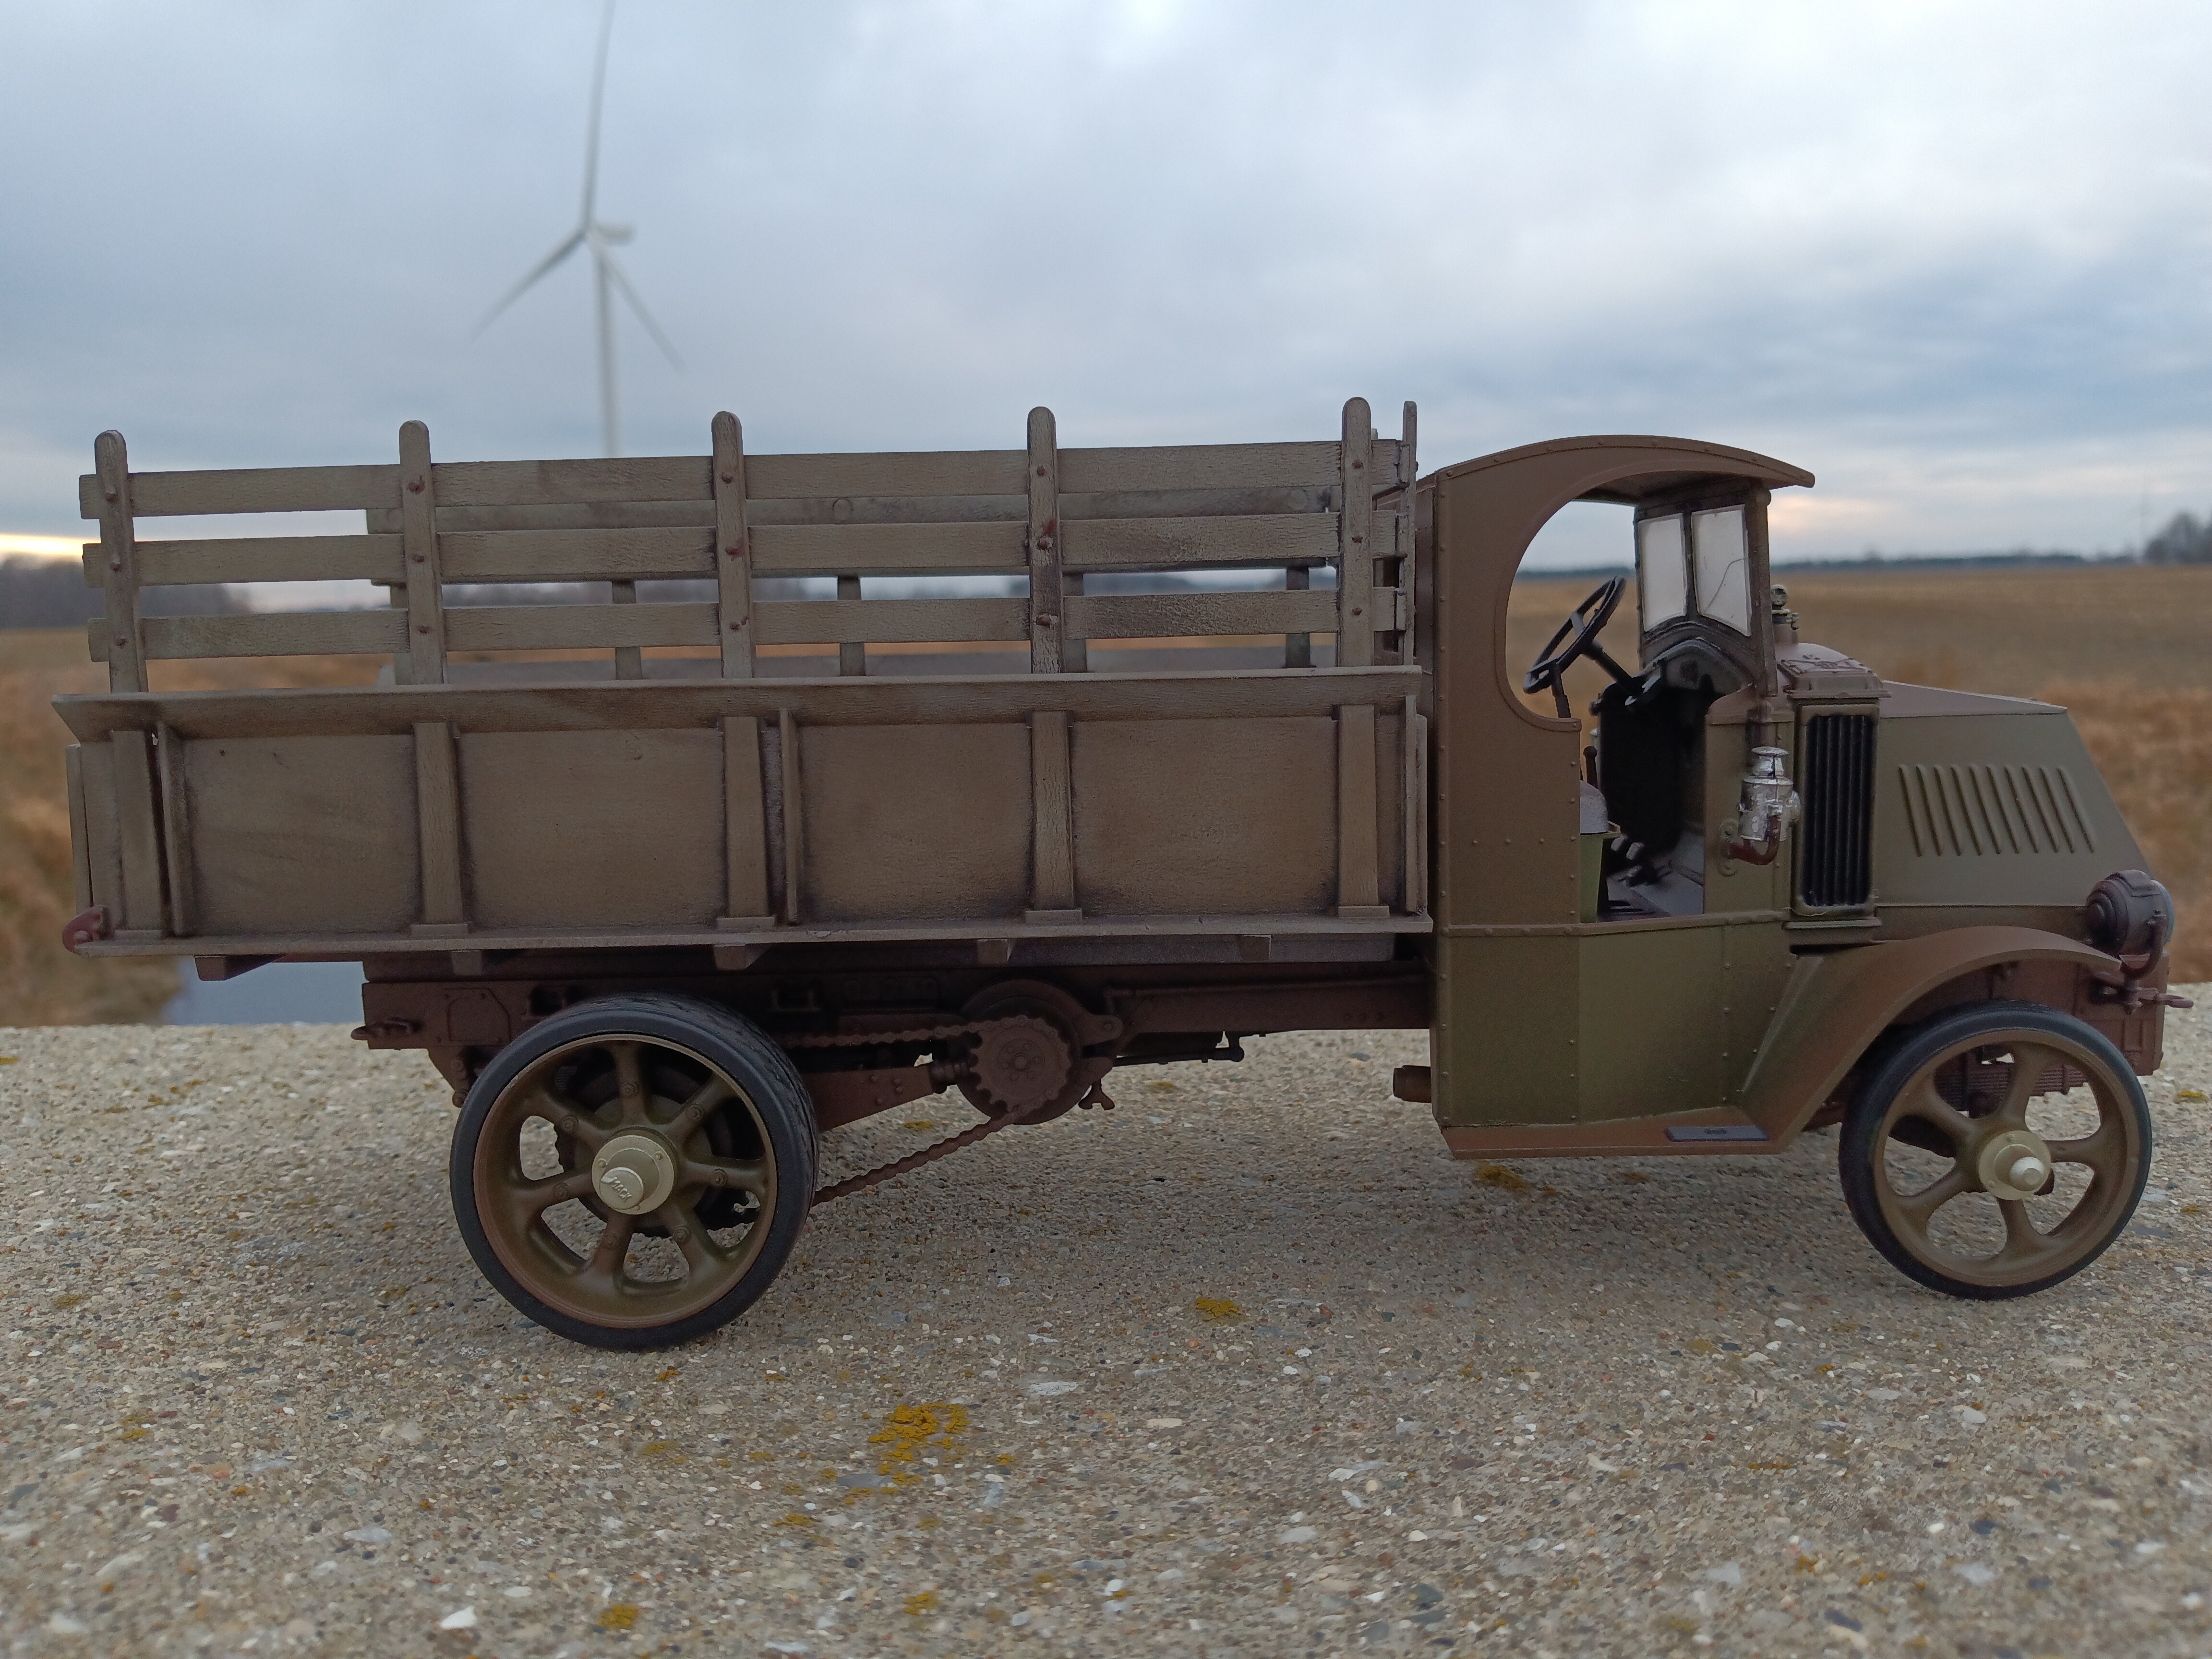
This is an original T596 kit that I bought a couple of years ago. I just love that old rigid plastic. 😁 The hardened vinyl tires I could do without but hey ... That's the tradeoff I guess.
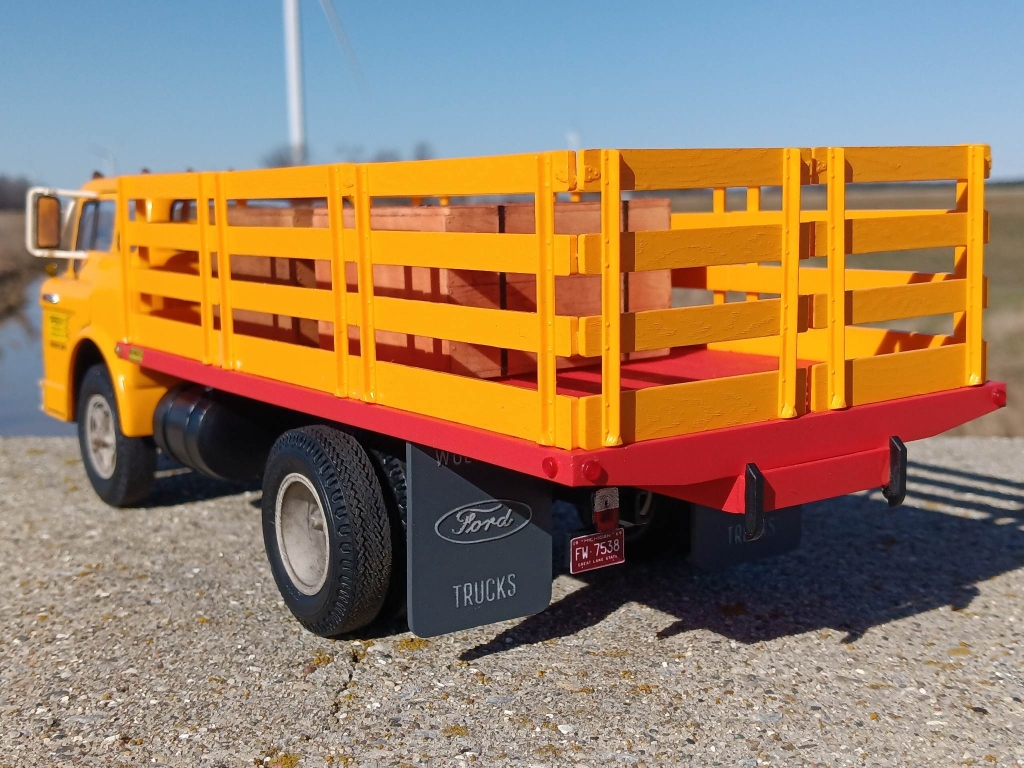
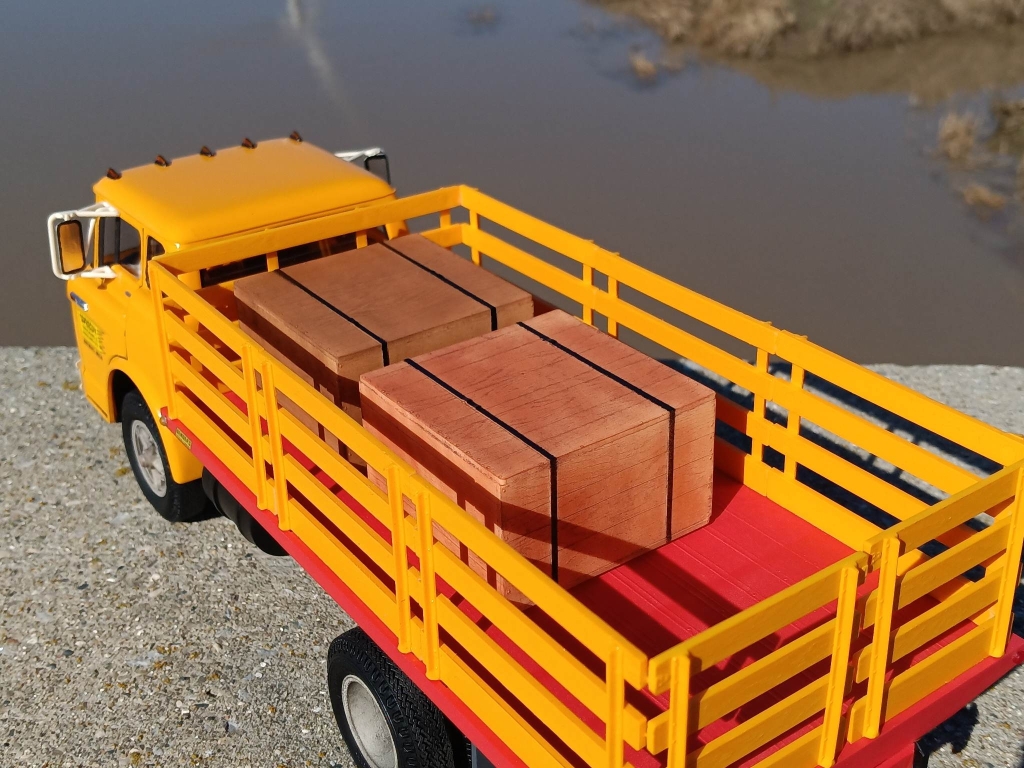
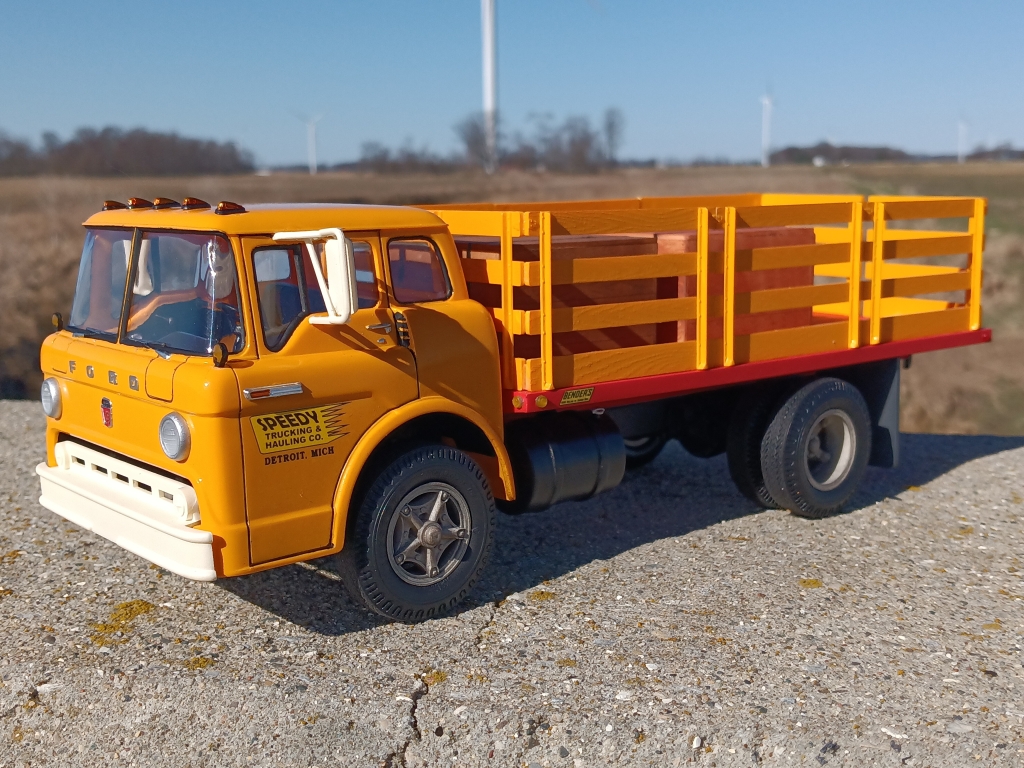
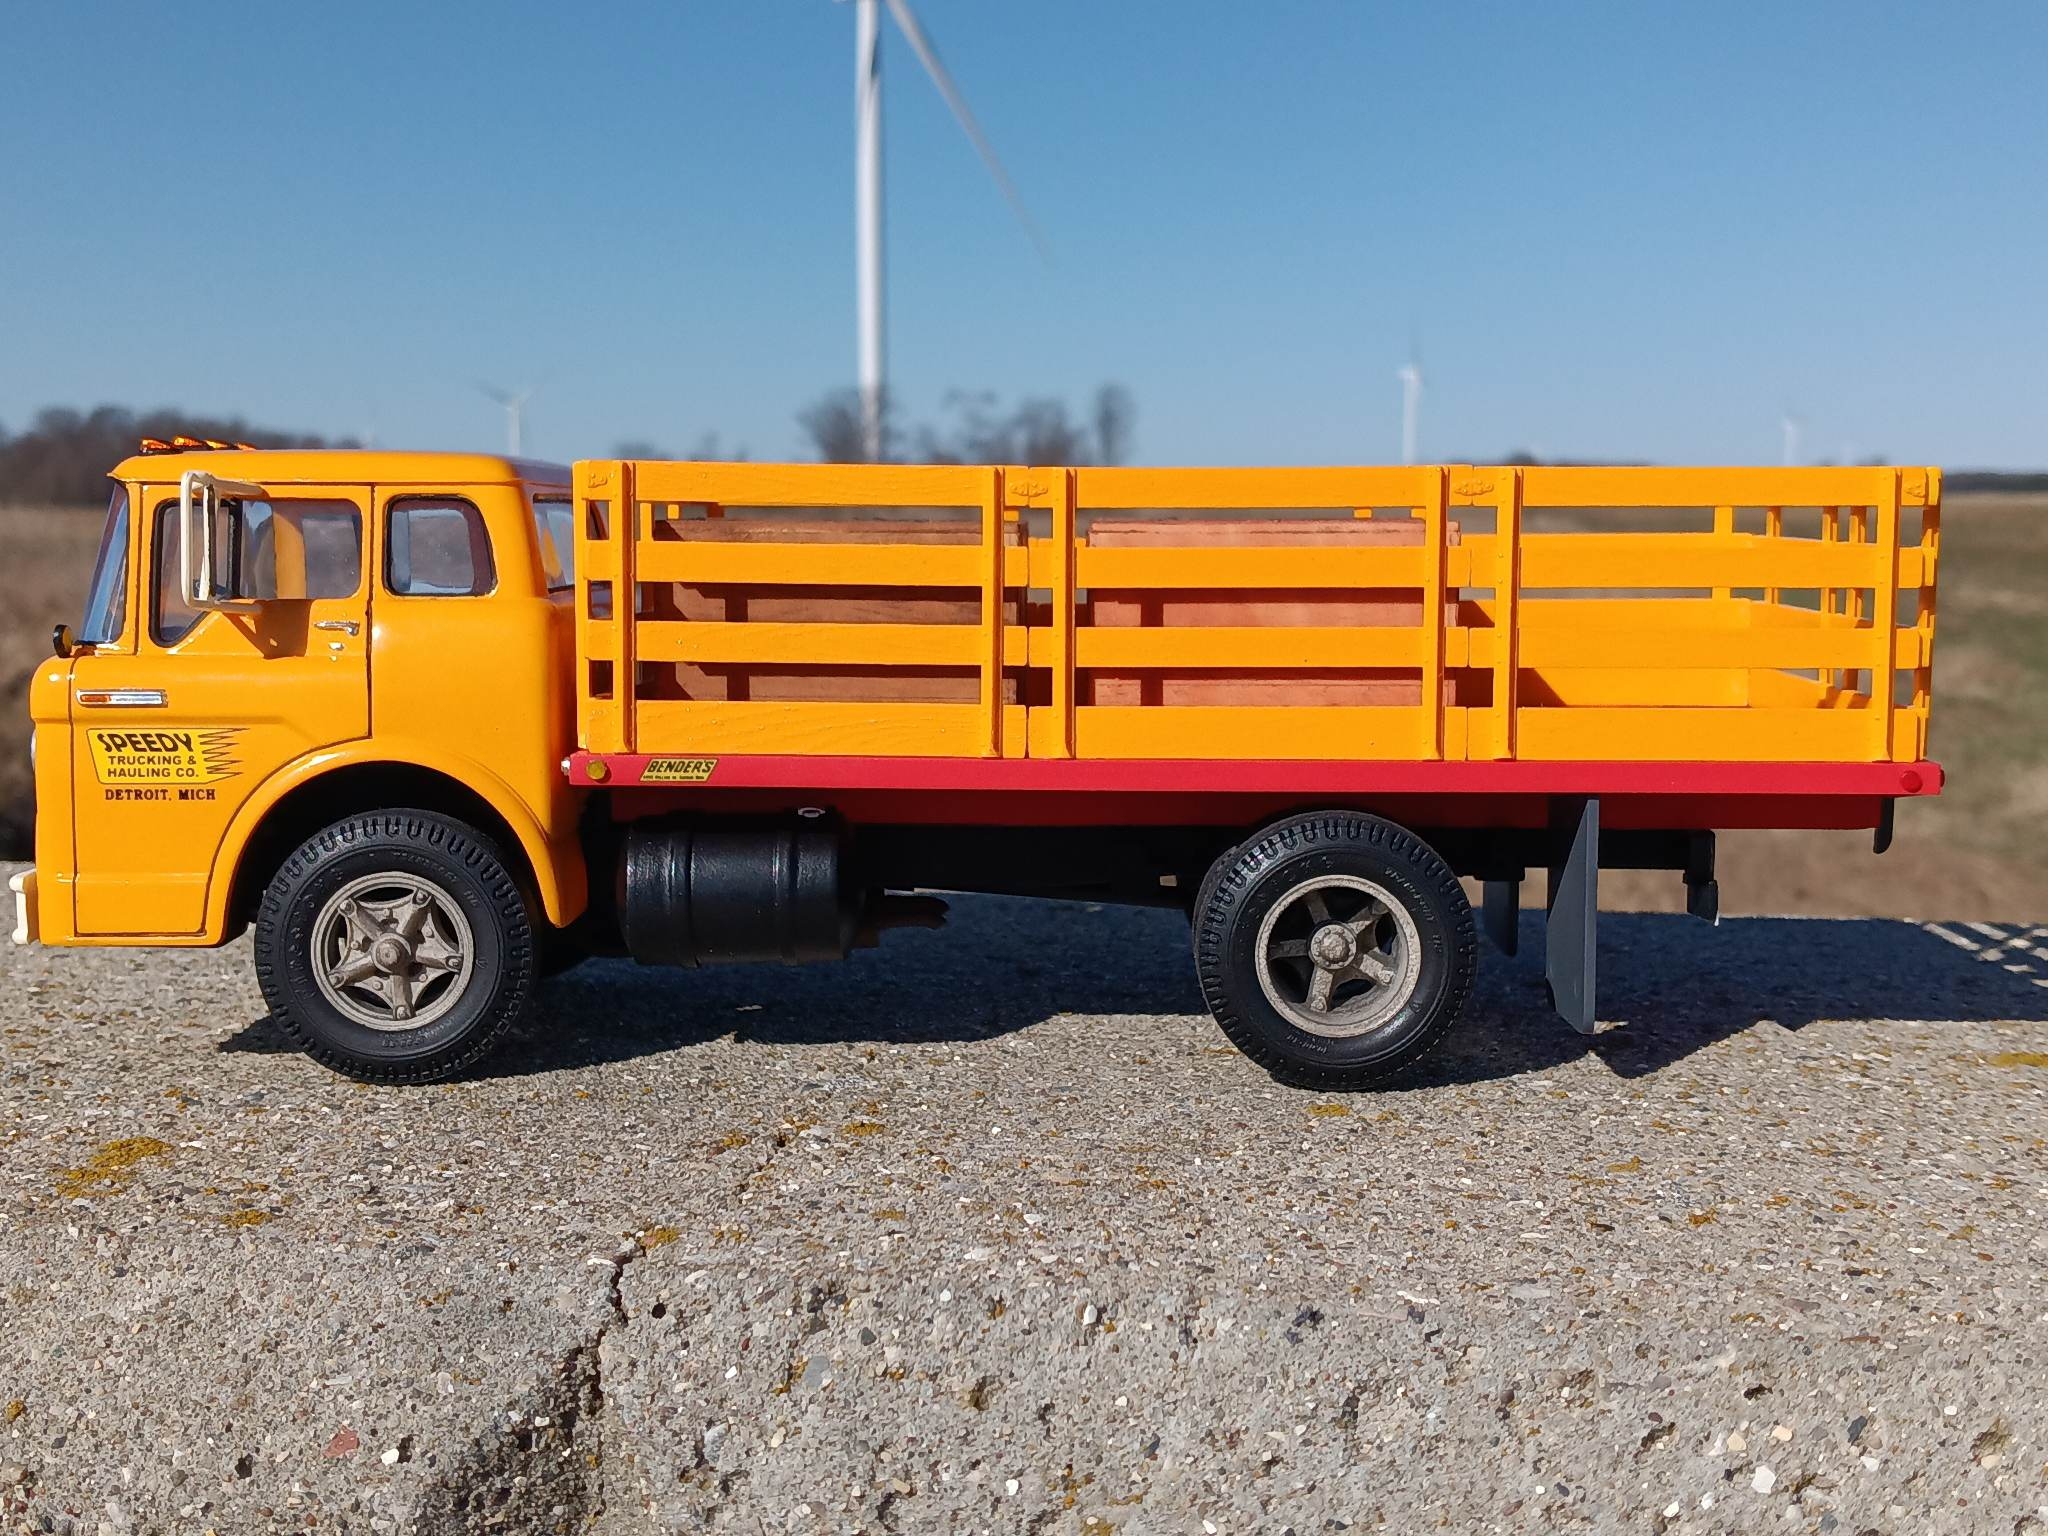
Inspired by the box art I used that and a Purple Wave auction listing for a 1969 C700 as my guide. The paint is Tamiya Camel Yellow overall, with the bed finished in Krylon Scarlet. The chrome was stripped (no thick nasty undercoat in 1971... Another plus for the old kits) and refinished in Krylon Colonial Ivory, which is a decent match for aged Ford Oxford White. The Speedy decals are from Gofer Racing, I changed the location from Chicago to Detroit with a section of old Fred Cady graphics. Wheels and underside were lightly weathered.
The box art showed the door emblem above the character line, 1968-1970 style, while the actual cab has it below, 1971-1990 style. I sanded off the original emblem and replaced it with the Moebius 1967-1972 F100 hood emblem. There's a "bonus" set of these in the 65 and 66 kits. Speaking of, I modified a 65 F100 bench seat to use here.
The crates were painted Tamiya Flat Flesh and dusted with weathering powder.


-
1
-
-
More like McDirty, am I right? No? No. Okay... I'll show myself out, then...
🤣
-
1
-
 1
1
-
-
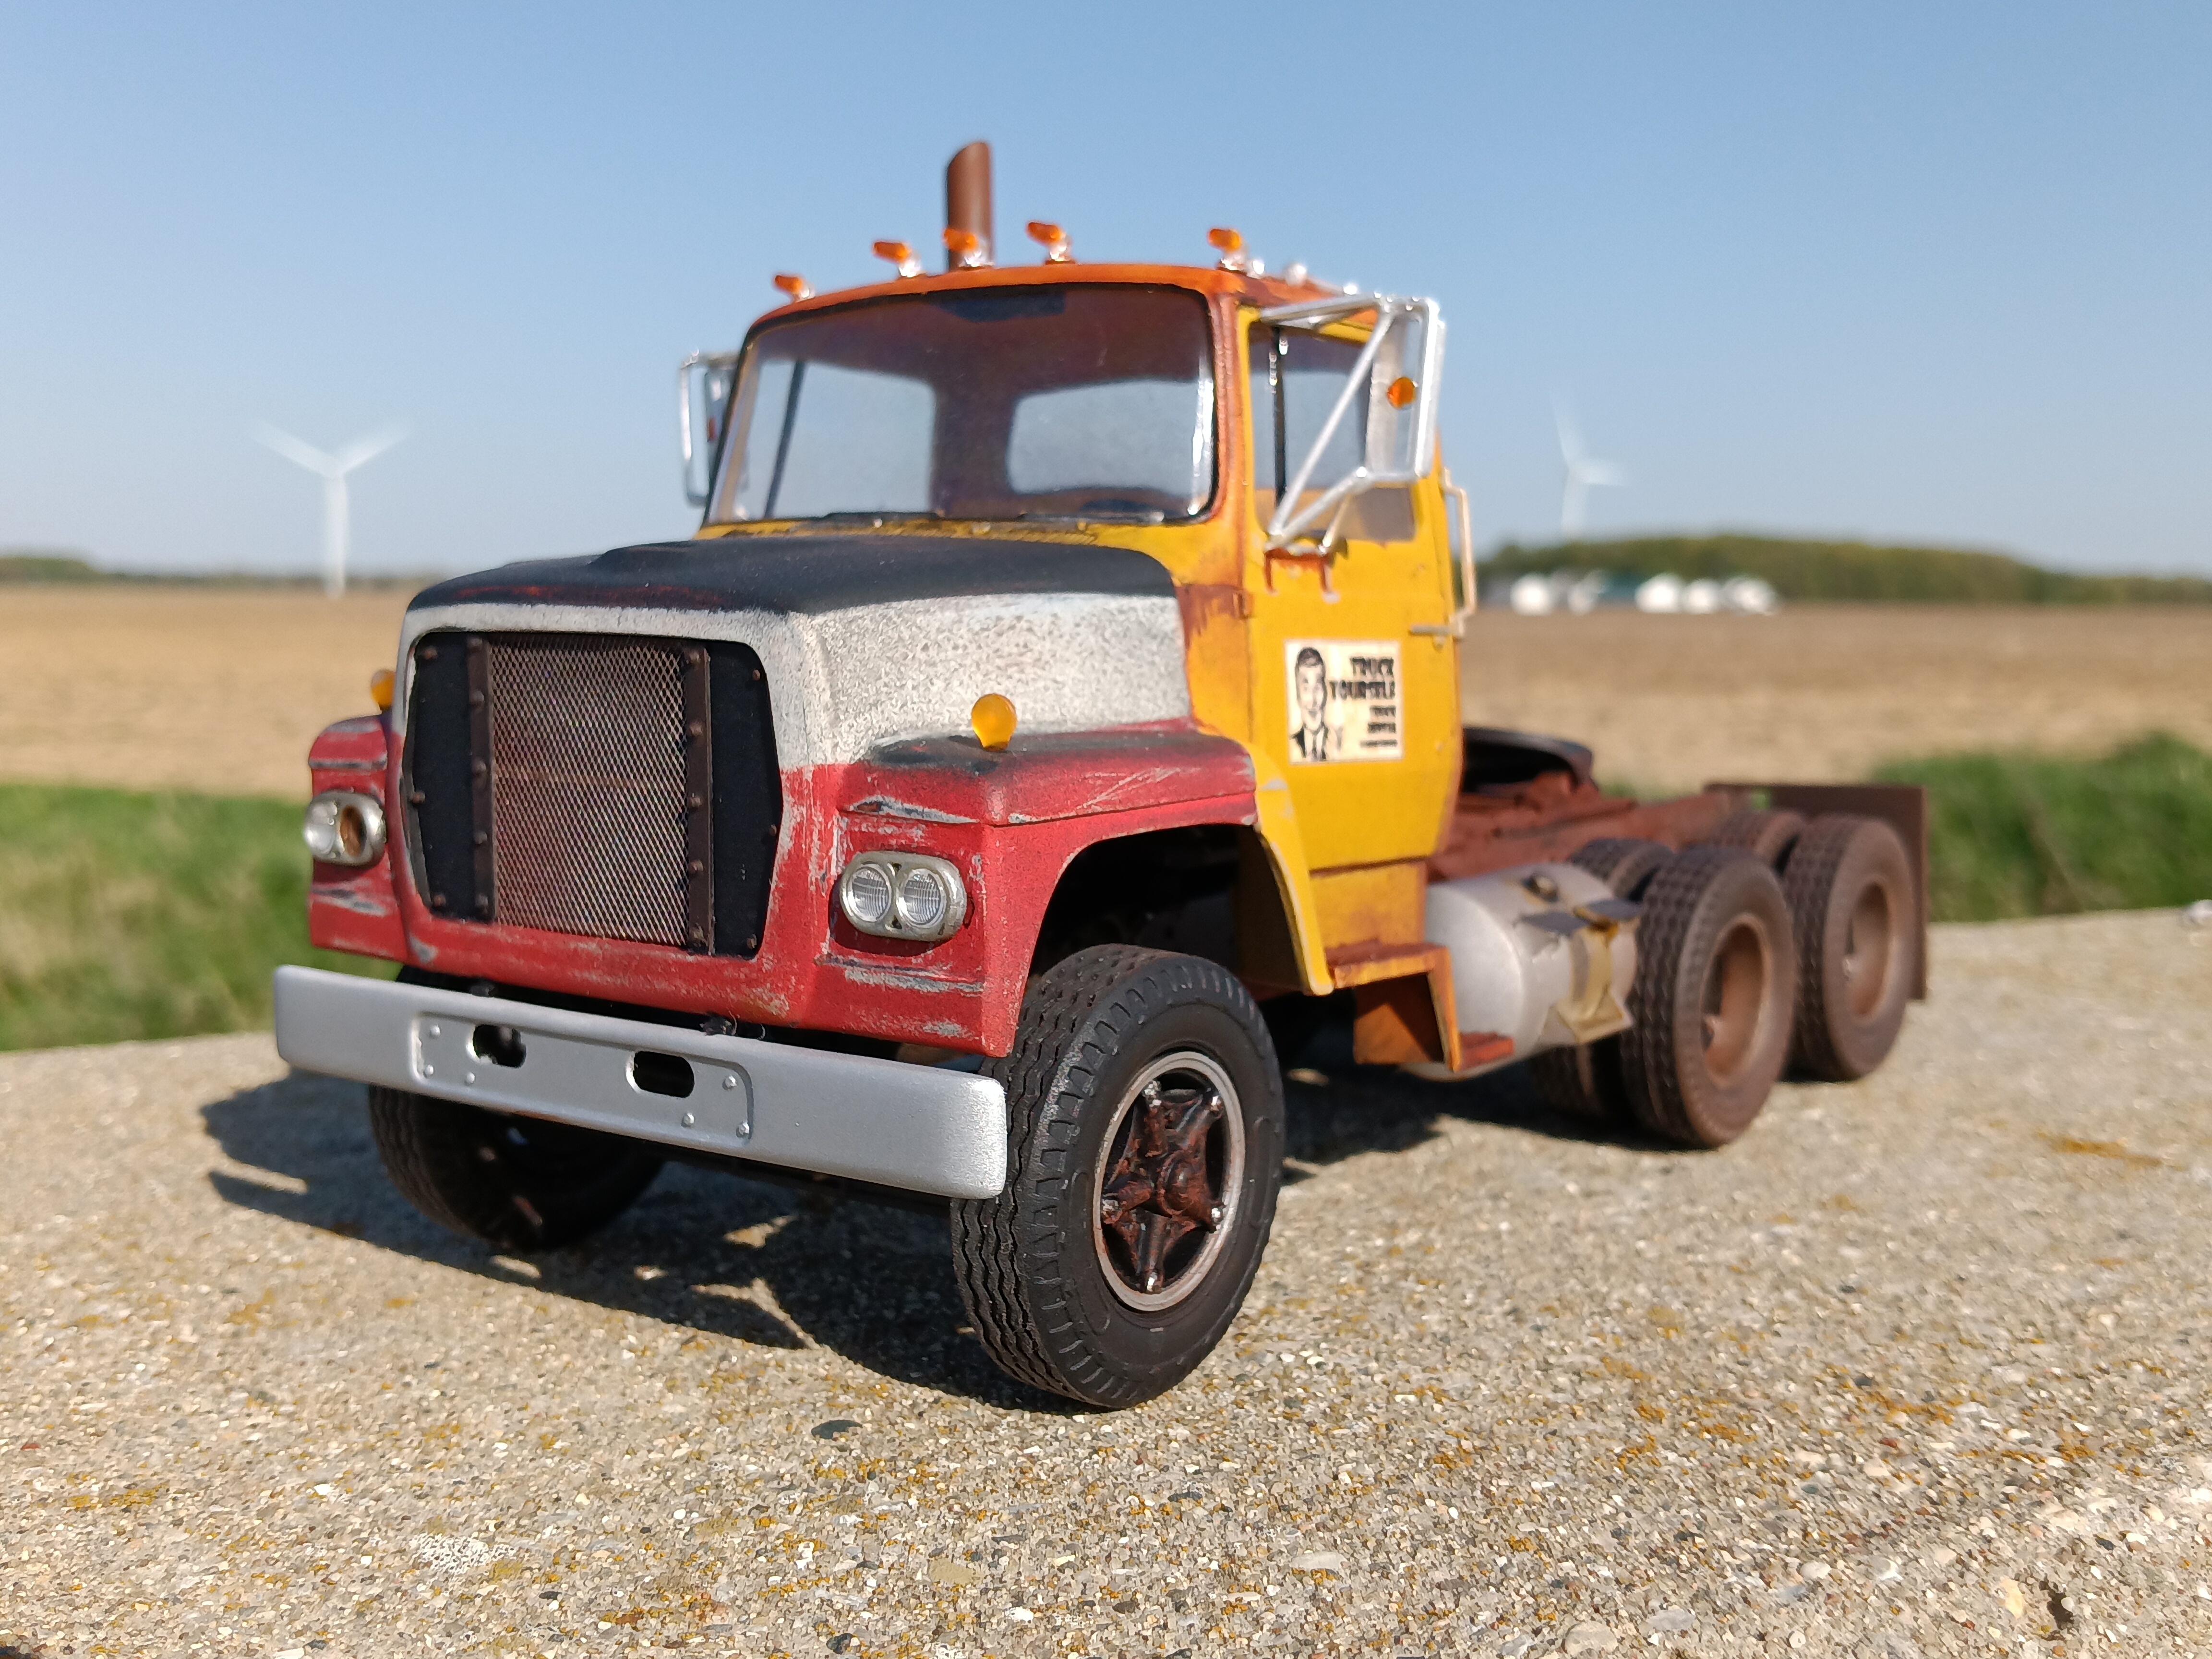
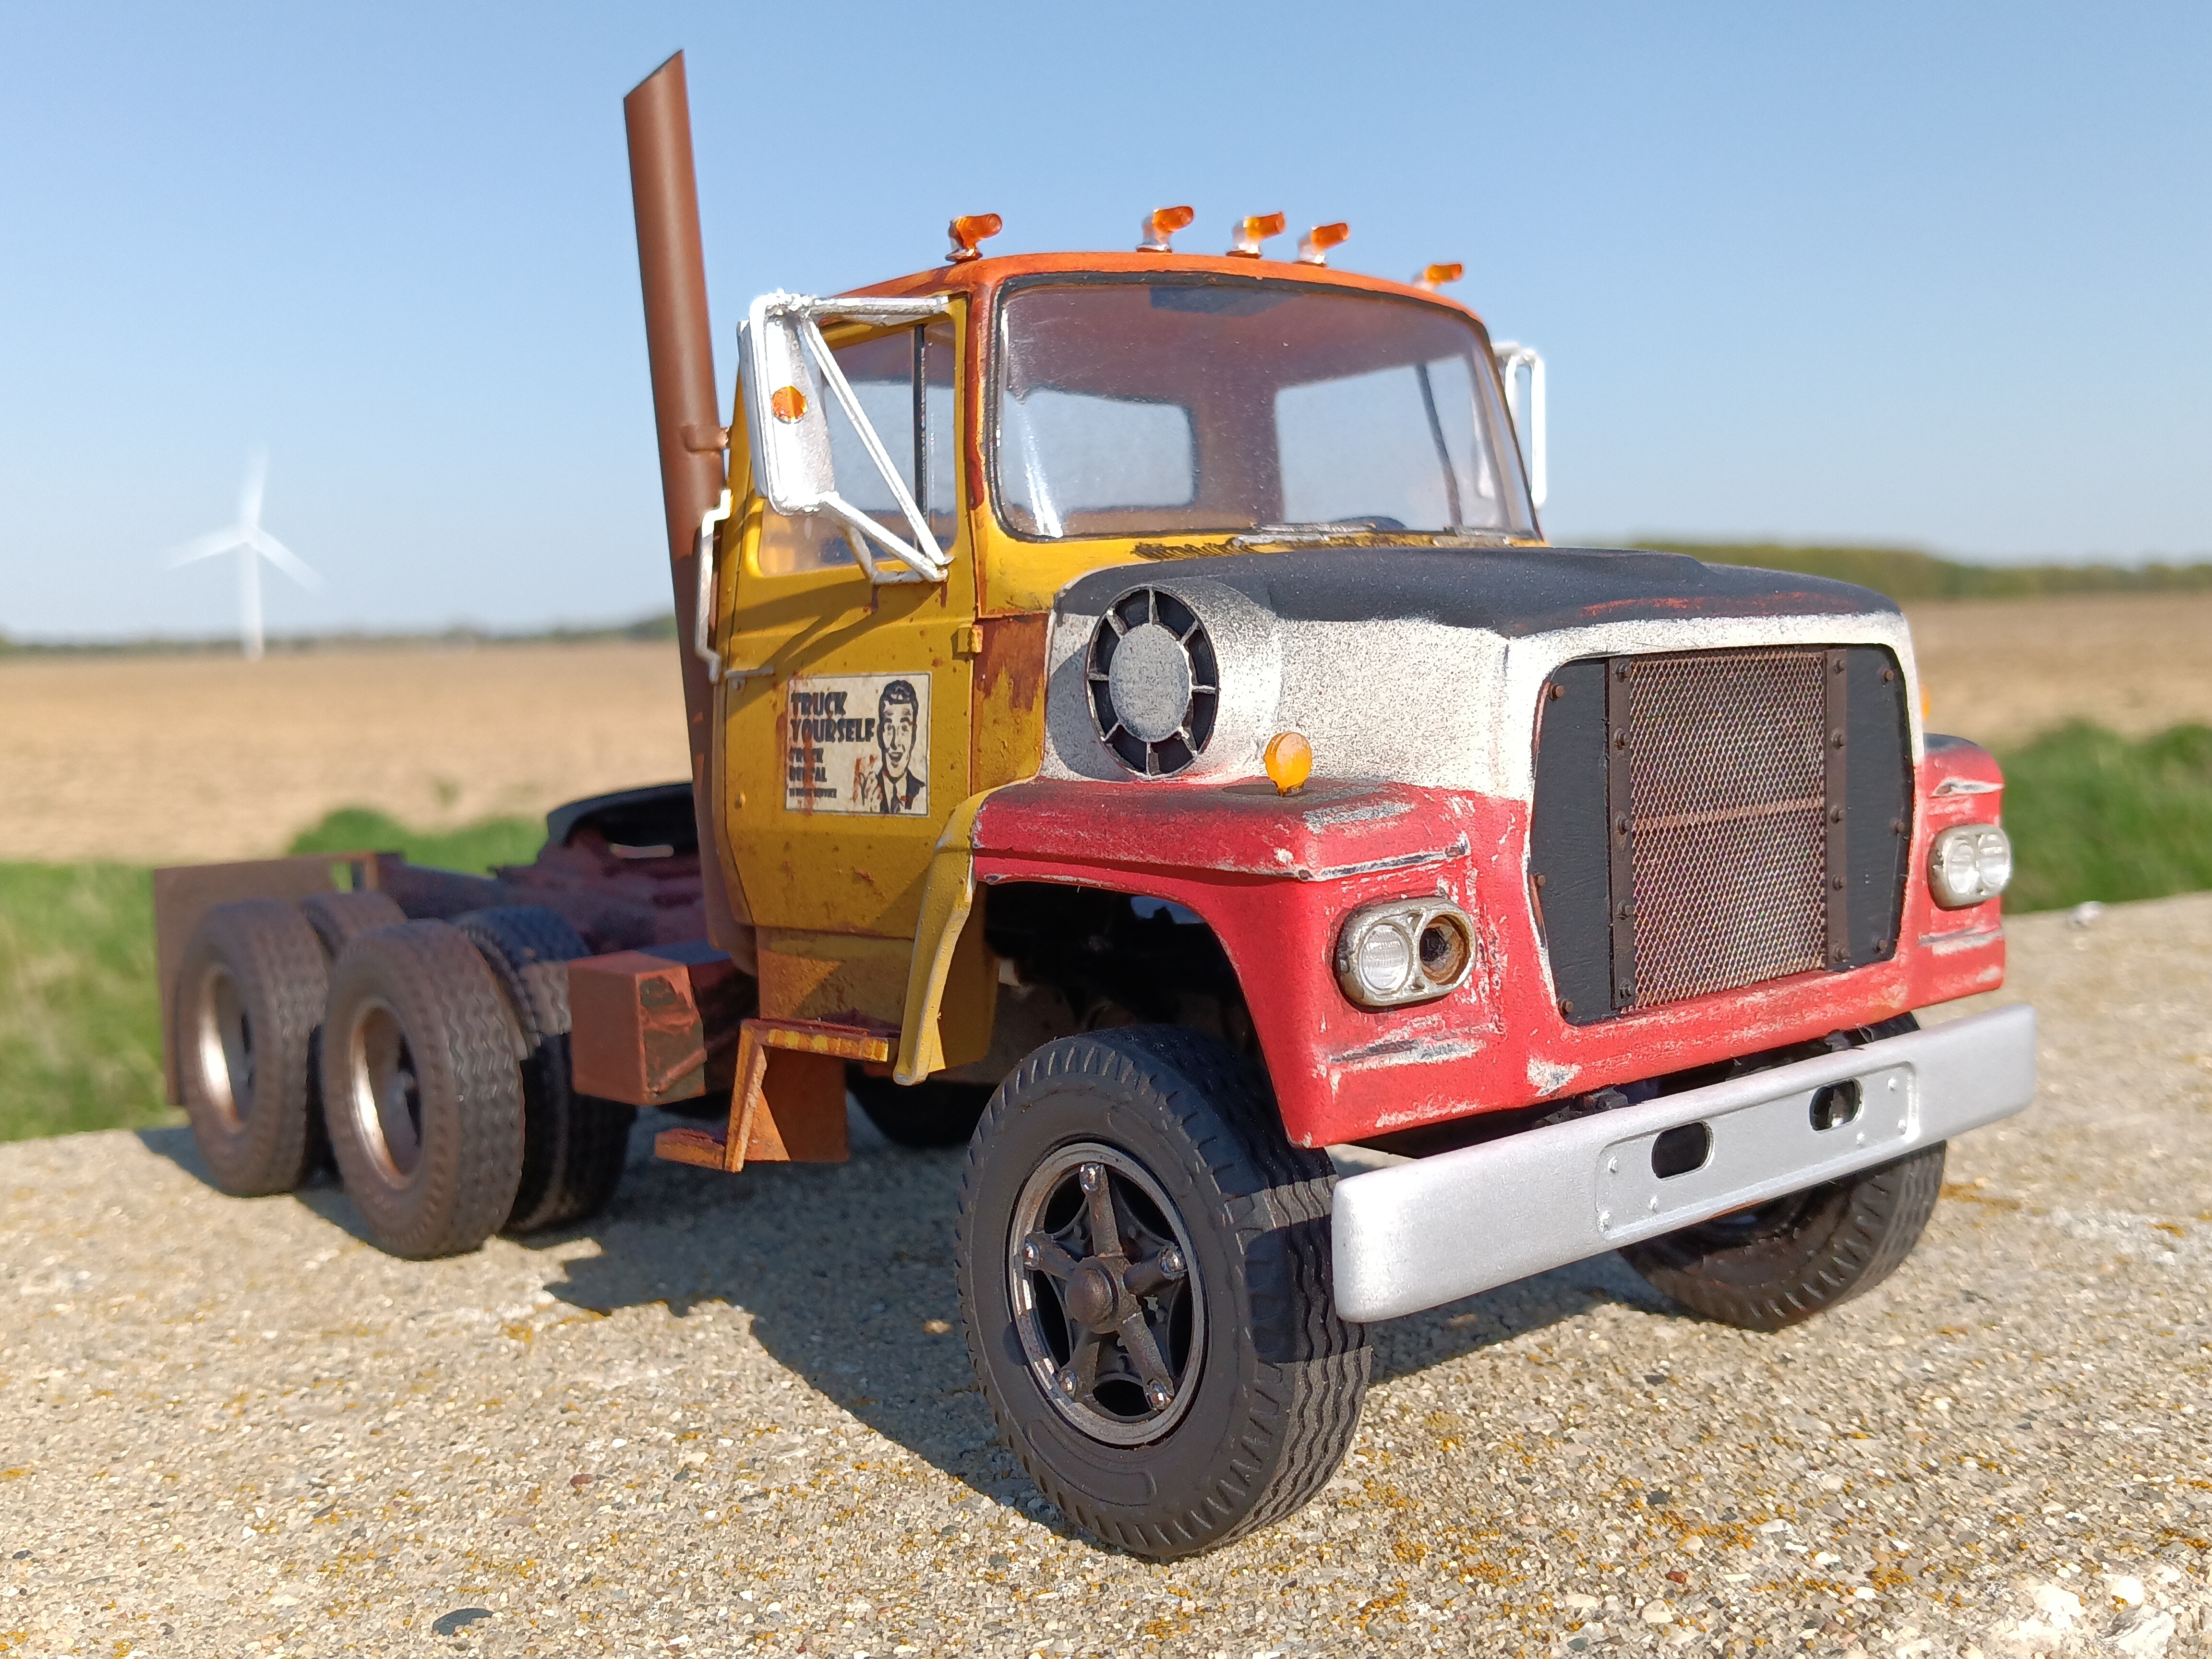
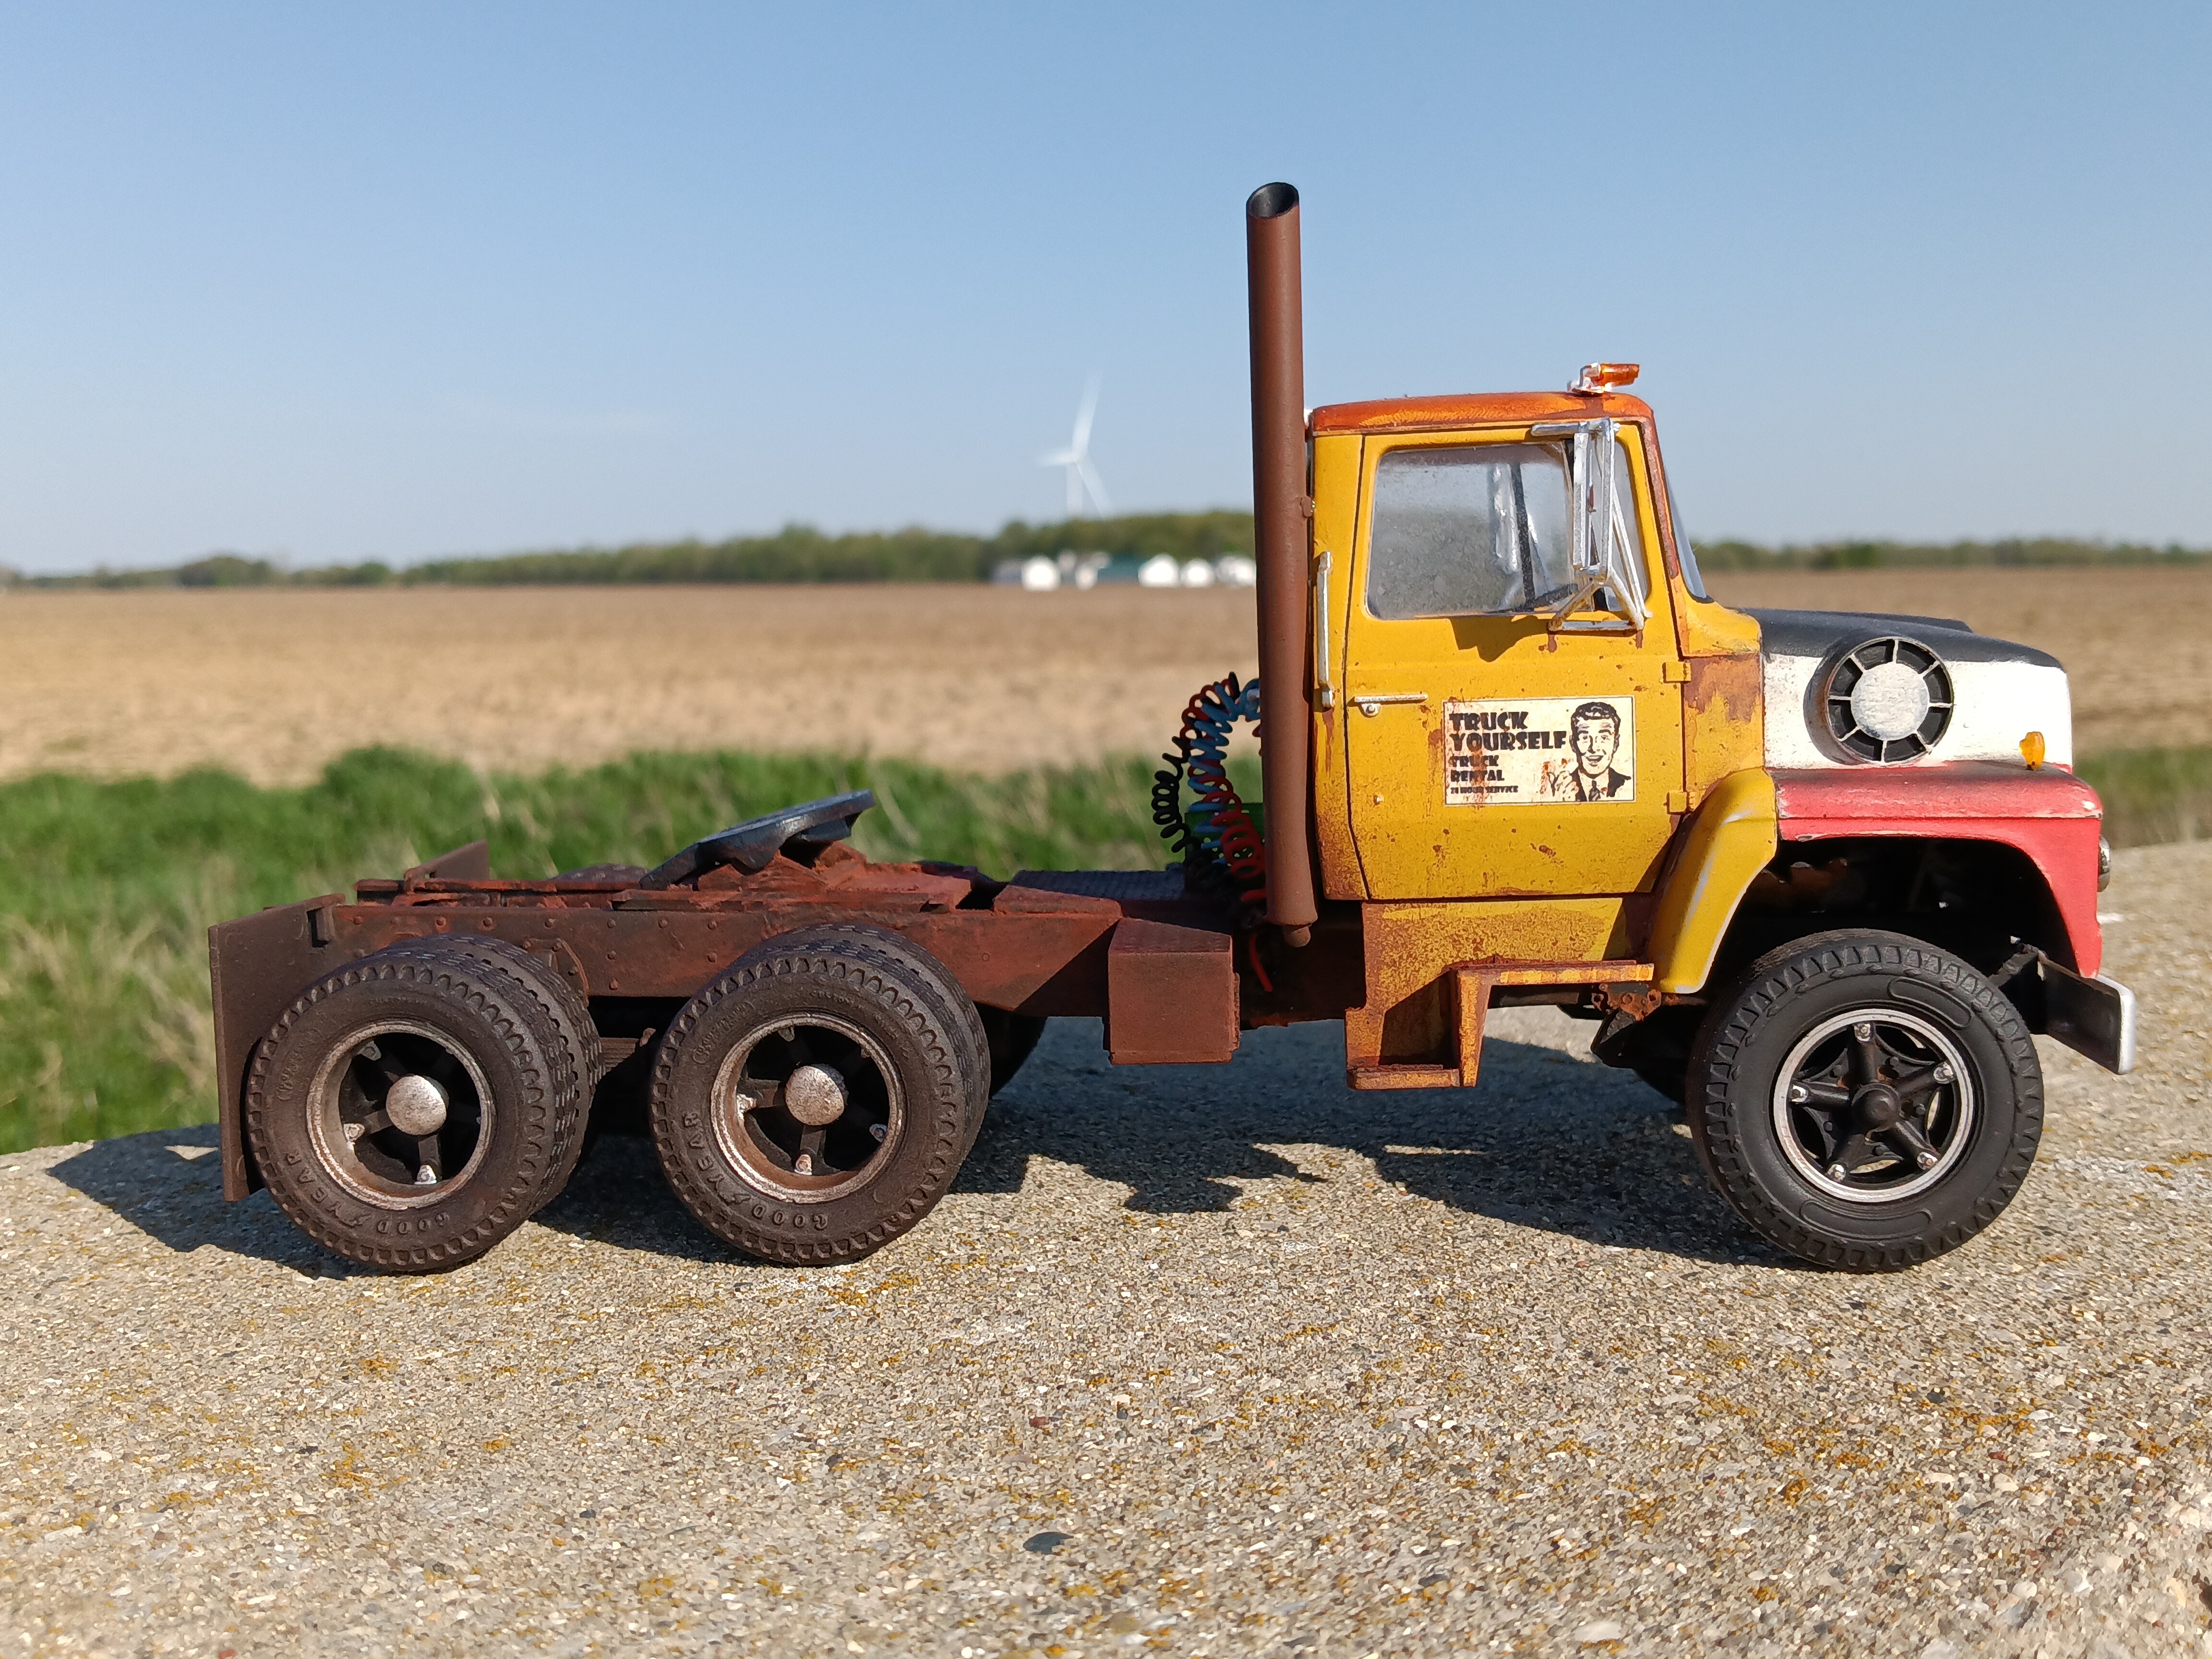
Very minor update, but here we go.
The engine is assembled and installed. I just went with primer gray and an oily wash, with Tamiya Linoleum Deck Brown on the exhaust manifold and turbo inlet to simulate rust. As you can see the engine is more or less completely hidden once the cab and everything is on, so I didn't go crazy with the details there. Add steering box to the list of missing parts. If I can't find anything suitable in the spares pile it shouldn't be much of a chore to fabricate something. For now the chassis is just flat black. It will be weathered as the project inches along.

The grille needed a broken hinge repaired. Once that was done foil was added and the whole thing was coated in Tamiya Rubber Black. Once dry, the paint was scraped off the foil with a toothpick. The lettering was done with brushed Tamiya acrylic.

-
1
-
-
About the crooked lettering... I actually got them fairly straight the first time but for some reason that bothered me given the "hastily resprayed before the shift" kind of vibe I had going. So off they came and I added a bit of slant. They might get chipped and scraped once I add the grime.
-
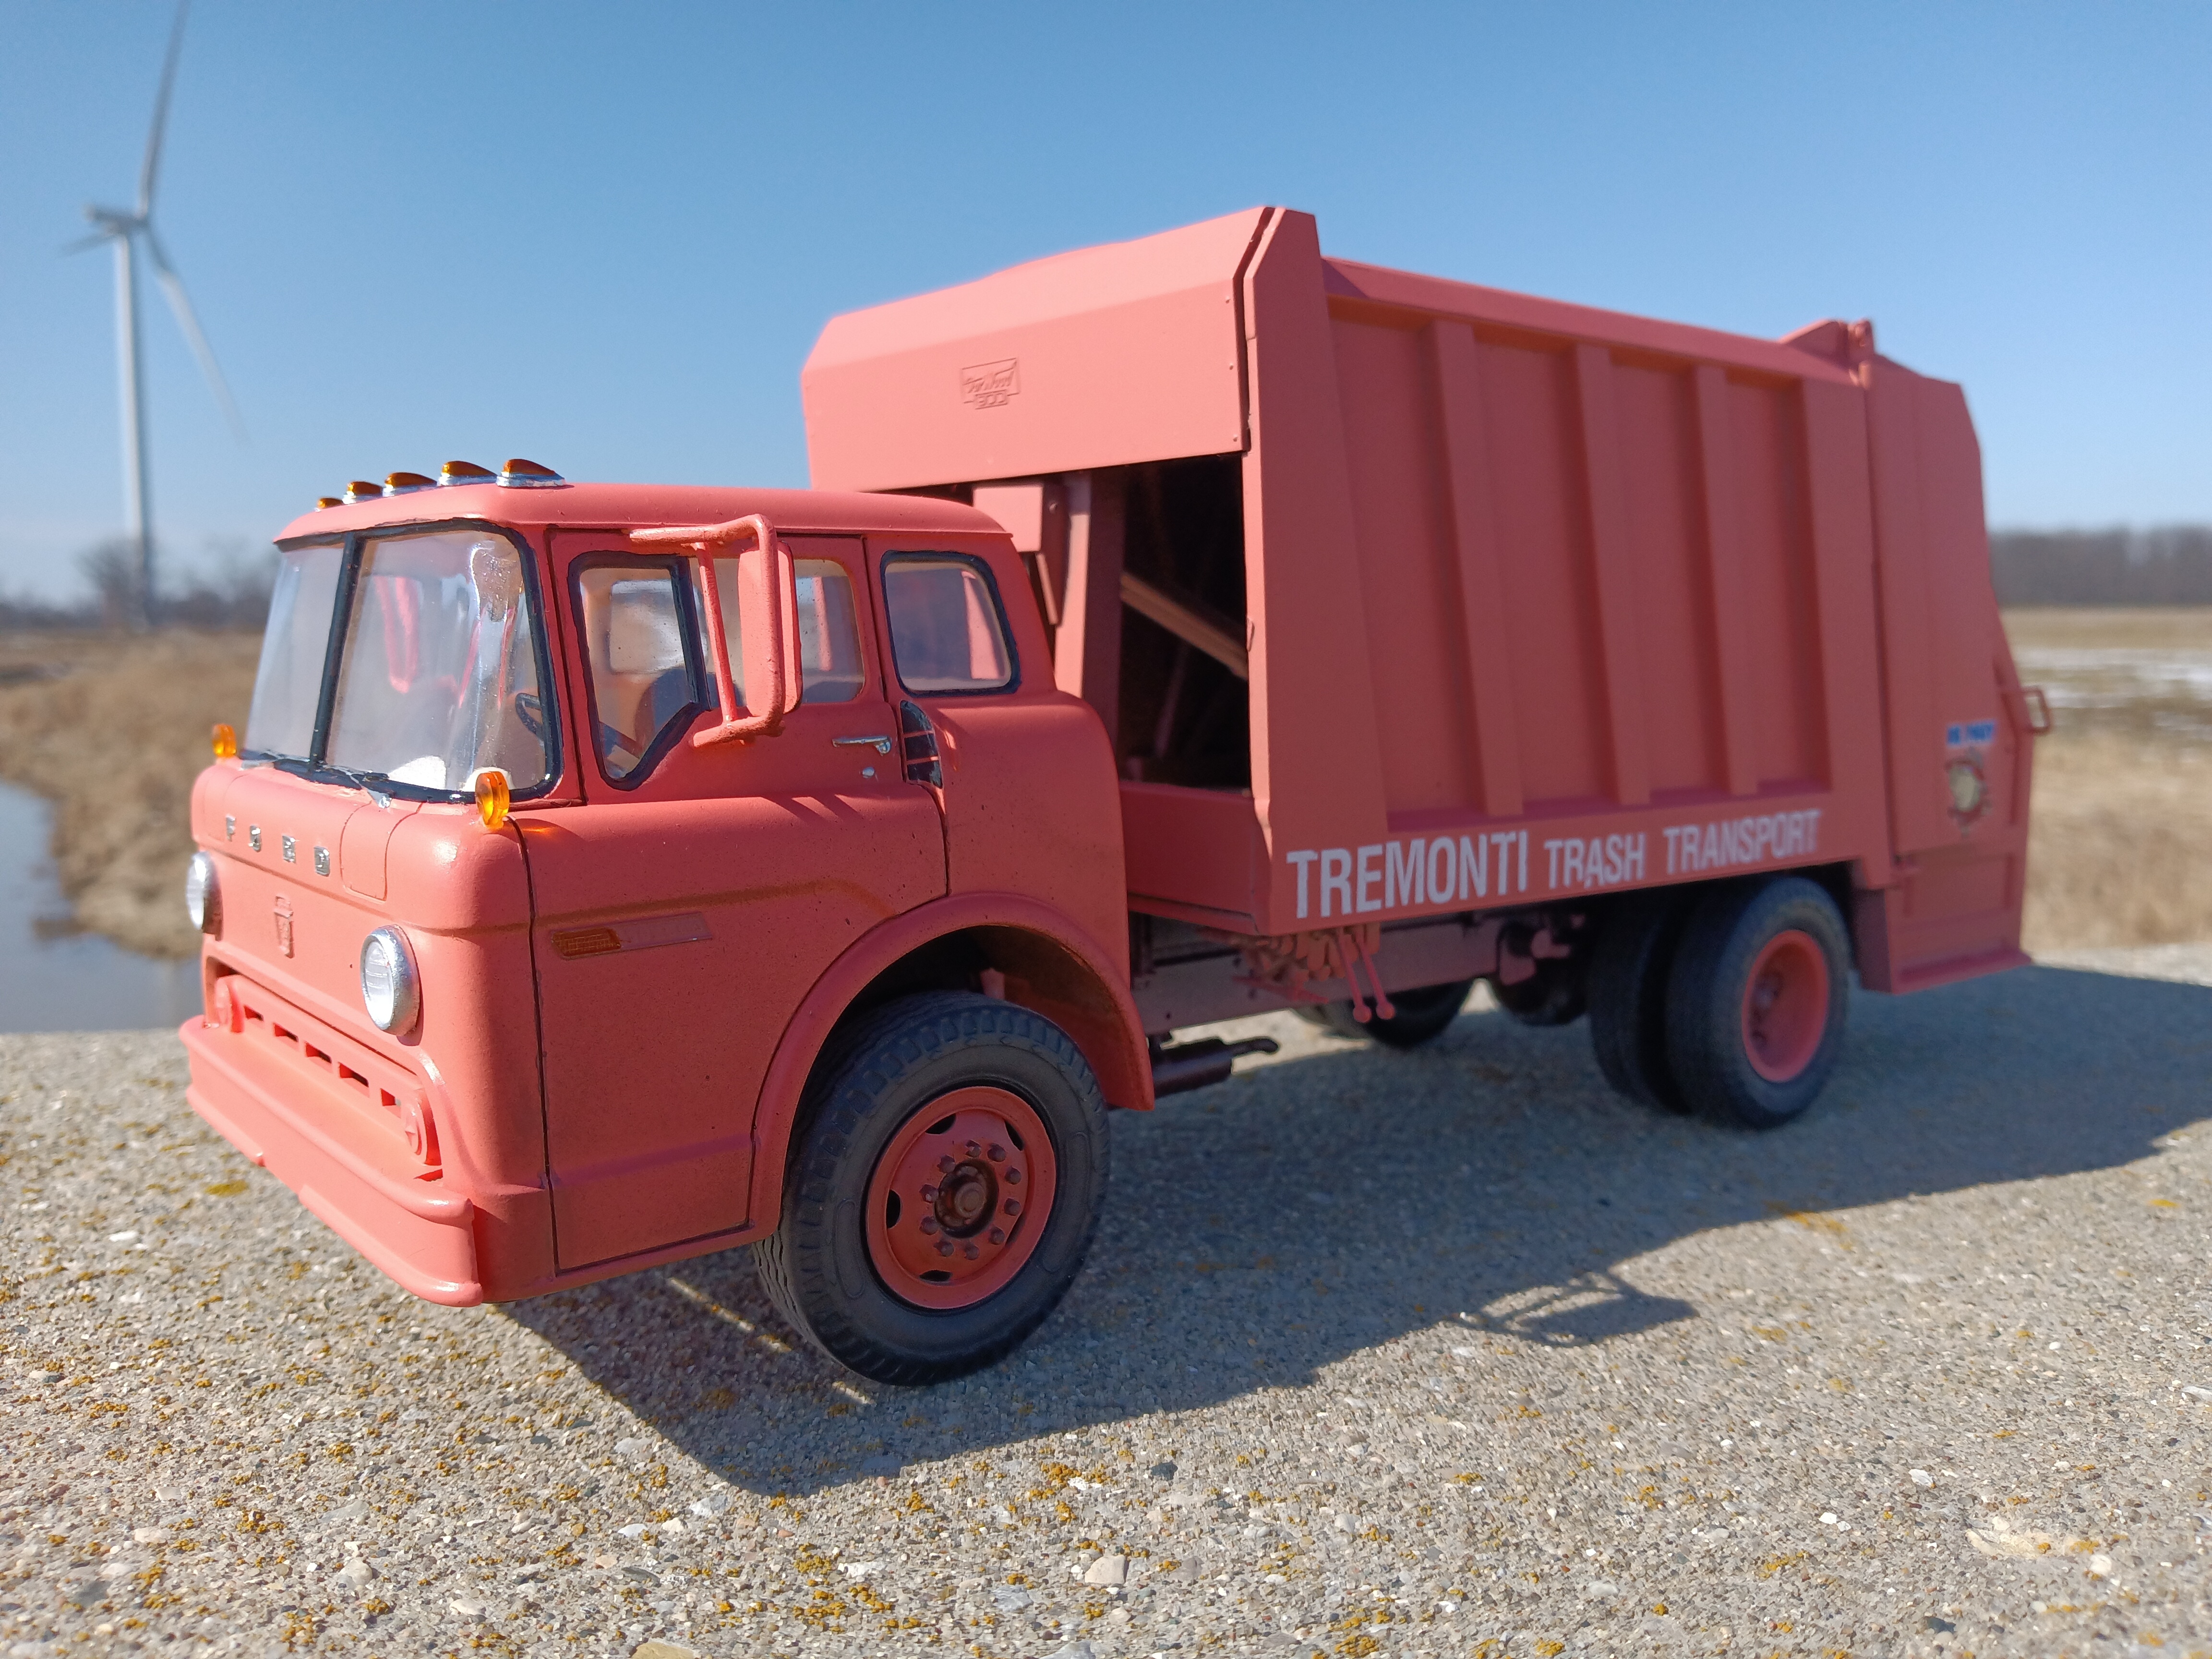
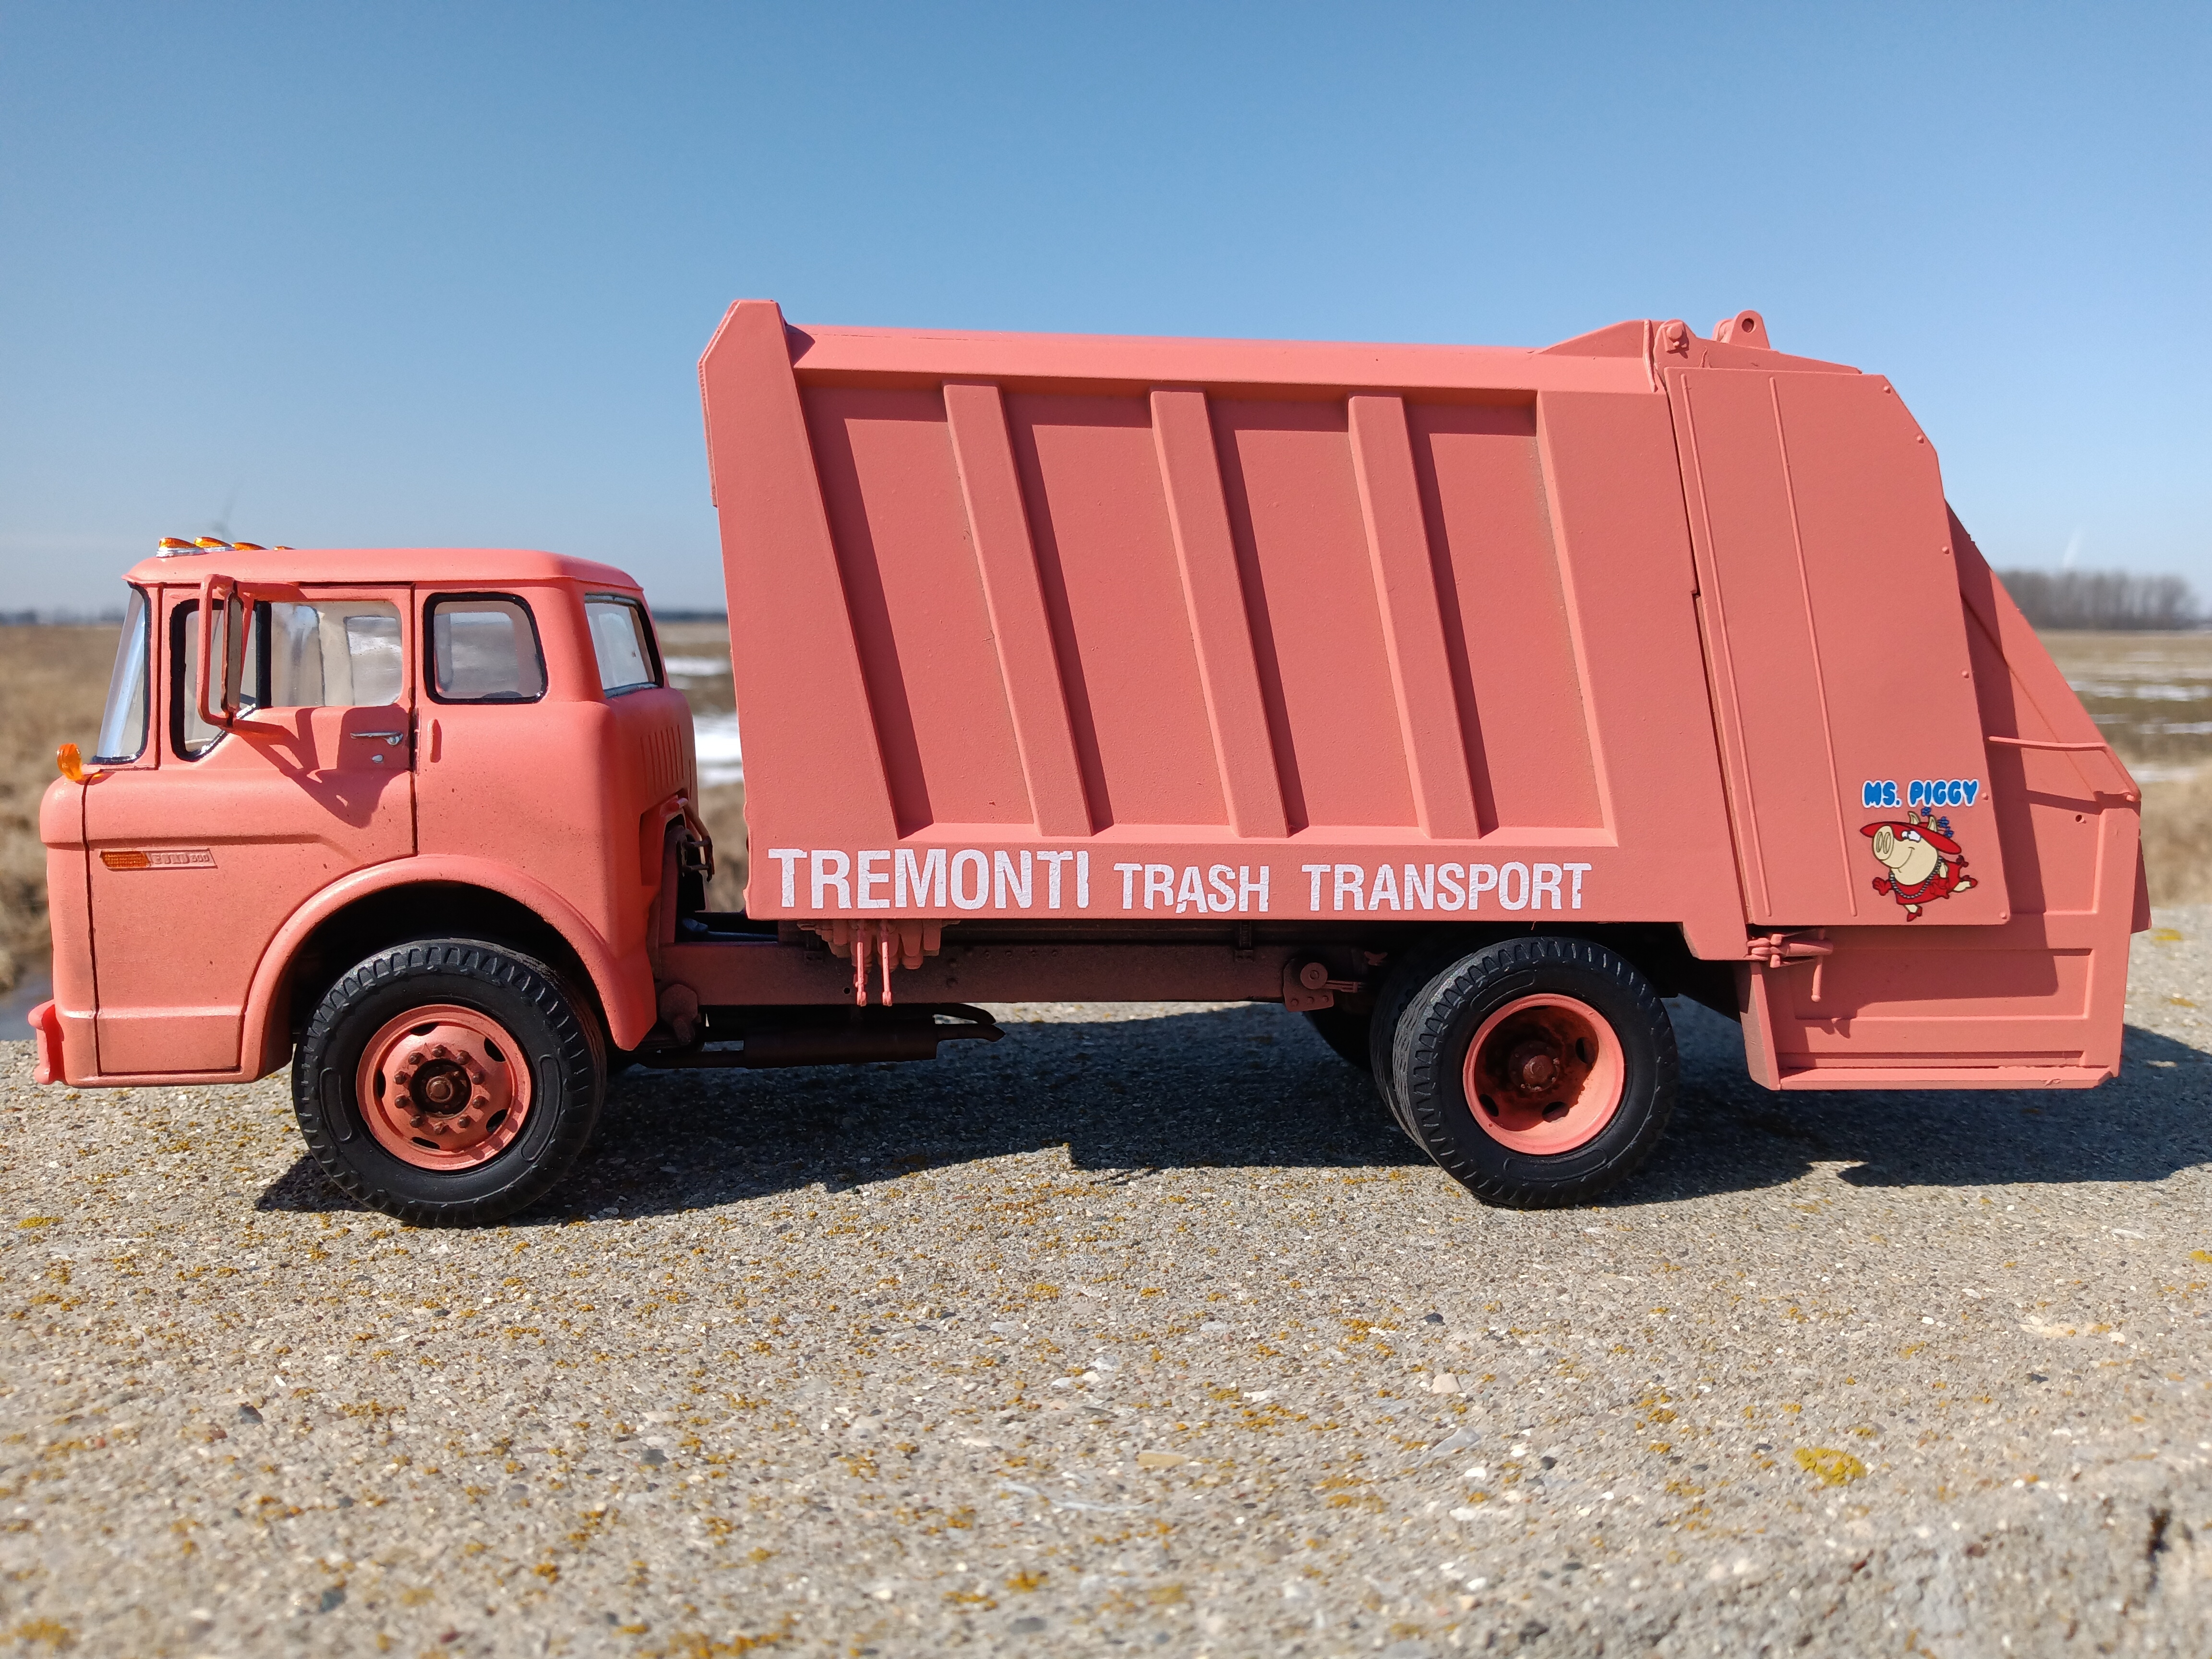
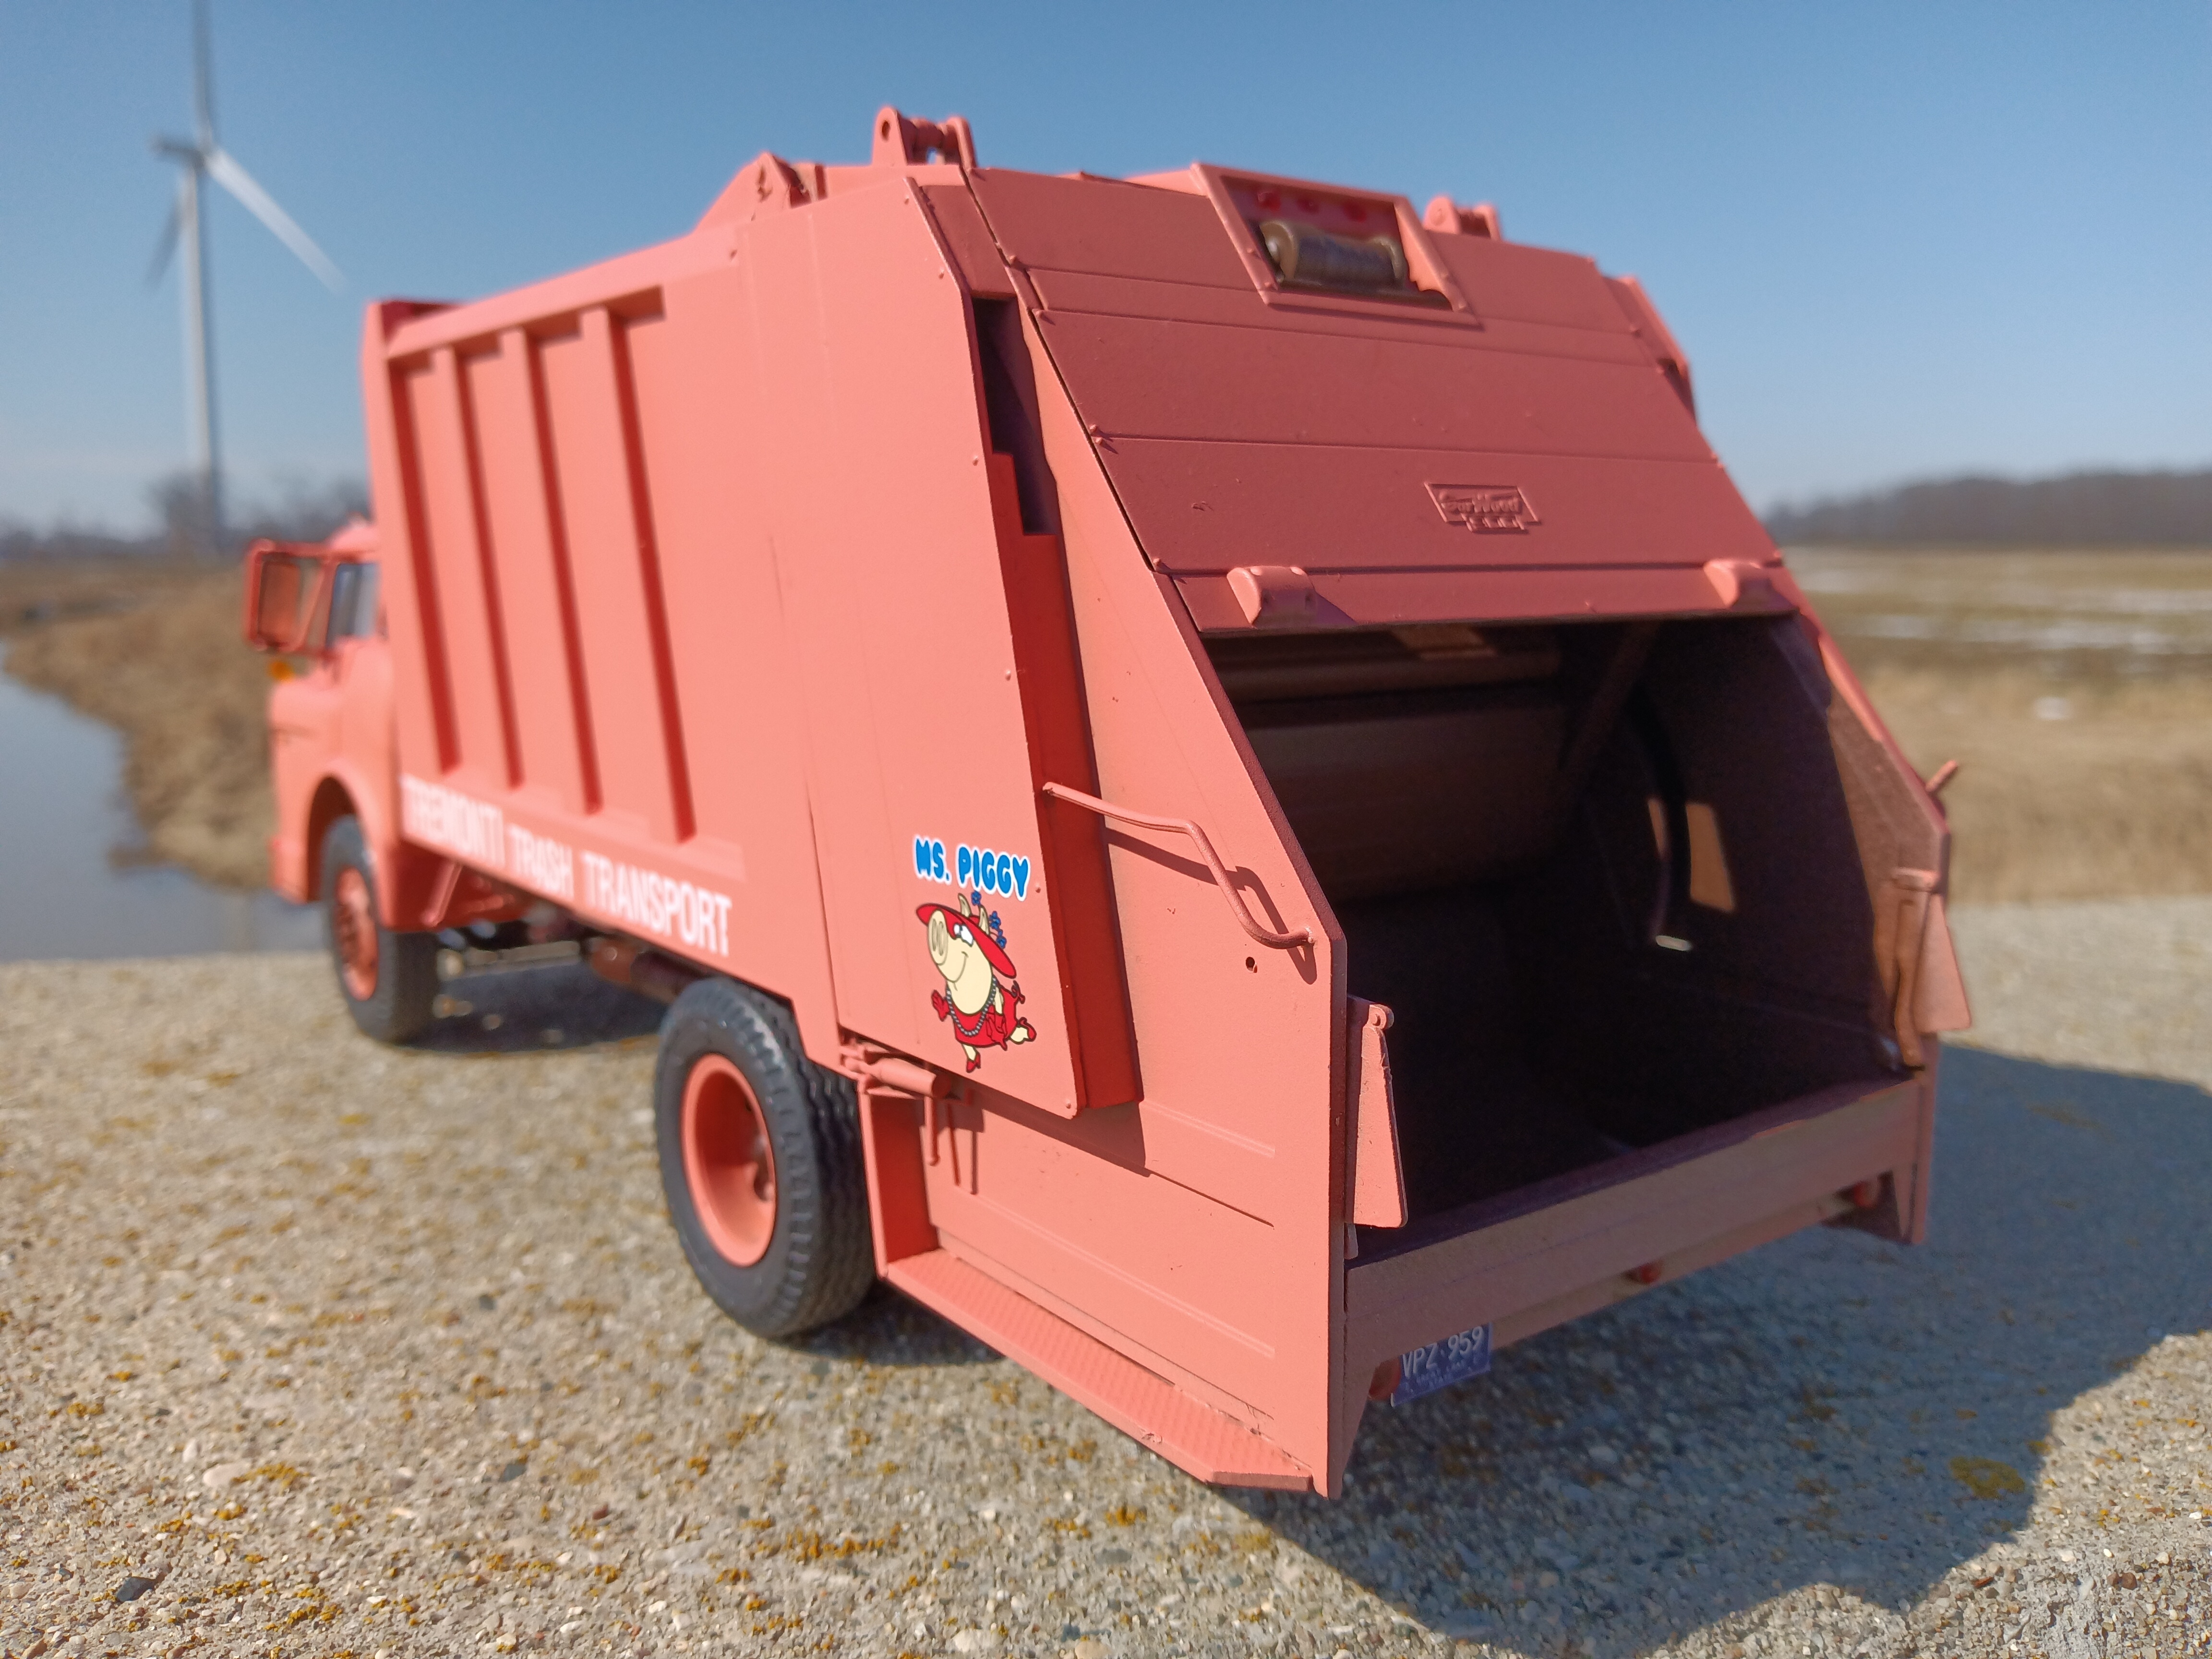
Mostly box stock AMT kit in Krylon Colormaxx Matte Sunrise. Eventually it will get dirtied up and loaded with trash. Still debating putting a figure on the back with a high visibility vest and about six inches of butt crack. 🤣 We'll see what happens.


-
 1
1
-
-
Just the Atlantis kit, thrown together out of the box with the exception of door graphics from the Atlantis Chevrolet flatbed. Not the greatest end result but I just wanted to get familiar with the kit.

-
1
-
-
Nice set! I believe this is in the "Forum Finds" section of the latest issue of MCM.
-
Lovely old warhorse.
-
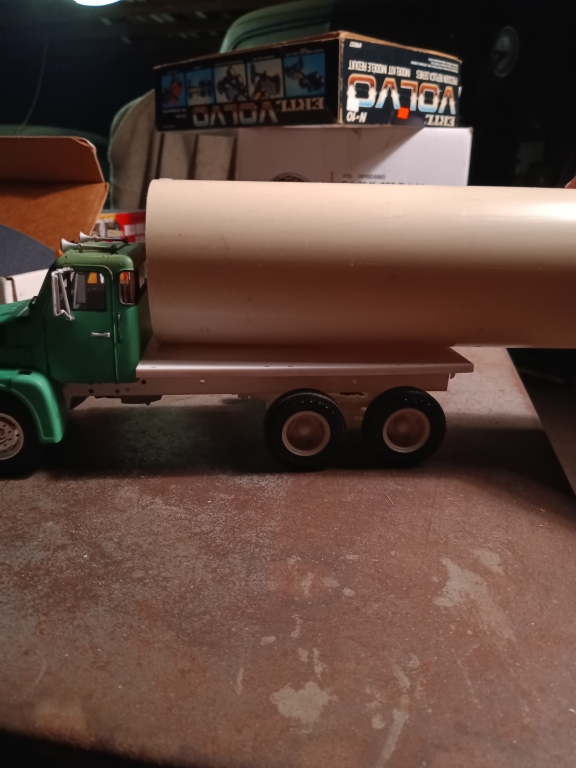
I've had the idea of a septic truck rattling around in my head for a while, and recently decided to take a shot at it.
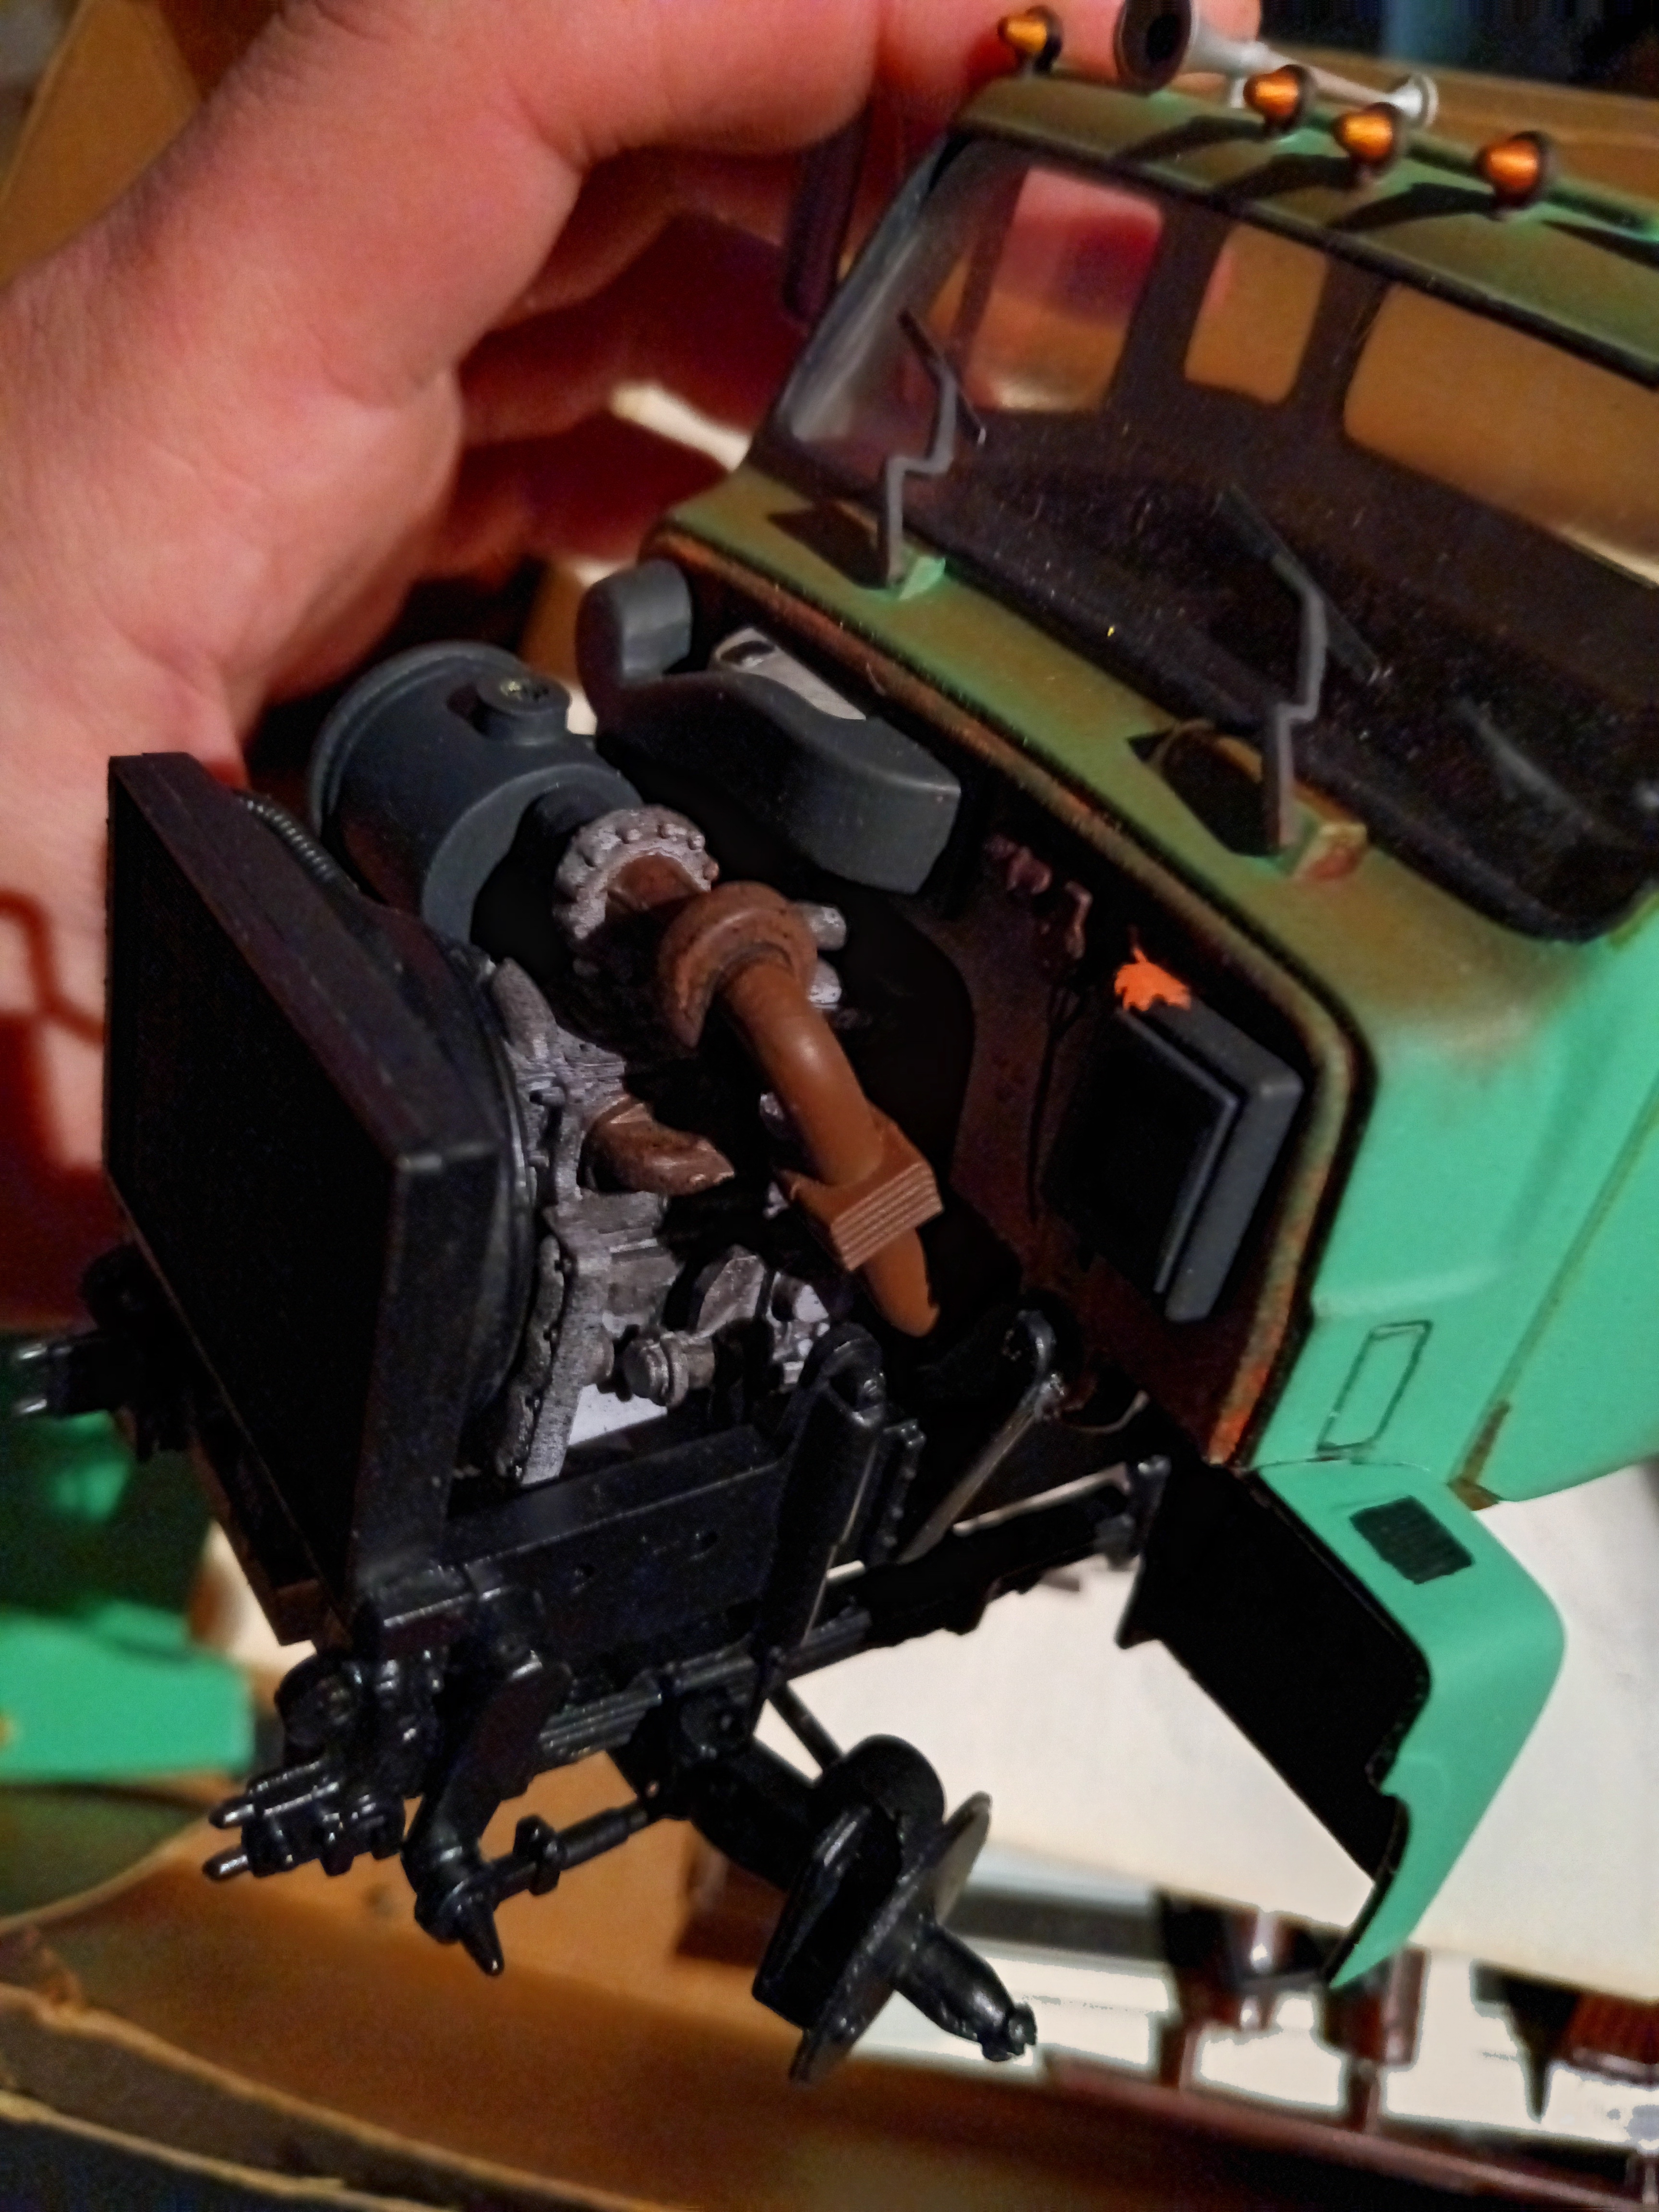
I paid the princely sum of 20 bucks for this thing. It had some engine assembly done and was missing the steering column and one cab clearance light, but those were easy enough to work around. Not even the diecast chassis parts could scare me off.

The idea was for a truck that was originally painted white then repainted in green later on in life. To that end, the "factory" white was left visible on the firewall and inside. That green, by the way, was purchased specifically for this project. I bought it just because I liked the color, APWA Safety Green from Ace Hardware. But I found out later that color is used by APWA to denote sewer lines. Perfect! You can also see the beginning stages of the weathering with Valejo rust washes. I also used a spare AMT lens to replace the missing cab light.
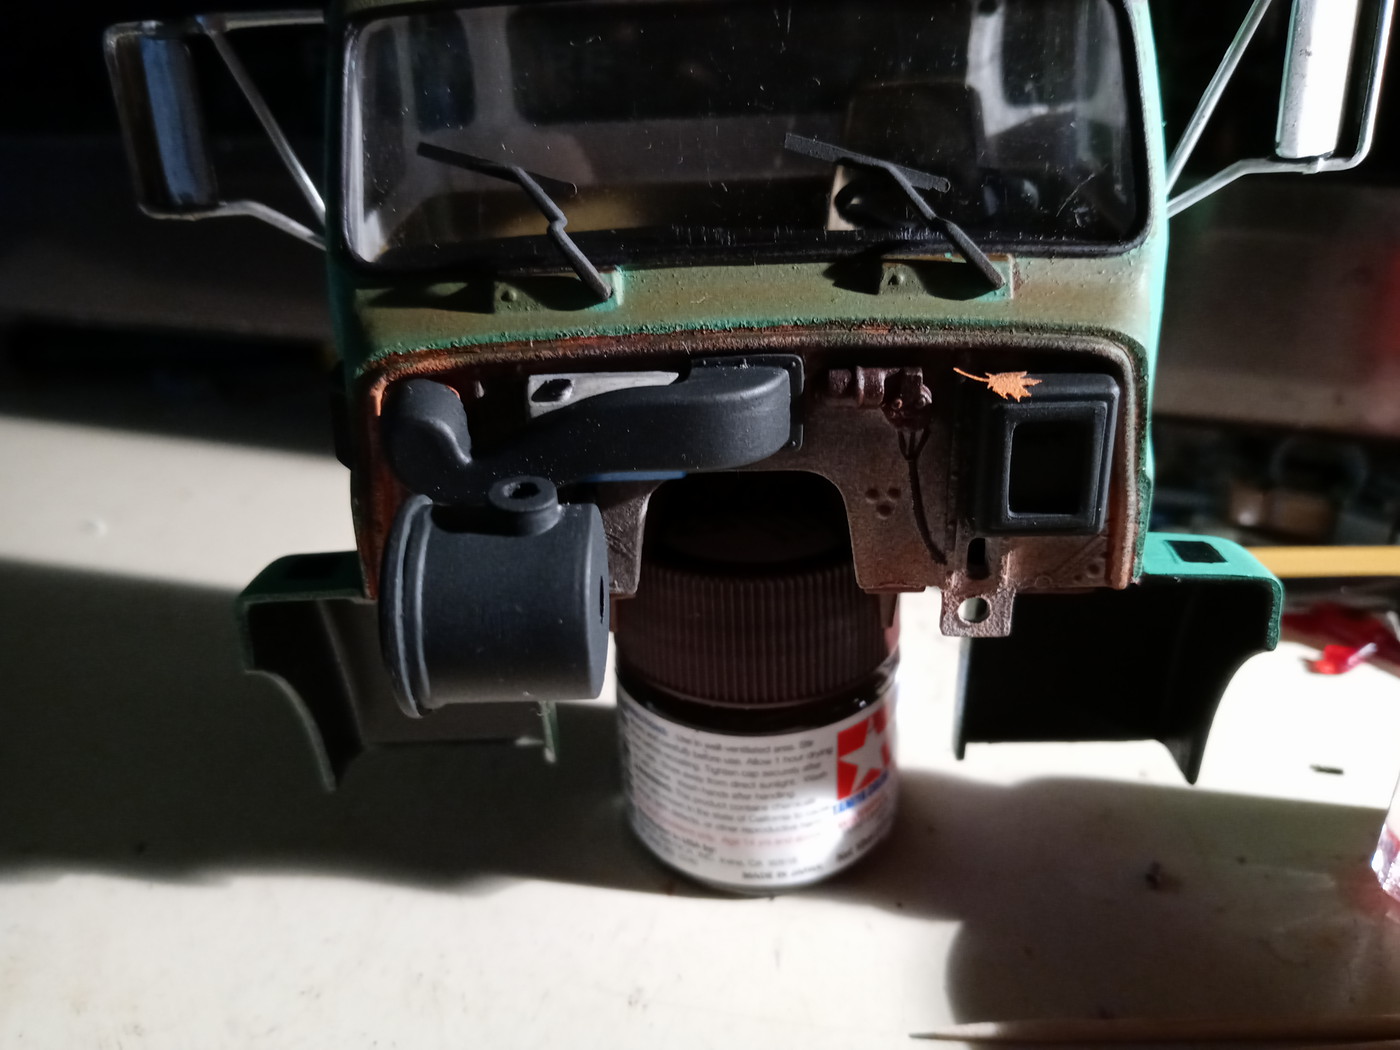
Here the firewall doodads have been added. The maple leaf is from AK Interactive. They're 1:35 scale but they'll work in 1:25 too... not like there's a "standard" leaf size, right? Here some weathering powders and AK weathering pencil action has taken place, along with a few washes.
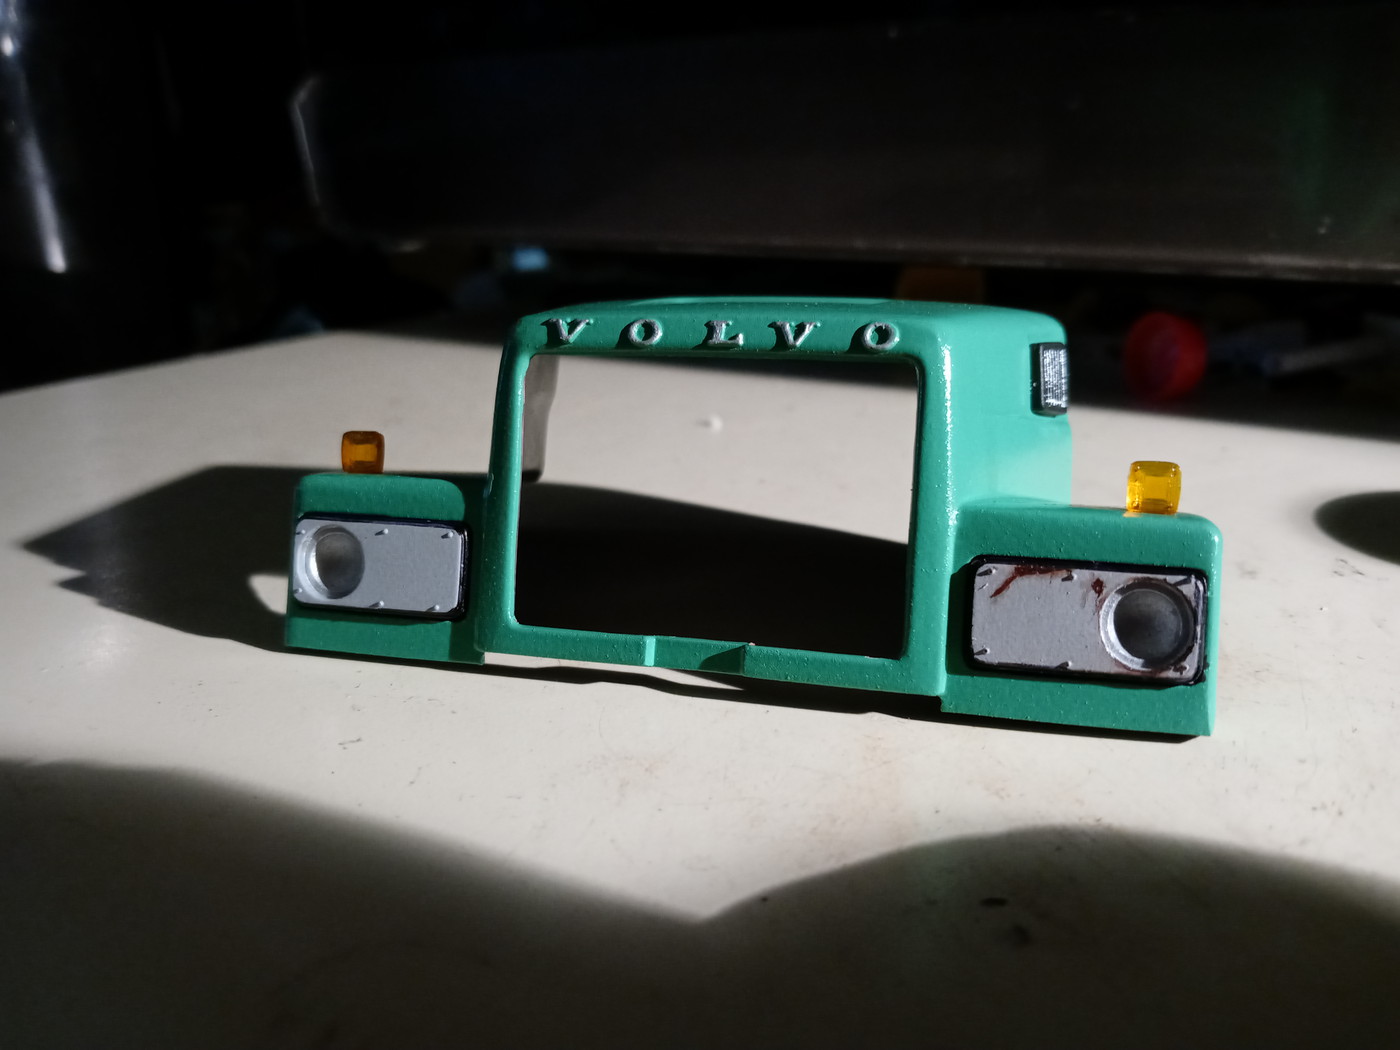
The headlight bezels have been weathered a bit, and more weathering will come later on- mostly some grime and maybe some chipping.

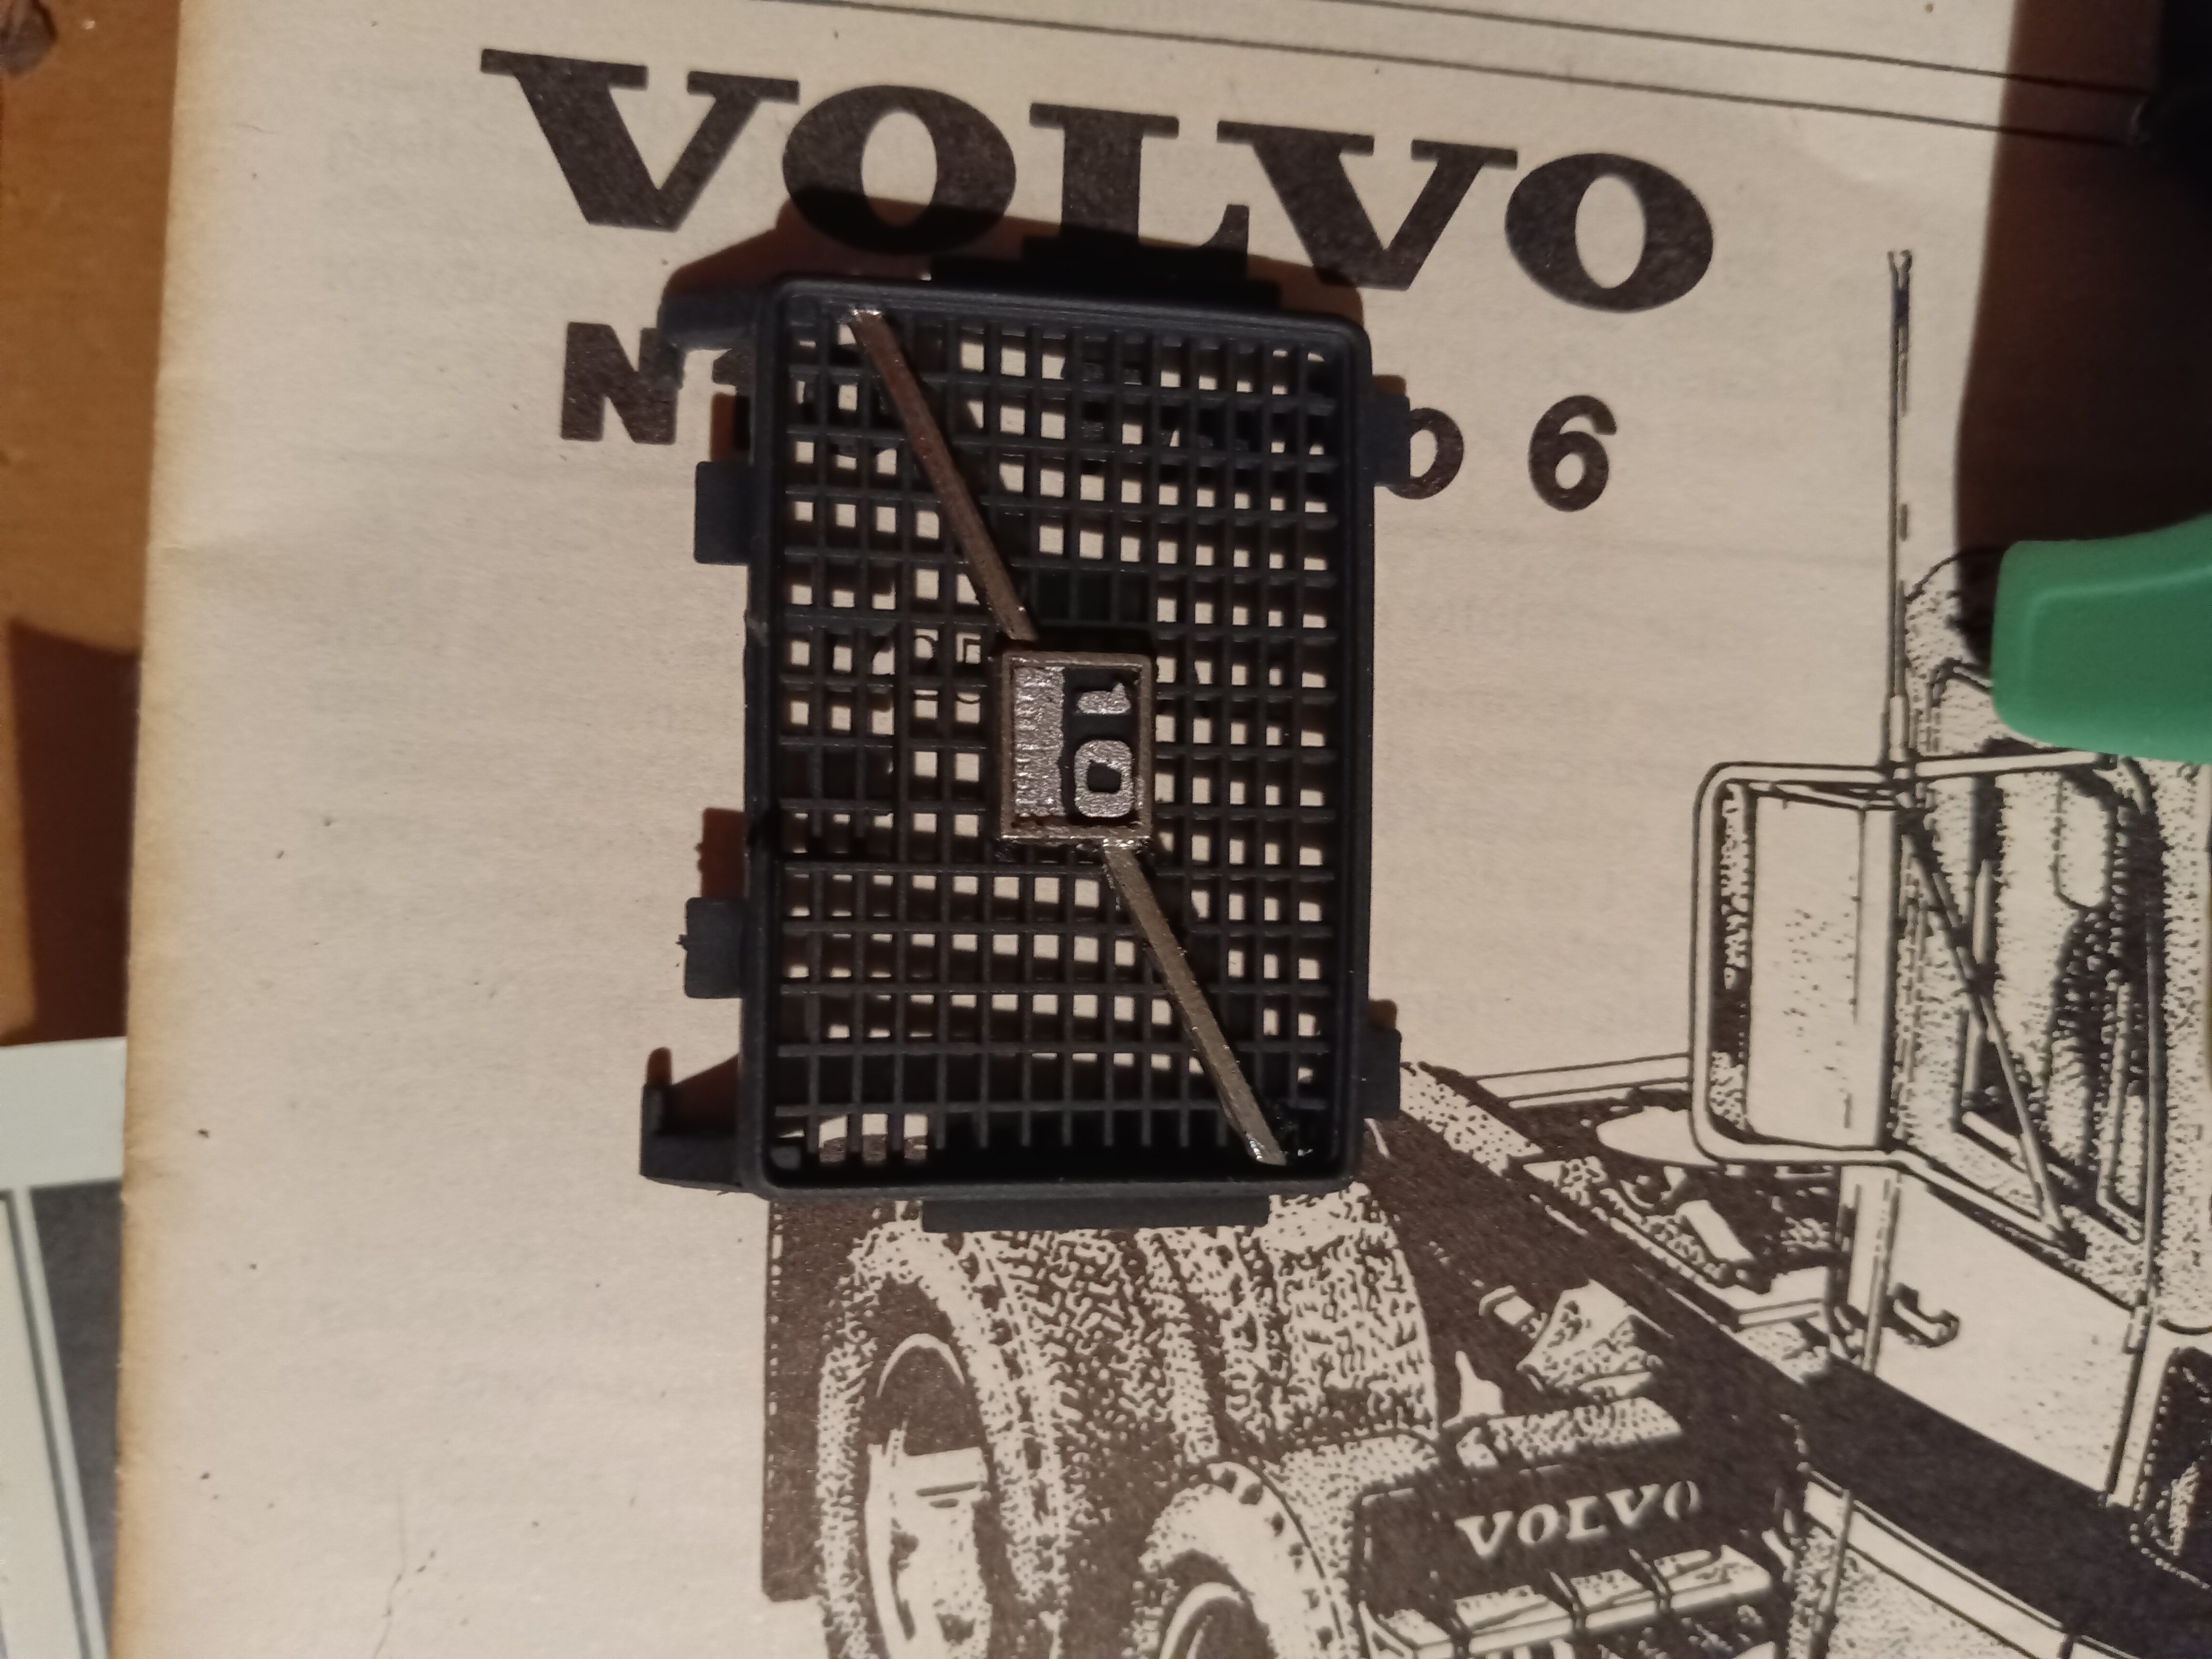
I omitted the passenger side seat and filled the void with an extinguisher, tool box, and a hazard reflector. 2mm strips of Bare Metal Foil were used to simulate duct tape on the seat. Vallejo mud cakes the floor, and the entire thing was dirtied up with powders and washes before being sealed with dull coat. Note the white strips on the side panels, again representing the painted metal in white of the truck's "original" finish.
That's it for this time. After a few mockups and seeing where things sit I'll get started on the tank and such.
-
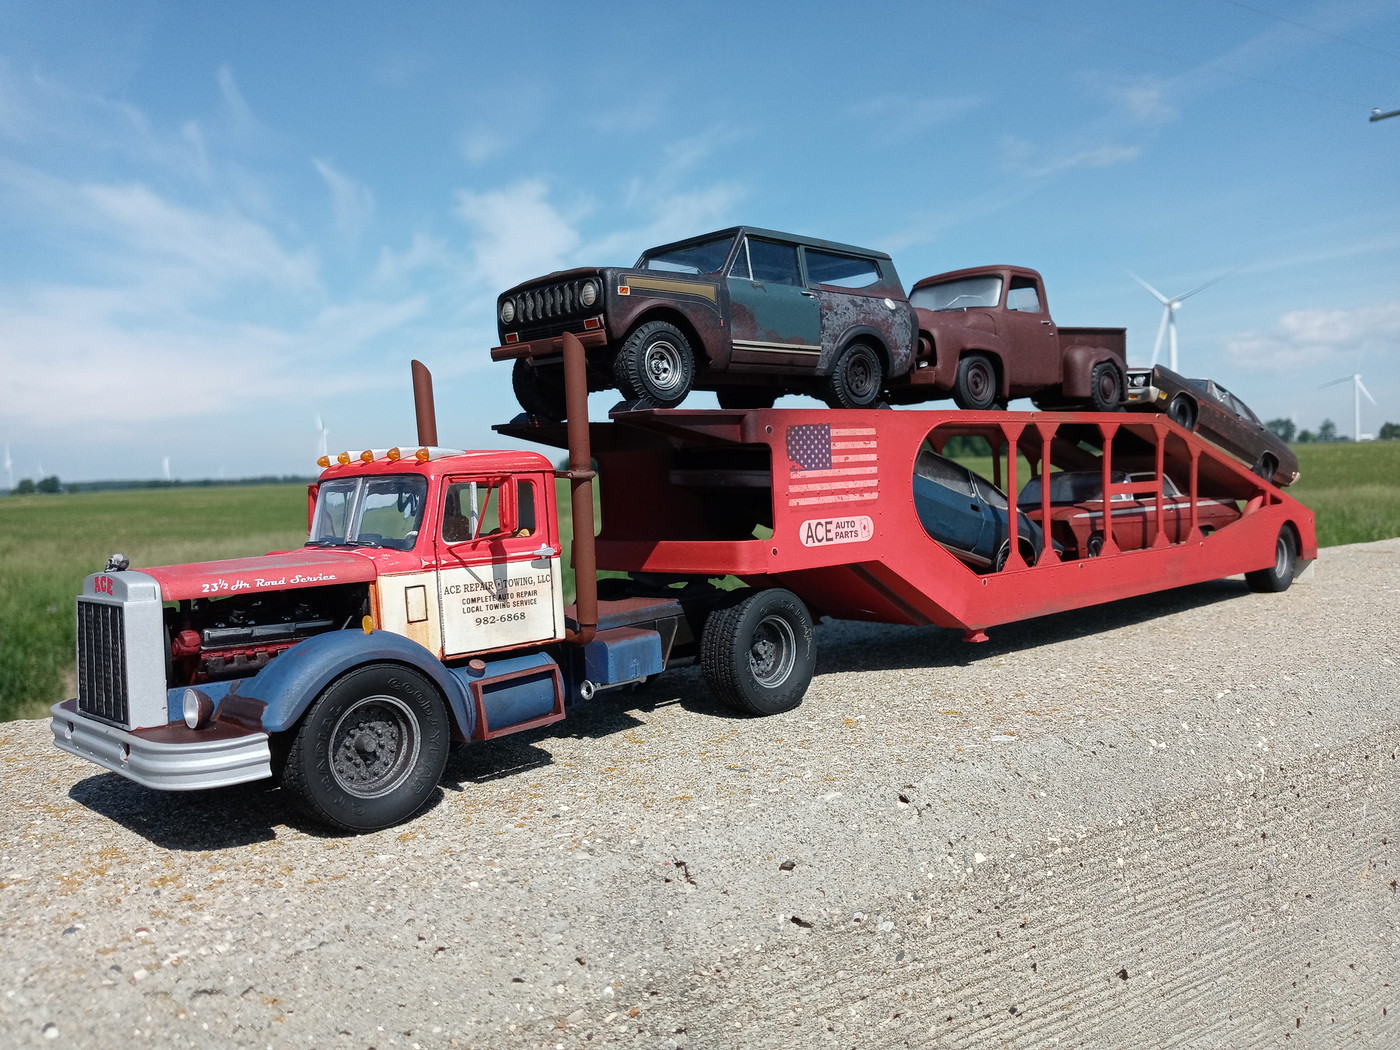
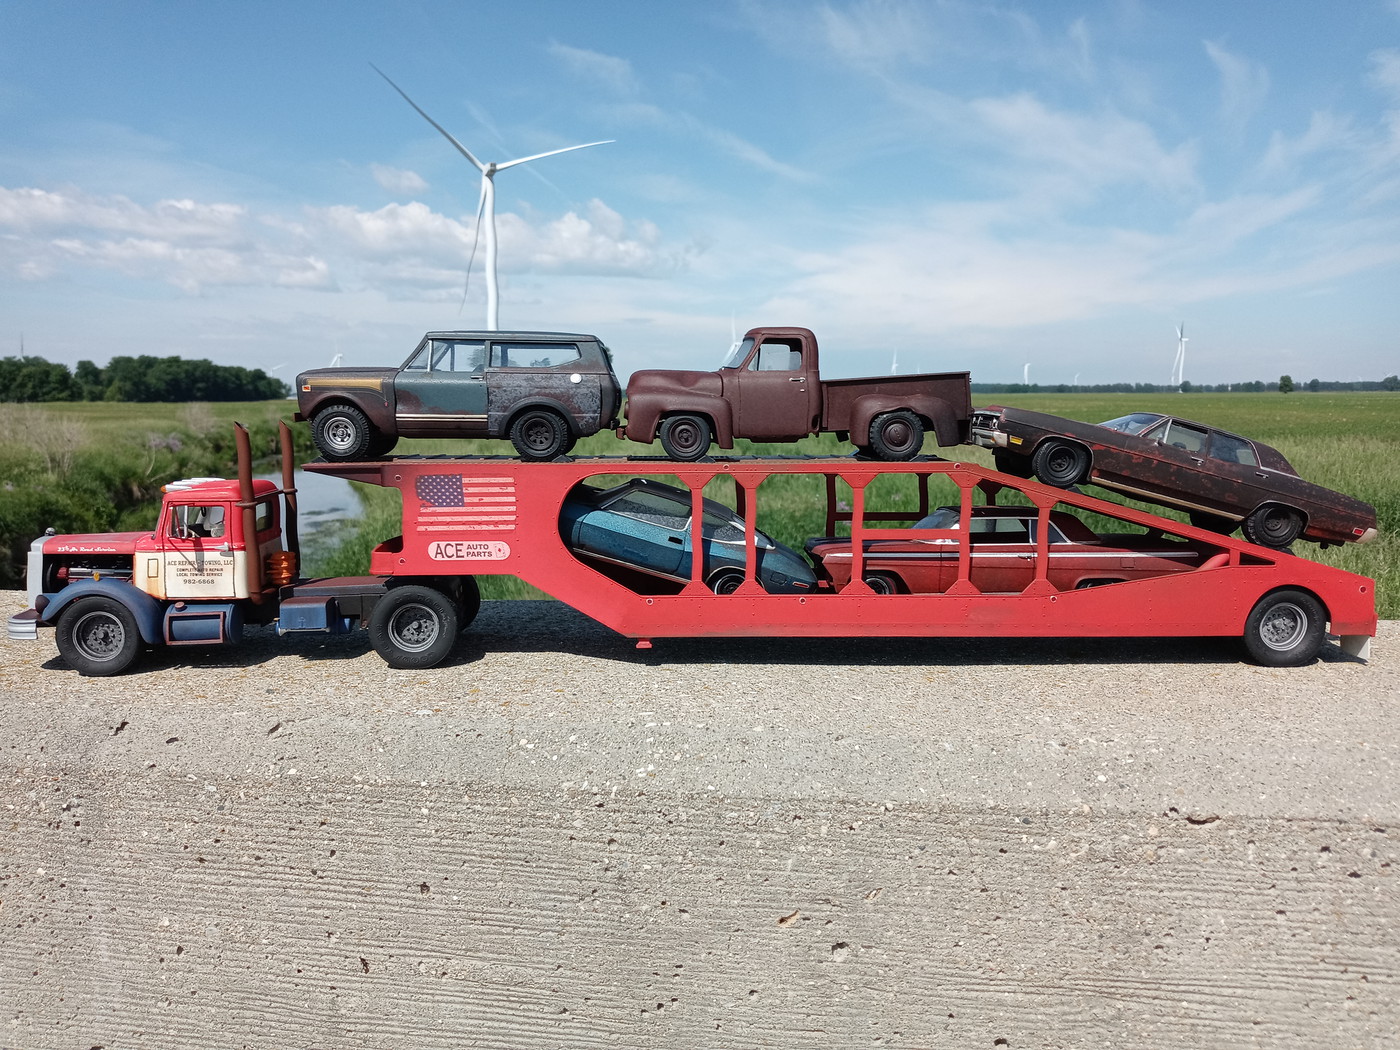
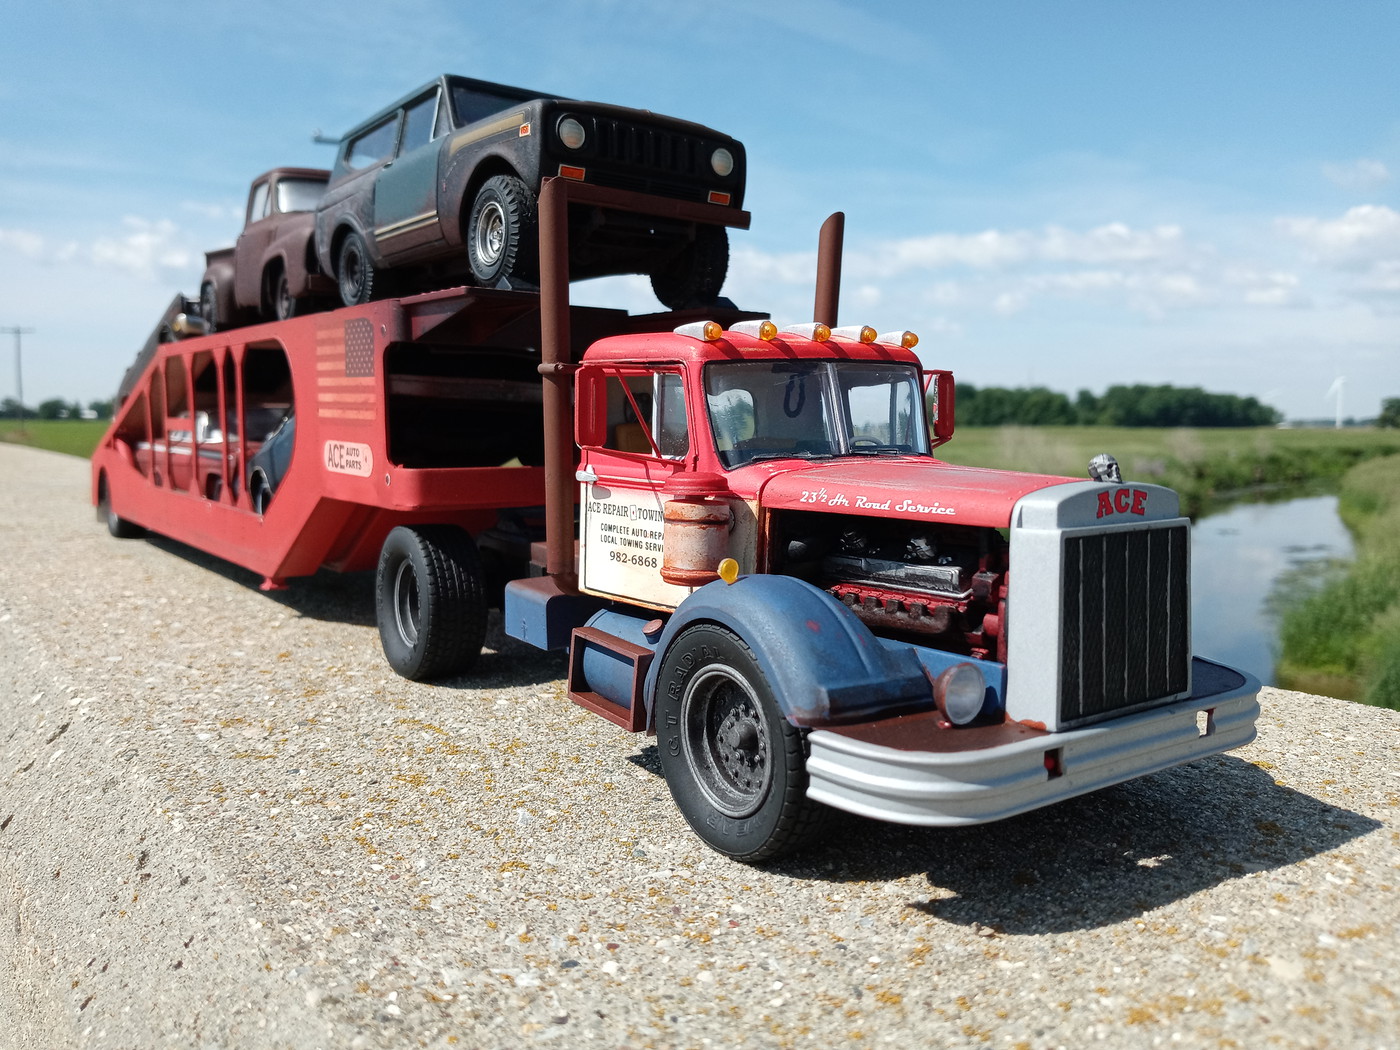
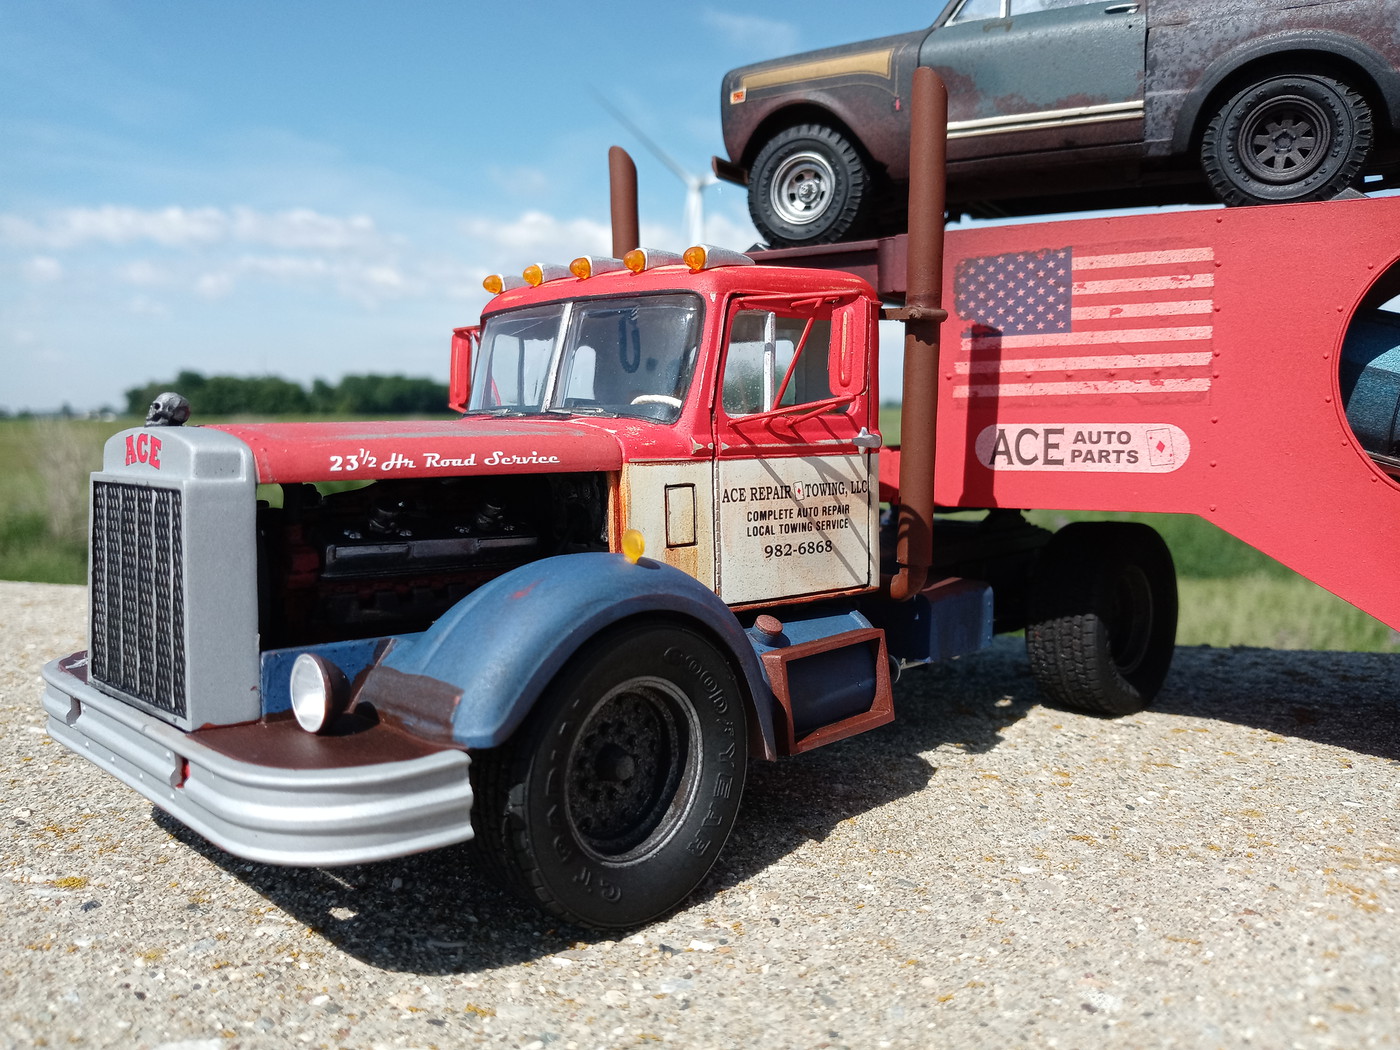
Been about three years since I finished a semi tractor or heavy truck of any kind, so here's my triumphant return. I guess.

I had the notion to build a hot rod shop truck, and kind of combined that idea with an AMT Autocar A64B. I started with an incomplete Stevens International kit I'd had laying around for several years. The engine is a Detroit V12 made from AMT and GW Trucks parts. The whole mess is lowered and sits on wheels from the infamous old Turnpiker Peterbilt 352, and the front tires are from a Revell Bill Signs 359. The rear tires, get this, are from the Revell Jeep CJ. Other than the height they're otherwise exactly the same as the 1:25 front floats. Same width, same tread and sidewall lettering, same I.D. even, just slightly taller overall. The single axle air suspension was made from spare parts and scratch built air bags. The headlights in this kit always looked dinky to me, so I replaced them with some lights from a Revell '32 Ford.
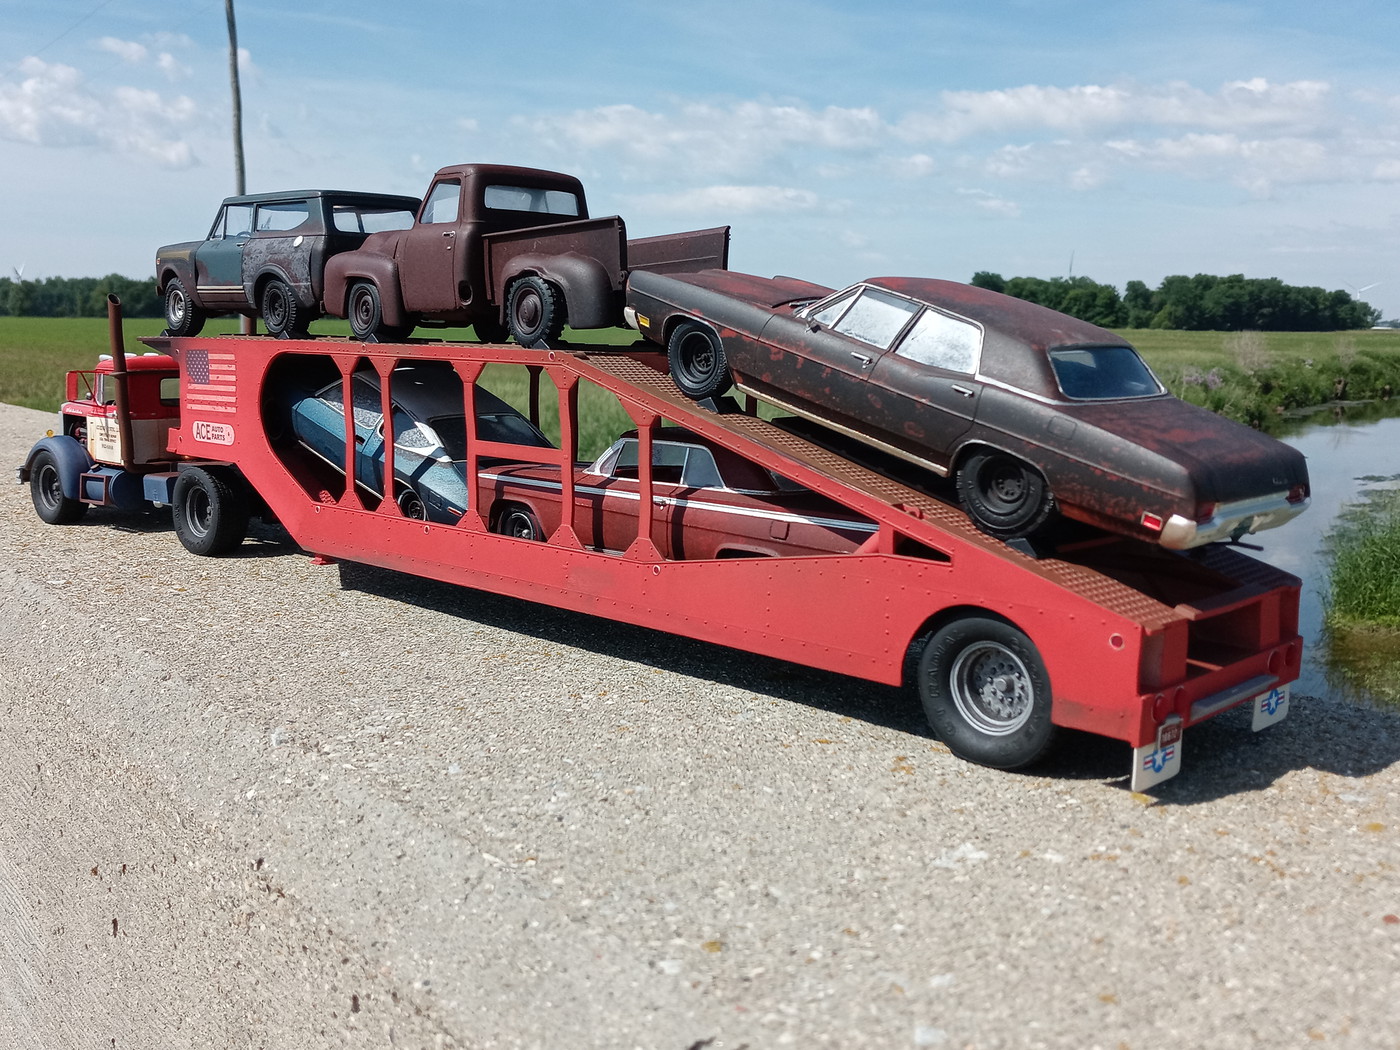
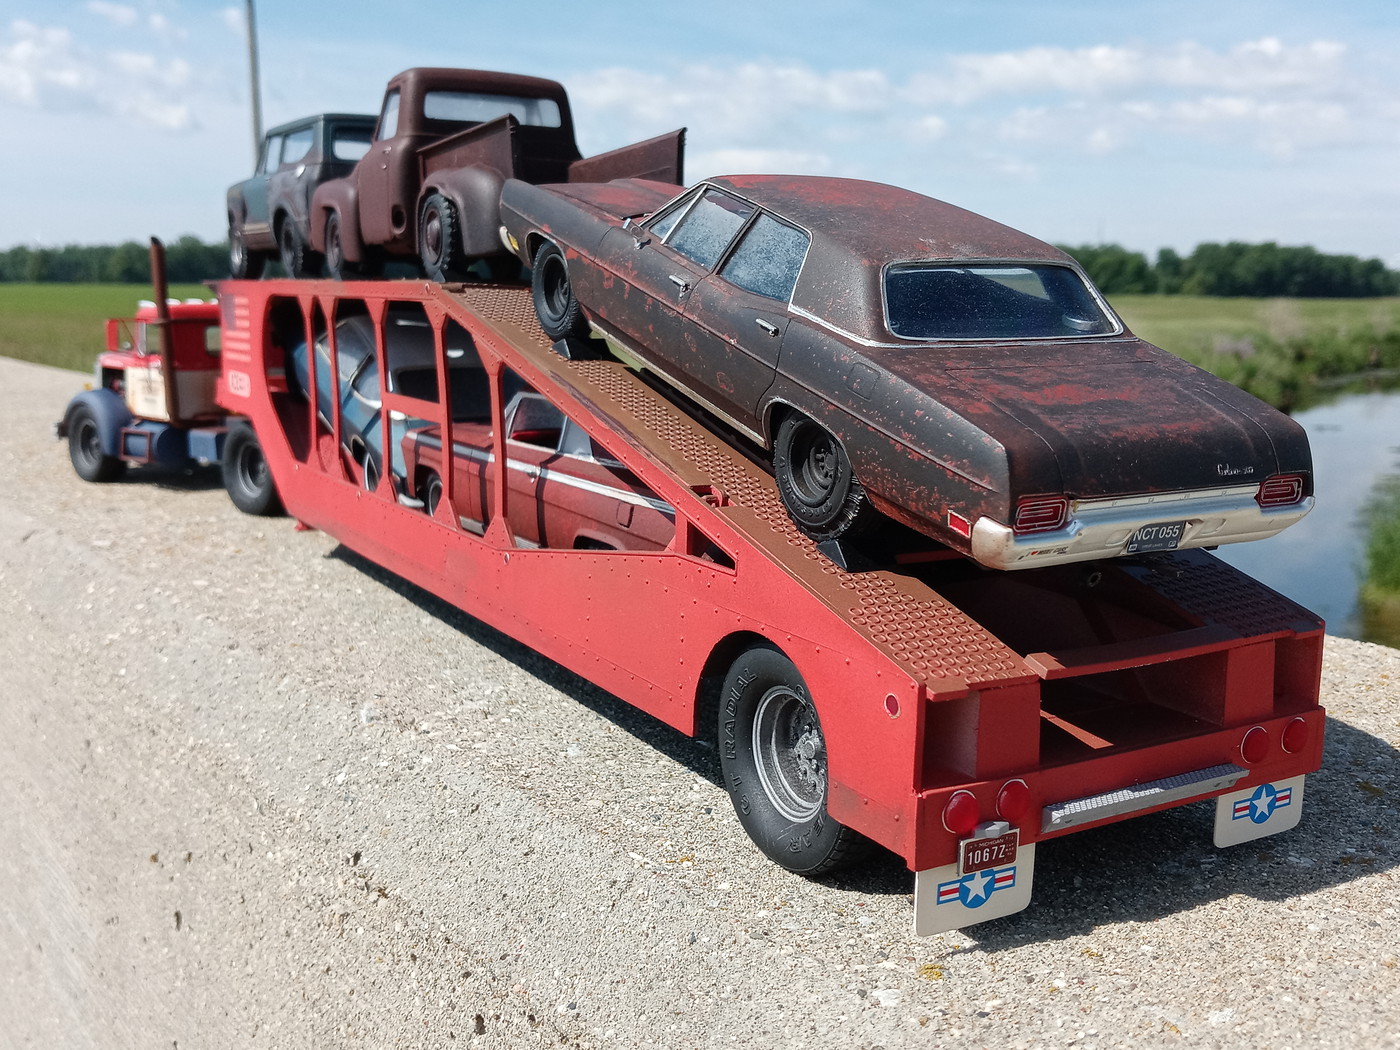
The Haulaway trailer is pretty much box stock, aside from wheels and tires to match the tractor, and mud flaps cut from .020" styrene. The models on the trailer were all ones I had sitting around, and were built between about 2008 and 2020. Upper deck has a '76 Scout II, '53 F100, and '70 Ford Custom, while the lower deck carries a '75 Matador and '62 Impala.

-
Beautiful model! I have the KFS cab in my stash but haven't built it yet. It intimidates me just a little bit. :D
-
Looks like it just came off a muddy two track... but not too muddy.
") Can't wait to see it paried up with the dump trailer.
Can't wait to see it paried up with the dump trailer.
-
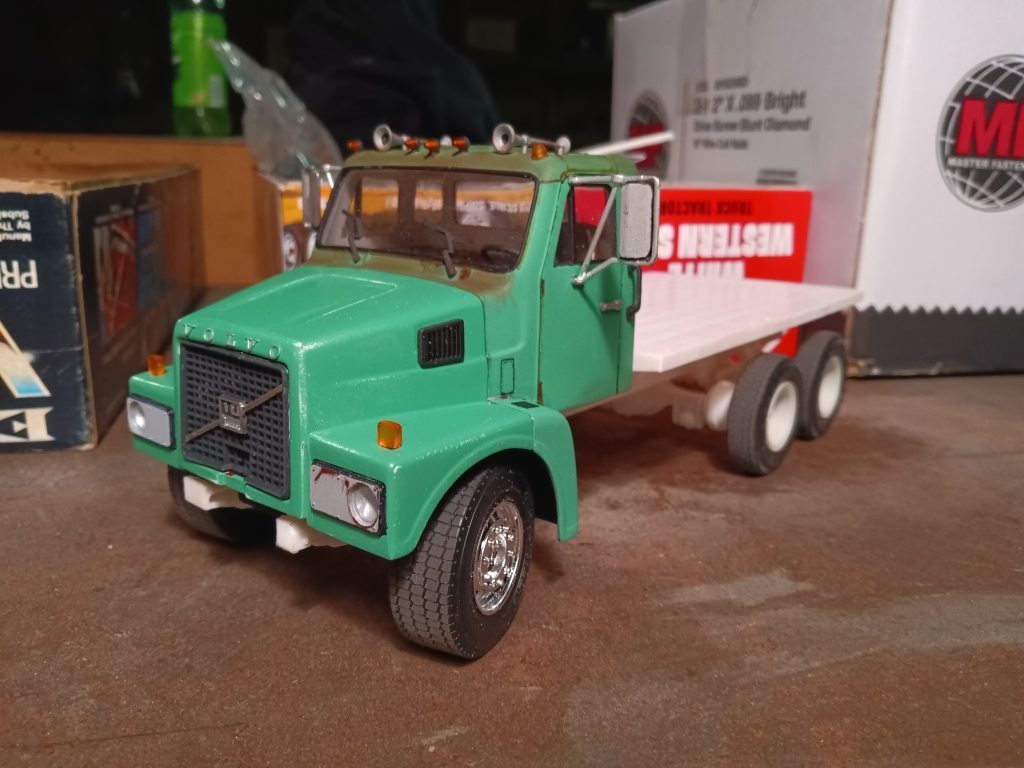
Love that shade of green. The truck has a nice, purposeful look to it.
-
Wish I had this much ambition! I've had a Crosley Farm-O-Road scratch build planned for years and I can't even be bothered to do that.

-
Love it! I've always wanted to do something similar fitted with a flat bed.
-
Shaping up quite nicely. With that color scheme she'd look right at home in East Lansing.
-
Love it! I still see these occasionally in use as farm trucks.


Dodge L700 Garbage Truck
in Model Truck Workbench
Posted
A few days ago I started piddling around with the Garwood 900 packer from the AMT. The inspiration began with finding a can of Rust-Oleum Satin Moss Green in the garage. It was a rather nasty shade of green and I thought it would look good in a garbage truck.
Obviously it needed a little corrosion and grime. To that end, I attacked it with Vallejo acrylics and Doc O'Brien weathering powder.
I also used some old Line-O reflective tape, though unfortunately the dull clear coat kinda diminished the reflectivity.
Here you see the flasher, and the winch cable made from leader line, a 1:35 scale block, and a couple of parts box hooks.
This afternoon I dug out the Dodge kit, and stretched the wheelbase by cutting the Dodge chassis and grafting on the rear portion of the Ford chassis.