
Cornbinder
-
Content count
407 -
Joined
-
Last visited
-
Days Won
66
Everything posted by Cornbinder
-

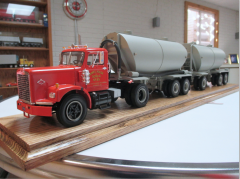
James House Diamond Reo and twin powdered cement trailers by Tim Gibson
Cornbinder posted a gallery image in Other
-
I've got a couple I need to get around to building myself.
-
International Transtar Eagle "Hidden Agenda"
Cornbinder replied to Cornbinder's topic in Model Truck Workbench
I don't know- I can still see them. *Edit* I THINK I know what happened, and I think I fixed it. -
International Transtar Eagle "Hidden Agenda"
Cornbinder replied to Cornbinder's topic in Model Truck Workbench
A little bit more progress. The engine is mostly done- it needs a little detailing and paint touch up. I used DupliColor Chrysler Intense Blue for the engine block... in person it's a few shades darker than in the pic, and looks like a decent match for the blue used on Navistar engines. I cut off the LoneStar's mud flaps and modified the Transtar's to fit to the LoneStar mounts/taillight housings. A "Scout" decal from an AMT/Ertl scout was used. I need to touch up the IH logos and clean off some fingerprints on some of the chrome, but these pieces are pretty much done. -
Fixed it for you. Cool project, too!
-
I've pondered making a few fenders like that. Did you roll a flat piece of plastic for the top, or use something that was already rounded, like a cut-down pill bottle?
-
Shaping up to be quite a machine!
-
Scratch Building Stacks
Cornbinder replied to Casey's question in Model Tuck Building Question and Answer
I've done this with plastic rod instead of tubing, what I do is leave the plastic in the tube. I'll leave a little sticking out past the bend so I have a "mounting pin" for the stack- the plastic tube will either slip into a hollow pipe under the cab, or I'll use a short piece of tube to connect it to a solid kit exhaust pipe. I will say I've had mixed results, but I'm totally willing to admit that might be because I'm doing something wrong. -
Big Al was a little too far ahead of its time- it was making more power and was more fuel efficient than other engines of the era. The trouble was, it was a bit too far ahead of the curve and got kind of a nasty reputation for being a ticking time bomb. One problem was you had to take it in for service and repair at an Allis Chalmers heavy equipment dealer... not as many of those guys around as there were for, say, Cummins. Big Al was based on the earlier Buda 844, AC having bought out Buda Engines in 1953.
-
That's shaping up very nicely!
-
I started this thing about three years ago- it's been an "on and off" project ever since. Mostly "off". I work on it when I feel like it. After getting the kit, I put in a call to Models By Dave for the cab and the grille, which is patterned after the Harley Davidson edition. I had originally planned to go with round headlights, so the stock headlight openings in the fenders were filled in. I painted the lower part of the bumper in textured semi-gloss black paint. I cut 58 scale inches out of the wheelbase, and painted the engine the color I had chosen for the cab... Duplicolor School Bus Yellow. The interior was color keyed in School Bus Yellow and good old basic semi-gloss black. The steering wheel came from a Monogram '55 Ford. A little bit of tinkering and I had this... You can see that I opted to shave the LoneStar scripts, as well as the door handles. I may leave the doors smooth, but it's still up in the air. I might add some old-style grab handles, or slam locks. I decided not to go with headlights on the fenders... we'll just say that the former fog lights now house regular headlights. A while later... I finally settled on a tank setup... I pirated some tanks from a Revell Peterbilt 359. That same kit also coughed up a headache rack. Both were finished in the same semi-gloss black paint as the fenders and frame. K&S aluminum was used to make the new stacks. I nabbed the quarter fenders from a Revell Kenworth snap kit. This piece has since been painted semigloss black and installed. I'm thinking I'll add some AITM diamond-plate tool boxes underneath the headache rack and make up some steps. I'm hoping that maybe I'll have this thing finished by year's end...
-
Ah, yes. That looks promising.
-
Yes they are. Everything on the "business end" is from the kit aside from the mud flaps- I made those from some thinner plastic sheet.
-
Well, this one just got a lot closer to finished... The toolboxes I ordered from AITM showed up. The more I looked at that dead air under the deck of the headache rack, the less I liked it. I figured the toolboxes would be a good way to fill it in. I went with a 24" box on the driver's side, with the modified factory toolbox just behind it. For the passenger's side, I went with the 48" box. A deck plate and a few other doodads and this one will be a done deal. Maybe.
-
Just received my first order from Dave at American Industrial Truck Models (after placing the order via internet Friday night, I might add), and am quite pleased! First, here are the tool boxes- Left to right- TB-7 24" Square Tool Box, TB-8 36" Long Tool Box, and TB-9 48" Long Tool box. Each of these particular boxes has a diamond-plate pattern on the door. The 24" boxes are $3.00 each, the 36" is $5.00, and the 48" is $7.00. Each box includes two sticks of styrene plastic strip for making the mounts. Here is the AS-3 set. It includes a hood, bumper, and tow pin to convert one of the AMT "Big 4" kits to the tilt-nose Autocar A64F. I'd suggest using a White Road Boss or White Western Star, that would give you the right dash. Of course, you could start with an Autocar if you have one handy, too. This set also includes decals for the grille emblem and optional nameplates for the sides. It's nicely cast and it'll set you back $35.00. If you want to see how this looks installed on a truck, you can check out Larry Spillars' completed Autocars in the gallery... Dave makes tons of neat stuff, from individual parts to complete kits. I'll be a repeat customer for sure. http://www.aitruckmodels.com/
- 1 reply
-
- 1
-

-
Lol, all I know about that thing is that it's a hodge podge of several body parts from different Petes, and the guy wanted 28 grand for it...
-
Cool! Being an American, I'm mostly interested in American trucks, but I do like quite a few of the European rigs as well, mostly because I don't see them on the roads over here.
-
Cool! Is that the day cab from the single drive, or the one from the dual drive cut down?
-
Back end is finished, and I modified the kit-supplied tool box with diamond plate on the steps.
-
Cool! I've thought about making up a Big Al for an old truck, looks like you actually went and did it. AC had a couple of semis they used as demos at truck shows- I know one was a KW cabover, and the other was a conventional Hendrickson.
-
Nice! I just made a flat panel for mine- since I planned on using a headache rack all along, it wouldn't have been worth the effort for me to make it look realistic, or buy an aftermarket one.
-
The Original Super Glue (two in a package for a buck at Dollar General), usually the thin stuff (red cap) but occasionally I'll use the gel (green cap). I use good old white craft glue for things like clear lenses. I also live dangerously sometimes and use it on clear parts, if the glue surface isn't exposed, in which case I'll revert to the white glue. Yes, cyanoacrylate glue can "fog" clear and chrome parts, but usually a quick swipe or two with a polishing cloth or a thin, brushed on coat of Pledge Future floor polish (or whatever clear you prefer to use) will do away with that. I used to use two-part epoxy but never liked it- just too messy for me.
-
I've never been fond of Italeri semi kits (Freightliner frames belong under Freightliners, multi-piece cabs were obsolete in 1959, and tacky graphics went out of style in the '70's...), but I do like quite a few of the subjects they make... they do have a knack for picking cool subjects. I guess some people don't like this kit in particular, because it has a rarely-seen early hood style, or something like that. I must be in the minority again, as I like the way it looks. And I got this kit sealed for twenty bucks... so there's no way I was going to say no. About all I did was leave off the sleeper, plug off the back wall of the cab, and use the headache rack from a Revell Peterbilt 359. I did mess around with the cab mounts a bit so the hood and cowl would line up, but other than that and the lack of the sleeper it's built more or less the way Italeri intended, for better or for worse.
-
That's the way it comes in the kit- you can install it or leave it out to look like it's rolled down all the way.