


vincen47
-
Content count
298 -
Joined
-
Last visited
-
Days Won
19
2 Followers

Recent Profile Visitors
6,592 profile views


-
Good color choices, it’ll be a nice build.
-
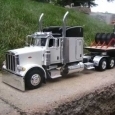
That’s a beautiful truck. Makes a great resto-mod. Maybe gets some work, but nothing too hard in its semi-retired life, and always gets cared for, washed and polished. Maybe it’s the boss’ truck, something you’d see at a truck show. Nice work.
-
Next up, I’ll add the frame-mounted primary fuel filter, a common sight on these Cats. I took a fuel filter from a Italeri Series 60, with a scratch built frame mount and fuel lines. Just to the right of the cab mount, I added a Bendix AD-SP Air Dryer and associated connections and hoses. I started with an air dryer from CTM, and modified it a bit to better represent the Bendix model, and used decals from Modeltruckin for both the fuel filter and air dryer. For the engine cooling system, I wanted something more on the lines of a modern-looking aftermarket coolant reservoir, rather than the Italeri kit’s radiator top tank I have on it in the earlier photos. The newer Paccar trucks, like the 389, 589, and W990, have something similar from the factory. I started with the coolant tank from the A&N W990 kit, modifying and casting it in two halves. Using clear resin, the top half was tinted white to look like the slightly translucent white plastic, and the bottom half in translucent red. The long-life coolant used for these trucks is red, I’ve learned. The unit is mounted to the top of the radiator with Tamiya bolt detail, and a photo-etched model car garage radiator cap tops it. I made a windshield washer reservoir using a similar process, starting with the windshield washer tank from a modified resin casting of a Moebius Lonestar kit part for the bottom portion, tinted translucent blue. For the top portion and mount, I modified some unknown engine part from the parts box, cast in white-tinted clear resin. The chassis is basically complete, for now. More detail to add to the engine area once the hood is in place. Next up, we’ll start the cab, hood, and coach body. Glad everyone is enjoying the build so far.
-
Yeah, you have a good thing started. Dark cherry will look good.
-
Nice builds, they look great. I like the color on the Mack and the Moebius wheels look great on the Dodge.
-
Welcome to the forum!
-
Welcome to the forum. I have you saved as a favorite seller on eBay. Nice parts.
-
To connect the charge air cooler to the turbo and engine block, I used rubber air to air connectors from Moluminum along with Plastruct elbows and aluminum tubing, cut to fit and painted with Molotow chrome. The rubber air connectors came in blue and orange, and though that’s common in real life, (orange on the hot side, blue on the cool side) I opted to paint them rubber black to better match the overall look. You can find black silicone connectors on 1:1 trucks as well.I also added the chrome rings around the connectors by using brass zip ties from CTM, painted chrome. That was one of the most tedious things I’ve done on this build, but the only option that seemed to work. Painting the recesses chrome was a failure, so CTM to the rescue. For the exhaust exiting the turbo, I needed a flex tube, just like the real thing, in order to make the awkward curvature needed to fit between the engine block and frame. Once I had the plastic tubing bent to fit, I wrapped it in wire, and added putty between to get the look. Painted in aluminum, it works well. I finished with adding the tubing clamps where the connections are with chrome bands made from strips of furnace tape.
-
Excellent job on a unique build.
-
Thanks, I appreciate that.
-
Now that we have a rolling (non-rolling) chassis, time to install the engine and add the radiator and charge air cooler. It’s a squeeze, but she fits. There’s a lot of extra parts adding to the overall engine width, like the serpentine bracket, so I made sure to measure and test fit beforehand. To connect the driveline, I made three driveshaft carrier bearings from styrene. Onto the CAC: There’s a void in the aftermarket for a proper charge air cooler/air to air aftercooler. Italeri tried in the 378 kit, but it leaves a lot to be desired. I used the Italeri kit parts as a basis for creating an aftermarket CAC in the style of a Duralite. I added photo etched radiator mesh and modified the side of the kit radiator. Then, adding putty to create the shape needed. The kit’s radiator coolant reservoir was added to the top at this point, but I will replace it later with a better version. On the front side, I added a parallel flow AC condenser unit, made with photo etched mesh. I’ll add the lines to and from it later, as well as the air intake connectors and pipes to the turbo and engine block.
-
KW T800 150 ton traveling rotator wrecker....
vincen47 replied to Tom Hall's topic in Model Truck Show Room
It would be a great model if it was fully static, but the fact that it has a functional boom and outriggers is extra impressive. What’s under the hood? -
That’ll be an awesome build.
-
Beautiful paint colors, and details. Impressive scratchbuilding. Love the subject and craftsmanship.
-
KW T800 150 ton traveling rotator wrecker....
vincen47 replied to Tom Hall's topic in Model Truck Show Room
Wow, fantastic build. 103k? She’s certainly heavy. But I suppose that adds stability. Nice scratch building. She’s a beauty.
